One of the most enjoyable aspects of Minecraft lies in its name. Yep – crafting. There are currently 379 craftable items in-game, and half the fun lies in discovering how to make them! However, if you’re in a pinch, don’t worry; there are plenty of ways to discover the exact recipes for these items.
Here’s our way; an extensive guide on the most recent Minecraft recipes. We’re starting this with 21 of the most popular recipes, and then we’ll break down a couple of other recipes you might be interested in. Take a look at our guide!
Be sure to check out the latest news on the Minecraft Caves and Cliffs Update!
Once you’re done exploring the best Minecraft recipes be sure to check out CodaKids’ online classes. Enroll in a 14-day free trial.
Table of Contents
The 21 Most Essential Minecraft Recipes
- Potion of Strength
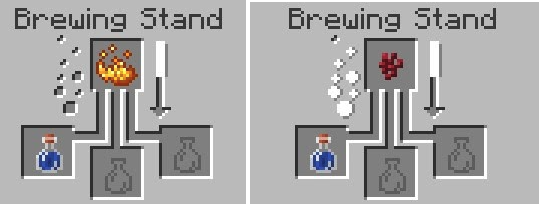
As you probably know, there are dozens of craftable Minecraft potions. But the Potion of Strength is particularly appealing because of how useful it is in combat. For three minutes, one Potion of Strength gives you a +130% boost to your attack damage.
Here’s the recipe:
- Components: 1 Water Bottle, 1 Nether Wart, 1 Blaze Powder
- Pattern: start with water bottle and Nether wart; place Nether wart in topmost box of Brewing Stand and water bottle in lower left box to create an Awkward Potion. Add blaze powder topmost box once Nether wart has disappeared
- Blast Furnace
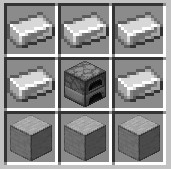
In Minecraft, a blast furnace is an incredibly useful tool that can smelt items twice as fast as a regular Minecraft furnace. You can find one in a Village in the Armorer’s house, or you can just craft your own! The blast furnace recipe is as follows:
- Components: 5 Iron Ingots, 1 Furnace, 3 Smooth Stones
- Pattern: place the furnace in the center square; place all three smooth stones in the lowest row, then fill in the remaining boxes with the iron ingots
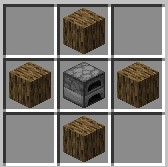
- Smoker
Like the blast furnace, a Minecraft smoker cooks food twice as fast as a regular furnace. It’s incredibly useful to have on-hand, especially in Survival Mode. And the ingredients for the recipe are fairly easy to obtain, too:
- Components: 1 Furnace, 4 Wood Logs
- Pattern: place the furnace in the center square, and then place the wood logs around it in the four immediate directions (top, left, right, bottom)
- Smooth Stone
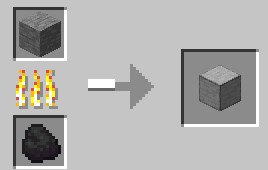
Smooth stone blocks are one of those basic building essentials that turn up in practically every recipe – which is why players stock up on mountains of the stuff. Once you know how to make smooth stone blocks in Minecraft, you’ll be well on your way to crafting hundreds of other items.
And it shouldn’t be too hard, seeing as the only raw ingredient you really need here is stone.
- Components: 1 Stone, 1 Furnace Fuel (like Coal)
- Pattern: place the fuel (coal) in the lower box of the furnace, then place the stone in the upper box
- Lantern
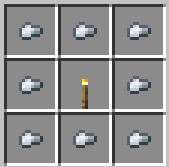
It may just be a decoration, but you’ll be amazed by what a lantern can do for your dull, bland, and dimly-lit house. And it doesn’t take that much to make, either; just some iron nuggets and a single torch. Here’s the full Minecraft lantern recipe:
- Components: 8 Iron Nuggets, 1 Torch
- Pattern: place a torch in the center square, then fill up the rest of the squares with iron nuggets
- Stonecutter
The stonecutter is actually a craftable item that can be used to craft other items.
Pretty meta, huh?
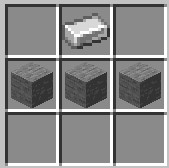
It can be used as an alternative to the crafting table, but only for stone items (hence the name). If you want to make a stonecutter, Minecraft makes it pretty easy to do so.
- Components: 1 Iron Ingot, 3 Stones
- Pattern: place all three stones in the middle row, then place iron ingot in the top middle square
- Potion of Weakness
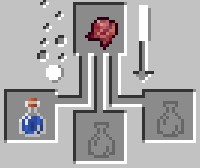
Like the Potion of Strength, the Potion of Weakness is a highly sought-after item. But its effect, of course, is the complete opposite of the former. Still, it’s fairly easy to brew in the brewing stand. You just need two ingredients:
- Components: 1 Fermented Spider Eye, 1 Water Bottle
- Pattern: add fermented spider eye to the topmost box, then add a water bottle to the lower-left box
- Observer
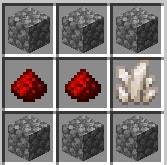
A Minecraft observer is basically used to detect changes in neighboring blocks. Gathering all the ingredients to craft it can be a bit tricky, but an observer is so incredibly useful to have on-hand, we highly recommend pushing through and crafting it. You will need:
- Components: 2 Redstone Dust, 1 Nether Quartz, 6 Cobblestones
- Pattern: place three cobblestones in the top row and three cobblestones in the bottom row; place Nether quartz in the middle right box, then fill up the remaining two boxes with Redstone dust.
- Map
If you want to navigate your way around the wide, wide world of Minecraft, you’ll need a map. And for you to obtain a map, you actually need to craft one. What’s even cooler is that once you’re done crafting your map, you can turn it into a fully usable item. So, want to know how to make a map in Minecraft? Here’s the recipe:
- Components: 8 Papers, 1 Compass
- Pattern: place compass in the center square, then fill up the rest of the squares with papers

- Paper
The whole deal with Minecraft is that it is, essentially, a creation game. Yes, combat and survival make up a good deal of the gameplay. But refusing to craft anything sort of puts you at a disadvantage. Practically anything you need, you have to craft.
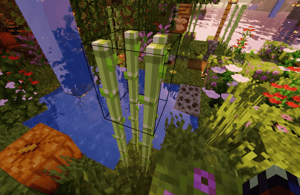
Yes, even paper. Minecraft asks that you craft that, too. Here’s how:
- Components: 3 Sugar Canes
- Pattern: place all three sugar canes in middle row, leaving top and bottom row empty

- Piston
A piston plays a vital piece in many craftable Minecraft mechanisms. It’s a basic building block without which bigger machine blocks would not function. Here’s the piston recipe:
- Components: 3 Wood Planks, 4 Cobblestones, 1 Iron Ingot, 1 Redstone
- Pattern: place three wood planks in topmost row, then iron ingot in the center square; place Redstone in the bottom middle square and fill the remaining squares with cobblestones

- Redstone Comparator
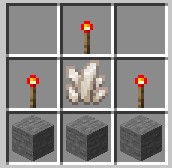
Like a piston, a Redstone comparator in Minecraft serves as an essential building block for bigger, more “complex” mechanisms or machine blocks. Here’s how to make one:
- Components: 3 Stones, 3 Redstone Torches, 1 Nether Quartz
- Pattern: place the Nether quartz in the center square; fill bottom row with stones, then place Redstone torches around Nether quartz following immediate directions – top, left, right
- Armor Stand
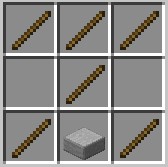
In Minecraft, an armor stand can serve as both decoration and functional equipment. You can hang your armor on it when you’re not using it. In fact, if you have multiple sets of armor, you can use armor stands to display every armor set you own. Perfect for the “accomplished warrior” narrative.
The armor stand recipe is as follows:
- Components: 1 Smooth Stone Slab, 6 Sticks
- Pattern: place the smooth stone slab in the lower middle square, then place two sticks on either side; place three sticks in the topmost row and the last stick in the center square
- Loom
A lot of Minecraft decorations are made using the loom. Just like a crafting table, a loom allows you to create new items – in this case, decorations – by combining ingredients. For instance, you can combine a banner, a dye, and a banner pattern to create your own unique, customized banner.
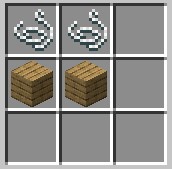
This is the loom Minecraft recipe. Note that you can use any type of wood (spruce, dark oak, etc.):
- Components: 2 Strings, 2 Wooden Planks
- Pattern: place both strings in the first two squares of the upper row; place both wooden planks in the first two squares of the second (middle) row
- Stone Pressure Plate
Stone pressure plates in Minecraft do pretty much what you’d expect them to do. They’re pretty easy to make and pretty nifty to have around (especially if you’re in the habit of opening doors from a distance). The recipe is pretty simple, too:
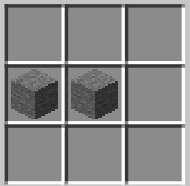
- Components: 2 Stone Blocks
- Pattern: place both stone blocks in the middle row, first and the second column
- Shield
A shield is a quintessential item for any melee-ranged whack-and-attacker. Thankfully, the ingredients used for crafting it are pretty easy to obtain. Here’s how to make a shield in Minecraft:
- Components: 6 Wooden Planks, 1 Iron Ingot
- Pattern: place iron ingot in the top middle square, with one wooden plank on either side; then, three wooden planks in the middle row followed by one wooden plank in the bottom middle square

- Ender Chest
This visually sleek chest is another must-have on your crafting list. It allows players to store up to 27 stacked items – just like a regular chest. The neat part is that two ender chests can be connected regardless of location. This just means that you can access the items stored from either chest. Definitely saves you a trip once you know how to use them strategically.
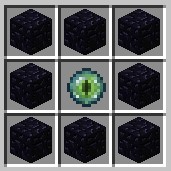
The ender chest recipe is:
- Components: 1 Eye of Ender, 8 Obsidian Blocks
- Pattern: place the eye of ender in the center square; fill the remaining squares with obsidian blocks
- Book
You already know how to craft paper (see number 10), so you might as well take it one step further. Once you know how to make a book in Minecraft, you’re well on your way to crafting a handful of other incredibly useful items.
Here’s the recipe:
- Components: 3 Papers, 1 Leather
- Pattern: place three papers in the topmost row and leather directly below, in the first square of the second row

- Eye of Ender
You can’t find the Ender Portal without an Eye of Ender. You can’t make that cool, two-way Ender Chest, either (see number 17). So you might as well take down the Eye of Ender recipe. Trust us, it’ll come in handy later in your Minecraft journey.
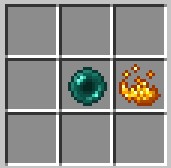
- Components: 1 Eye of Ender Pearl, 1 Blaze Powder
- Pattern: place eye of Ender in the center square and blaze powder directly to the right of it (third column, second row)
- Tripwire Hook
Just like a stone pressure plate, a tripwire hook has a myriad of uses that you might find incredibly handy when building in Minecraft. It can be used to detect multiple entities when they pass through your tripwire circuit. You can use this to give yourself a head start, combat advantage, and the like. Plus, the tripwire hook recipe is surprisingly easy. All you need is:
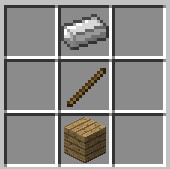
- Components: 1 Iron Ingot, 1 Stick, 1 Wood Plank
- Pattern: place the stick in the center square, the iron ingot in the upper middle square, and the wood plank in the lower middle square
- Anvil
Lastly, (but most certainly not least), you have the old, reliable anvil. Players can use this tool to enchant, repair, and name items in their game. It’s pretty much a basic in any Minecraft item starter-pack. Here’s the anvil recipe:
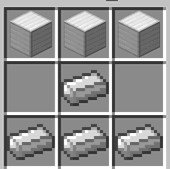
- Components: 3 Iron Blocks, 4 Iron Ingots
- Pattern: place all three iron blocks in the top row; place three iron ingots in the bottom row and the last iron ingot in the center square
Other Minecraft Recipes
ARMOR
Diamond
Diamond Boots
- Components: 4 Diamonds
- Pattern: two diamonds on the left, two diamonds on the right (no diamonds in the middle)
Diamond Chestplate
- Components: 8 Diamonds
- Pattern: fill up every slot; leave the top middle slot empty
Diamond Helmet
- Components: 5 Diamonds
- Pattern: three diamonds in the middle row, one diamond in the lower-left corner, one diamond in the lower-right corner
Diamond Leggings
- Components: 7 Diamonds
- Pattern: three diamonds in the top row, then two diamonds on the left, two diamonds on the right
Gold
Golden Boots
- Components: 4 Gold Ingots
- Pattern: two ingots on the left, two ingots on the right (no ingots in the middle)
Golden Chestplate
- Components: 8 Gold Ingots
- Pattern: fill up every slot; leave the top middle slot empty
Golden Helmet
- Components: 5 Gold Ingots
- Pattern: three ingots in the middle row, one ingot in the lower-left corner, one ingot in the lower-right corner
Golden Leggings
- Components: 7 Gold Ingots
- Pattern: three ingots in the top row, then two ingots on the left, two ingots on the right
Iron
Iron Boots
- Components: 4 Iron Ingots
- Pattern: two ingots on the left, two ingots on the right (no ingots in the middle)
Iron Chestplate
- Components: 8 Iron Ingots
- Pattern: fill up every slot; leave the top middle slot empty
Iron Helmet
- Components: 5 Iron Ingots
- Pattern: three ingots in the middle row, one ingot in the lower-left corner, one ingot in the lower-right corner
Iron Leggings
- Components: 7 Iron Ingots
- Pattern: three ingots in the top row, then two ingots on the left, two ingots on the right
Leather
Leather Boots
- Components: 4 Leather
- Pattern: two leathers on the left, two leathers on the right (no leathers in the middle)
Leather Chestplate
- Components: 8 Leathers
- Pattern: fill up every slot; leave the top middle slot empty
Leather Helmet
- Components: 5 Leathers
- Pattern: three leathers in the middle row, one leather in the lower-left corner, one leather in the lower-right corner
Leather Leggings
- Components: 7 Leathers
- Pattern: three leathers in the top row, then two leathers on the left, two leathers on the right
BASIC
Chest
- Components: 8 Wooden Planks (oak, spruce, birch, jungle, acacia, dark oak, crimson, or warped is fine)
- Pattern: fill up every slot; leave the middle slot empty
Furnace
- Components: 8 Cobblestones
- Pattern: fill up every slot; leave the middle slot empty
Ladder
- Components: 7 Sticks
- Pattern: fill up the right and left column completely (three sticks on each side); then, place the last stick in the middle square
Stick
- Components: 2 Wooden Planks (oak, spruce, birch, jungle, acacia, dark oak, crimson, or warped is fine)
- Pattern: place the first plank in the center square, then place the second plank directly below it (bottom middle square)
Torch
- Components: 1 Stick, 1 Coal/Charcoal
- Pattern: place the coal in the center square , then place the stick below it (bottom middle square)
Birch-Wood Plank
- Components: 1 Birch Log
- Pattern: place in the center square
Jungle-Wood Plank
- Components: 1 Jungle-Wood Log
- Pattern: place in the center square
Oak Wood Plank
- Components: 1 Oak Log
- Pattern: place in the center square
Spruce Wood Plank
- Components: 1 Spruce Log
- Pattern: place in the center square
Workbench
- Components: 4 Wooden Planks (oak, spruce, birch, jungle, acacia, dark oak, crimson, or warped is fine)
- Pattern: place all four planks in the lower-left corner of the grid
BLOCKS
Purpur Pillar
- Components: 2 Purpur Slab
- Pattern: place the first slab in the center square, then place the second slab directly below it (bottom middle square)
Rabbit Stew
- Components: 1 Bowl, 1 Baked Potato, 1 Carrot, 1 Cooked Rabbit, 1 Brown Mushroom
- Pattern: place the baked potato in the center square, and then place materials around it in four immediate directions (top, left, right, bottom)
Sea Lanterns
- Components: 5 Prismarine Crystals, 4 Prismarine Shards
- Pattern: place all four shards in the four corners of the grid, then fill up the remaining squares with crystals
Purple Shulker Box
- Components: 2 Shulker Shells, 1 Chest
- Pattern: place the chest in the center square, then place the Shulker shells directly above and below it (so only the middle column is filled up)
TNT
- Components: 4 Red Sand | 4 Sand, 5 Gunpowder
- Pattern: place all four sand (red sand or just sand) in the four immediate directions (top, left, right, and bottom square); fill up the remaining squares with gunpowder
Dark Prismarine
- Components: 1 Ink Sack, 8 Prismarine Shards
- Pattern: place the ink sack in the center square; fill the remaining squares with Prismarine shards
End Crystal
- Components: 1 Eye of Ender, 1 Ghast Tear, 7 Glass
- Pattern: place the eye of ender in the center square and the ghast tear directly below it (bottom middle square); fill up the remaining squares with glass
End Rod
- Components: 1 Popped Chorus Fruit, 1 Blaze Rod
- Pattern: place the popped Chorus fruit in the center square and the blaze rod directly above it (top middle square)
Jack-o-Lantern
- Components: 1 Pumpkin, 1 Torch
- Pattern: place the pumpkin in the center square, then place the torch below it (bottom middle square)
Slabs
Birch-Wood Slab
- Components: 3 Birch-Wood Planks
- Pattern: place all three planks in middle row
Oak-Wood Slab
- Components: 3 Oak-Wood Planks
- Pattern: place all three planks in middle row
Jungle-Wood Slab
- Components: 3 Jungle-Wood Planks
- Pattern: place all three blocks in middle row
Spruce-Wood Slab
- Components: 3 Spruce-Wood Planks
- Pattern: place all three planks in middle row
Brick Slab
- Components: 3 Brick Blocks
- Pattern: place all three blocks in middle row
Cobblestone Slab
- Components: 3 Cobblestone
- Pattern: place all three blocks in middle row
Purpur Slab
- Components: 3 Purpur Blocks
- Pattern: place all three blocks in middle row
Nether Brick Slab
- Components: 3 Nether Brick Blocks
- Pattern: place all three blocks in middle row
Sandstone Slab
- Components: 3 Sandstone Blocks
- Pattern: place all three blocks in middle row
Red Sandstone Slab
- Components: 3 Red Sandstone Blocks
- Pattern: place all three blocks in middle row
Stone Slab
- Components: 3 Stones
- Pattern: place all three stones in the lowest row
Stone Brick Slab
- Components: 3 Stone Bricks
- Pattern: place all three bricks in the lowest row
Quartz Slab
- Components: 3 Quartz Blocks
- Pattern: place all three blocks in middle row
Bricks & Blocks
Block of Coal
- Components: 9 Coals
- Pattern: fill up the whole grid
Block of Diamond
- Components: 9 Diamonds
- Pattern: fill up the whole grid
Block of Emerald
- Components: 9 Emeralds
- Pattern: fill up the whole grid
Block of Gold
- Components: 9 Gold Ingots
- Pattern: fill up the whole grid
Block of Iron
- Components: 9 Iron Ingots
- Pattern: fill up the whole grid
Block of Redstone
- Components: 9 Redstone Dust
- Pattern: fill up the whole grid
Bone Block
- Components: 9 Bone Meal
- Pattern: fill up the whole grid
Nether Wart Blocks
- Components: 9 Nether Wart Seeds
- Pattern: fill up the whole grid
Slime Block
- Components: 9 Slime Balls
- Pattern: fill up the whole grid
Prismarine Block
- Components: 9 Prismarine Shards
- Pattern: fill up the whole grid
Lapis Lazuli Block
- Components: 9 Lapis Lazuli
- Pattern: fill up the whole grid
Magma Block
- Components: 4 Magma Cream
- Pattern: place all four magma cream in the lower-left corner of the grid
Polished Andesite
- Components: 4 Andesite Blocks
- Pattern: place all four blocks in the lower-left corner of the grid
Polished Diorite
- Components: 4 Diorite Blocks
- Pattern: place all four blocks in the lower-left corner of the grid
Polished Granite
- Components: 4 Granite Blocks
- Pattern: place all four blocks in the lower-left corner of the grid
Prismarine Block
- Components: 4 Prismarine Shards
- Pattern: place all four shards in the lower-left corner of the grid
Clay Block
- Components: 4 Clay
- Pattern: place all four clay in the lower-left corner of the grid
Brick Block
- Components: 4 Clay Bricks
- Pattern: place all four bricks in the lower-left corner of the grid
Quartz Block
- Components: 4 Nether Quartz
- Pattern: place all four Nether quartz in the lower-left corner of the grid
Glowstone Block
- Components: 4 Glowstone Dust
- Pattern: place all four Glowstone dust in the lower-left corner of the grid
End Stone Bricks
- Components: 4 End Stones
- Pattern: place all four end stones in the lower-left corner of the grid
Red Sandstone Block
- Components: 4 Red Sand
- Pattern: place all four red sand in the lower-left corner of the grid
Purpur Block
- Components: 4 Popped Chorus Fruit
- Pattern: place all four popped chorus fruit in the lower-left corner of the grid
Sandstone Block
- Components: 4 Sand
- Pattern: place all four sand in the lower-left corner of the grid
Smooth Sandstone Block
- Components: 4 Chiseled Sandstone Blocks
- Pattern: place all four sandstone blocks in the lower-left corner of the grid
Snow Block
- Components: 4 Snowballs
- Pattern: place all four snowballs in the lower-left corner of the grid
Nether Brick Blocks
- Components: 4 Nether Bricks
- Pattern: place all four Nether bricks in the lower-left corner of the grid
Andesite Block
- Components: 1 Diorite, 1 Cobblestone
- Pattern: place the diorite in the center square; place the cobblestone directly to the left of it (left column, second row)
Mossy Stone Bricks
- Components: 1 Vine, 1 Stone Bricks
- Pattern: place the vine in the center square and the stone bricks directly to the left of it (first column, second row)
Granite Block
- Components: 1 Diorite, 1 Nether Quartz
- Pattern: place the diorite in the center square and the Nether quartz directly to the left of it (first column, second row)
Chiseled Quartz Block
- Components: 2 Quartz Slabs
- Pattern: place the first slab in the center square, then place the second slab directly below it (bottom middle square)
Pillar Quartz Block
- Components: 2 Quartz Blocks
- Pattern: place the first block in the center square, then place the second block directly below it (bottom middle square)
Chiseled Sandstone Block
- Components: 2 Sandstone Slabs
- Pattern: place the first slab in the center square, then place the second slab directly below it (bottom middle square)
Chiseled Red Sandstone Block
- Components: 2 Red Sandstone Slabs
- Pattern: place the first slab in the center square, then place the second slab directly below it (bottom middle square)
Diorite Block
- Components: 2 Nether Quartz, 2 Cobblestone
- Pattern: place all four components in the lower-left corner of the grid; alternate between Nether quartz and cobblestone
Red Nether Brick Block
- Components: 2 Nether Bricks, 2 Nether Wart Seeds
- Pattern: place all four components in the lower-left corner of the grid; alternate between Nether bricks and Nether Wart seeds
Stairs
Brick Stairs
- Components: 6 Brick Blocks
- Pattern: three in bottom row, two in middle row (starting from the left), one in top-left corner
Cobblestone Stairs
- Components: 6 Cobblestone
- Pattern: three in bottom row, two in middle row (starting from the left), one in top-left corner
Nether Brick Stairs
- Components: 6 Nether Brick Block
- Pattern: three in bottom row, two in middle row (starting from the left), one in top-left corner
Purpur Stairs
- Components: 6 Purpur Blocks
- Pattern: three in bottom row, two in middle row (starting from the right), one in top-right corner
Quartz Stairs
- Components: 6 Quartz Blocks
- Pattern: three in bottom row, two in middle row (starting from the left), one in top-left corner
Red Sandstone Stairs
- Components: 6 Red Sandstone Blocks
- Pattern: three in bottom row, two in middle row (starting from the left), one in top-left corner
Birch-Wood Stairs
- Components: 6 Birch-Wood Planks
- Pattern: three in bottom row, two in middle row (starting from the left), one in top-left corner
Jungle-Wood Stairs
- Components: 6 Jungle-Wood Planks
- Pattern: three in bottom row, two in middle row (starting from the left), one in top-left corner
Oak-Wood Stairs
- Components: 6 Oak-Wood Planks
- Pattern: three in bottom row, two in middle row (starting from the left), one in top-left corner
Spruce-Wood Stairs
- Components: 6 Spruce-Wood Planks
- Pattern: three in bottom row, two in middle row (starting from the left), one in top-left corner
Sandstone Stairs
- Components: 6 Sandstone Blocks
- Pattern: three in bottom row, two in middle row (starting from the left), one in top-left corner
Stone Brick Stairs
- Components: 6 Stone Bricks
- Pattern: three in bottom row, two in middle row (starting from the left), one in top-left corner
Fence Gates
Acacia Fence Gate
- Components: 2 Acacia Wood Planks, 4 Sticks
- Pattern: place the acacia wood planks in the lower middle column (center square and bottom middle square), then place two sticks to either side of them
Birch-Wood Fence Gate
- Components: 2 Birch-Wood Planks, 4 Sticks
- Pattern: place the birch-wood planks in the lower middle column (center square and bottom middle square), then place two sticks to either side of them
Dark Oak Fence Gate
- Components: 2 Dark Oak Wood Planks, 4 Sticks
- Pattern: place the dark oak wood planks in the lower middle column (center square and bottom middle square), then place two sticks to either side of them
Jungle-Wood Fence Gate
- Components: 2 Jungle-Wood Planks, 4 Sticks
- Pattern: place the Jungle-Wood planks in the lower middle column (center square and bottom middle square), then place two sticks to either side of them
Spruce-Wood Fence Gate
- Components: 2 Spruce Wood Planks, 4 Sticks
- Pattern: place the spruce wood planks in the lower middle column (center square and bottom middle square), then place two sticks to either side of them
Oak-Wood Fence Gate
- Components: 2 Oak-Wood Planks, 4 Sticks
- Pattern: place the oak-wood planks in the lower middle column (center square and bottom middle square), then place two sticks to either side of them
DECORATIONS
Armor Stand
- Components: 6 Sticks, 1 Stone Slab
- Pattern: place stone slab in bottom middle square; place three sticks in top row, one stick in center square, and then two sticks on either side of stone slab
Flower Pot
- Components: 3 Clay Bricks
- Pattern: place one brick in first column, second square; next brick in middle column, bottom square; last brick in third column, second square again
Glass Pane
- Components: 6 Glass Blocks
- Pattern: place glass blocks in all six lower squares (leave top row empty)
Cobblestone Wall
- Components: 6 Cobblestone Blocks
- Pattern: place cobblestone blocks in all six lower squares (leave top row empty)
Bookshelf
- Components: 6 Wooden Planks, 3 Books
- Pattern: place all three books in middle row; fill in the top and bottom row with wooden planks
Mossy Cobblestone Wall
- Components: 6 Moss Stones
- Pattern: place moss stones in all six lower squares (leave top row empty)
Iron Bars
- Components: 6 Iron Ingots
- Pattern: place cobblestone blocks in all six lower squares (leave top row empty)
Item Frame
- Components: 8 Sticks, 1 Leather
- Pattern: place the leather in the center square; fill the remaining squares with sticks
Painting
- Components: 8 Sticks, 1 Colored Wool (any color)
- Pattern: place the colored wool in the center square; fill the remaining squares with sticks
Sign
- Components: 6 Wooden Planks, 1 Stick
- Pattern: place wooden planks in first and second row; place stick in bottom middle square
Wool
- Components: 4 Strings
- Pattern: place all four strings in the lower-left corner of the grid
Banners
Banner – Black
- Components: 6 Ink Sack, 1 Stick
- Pattern: place stick in bottom middle square; place all ink sacks in topmost squares
Banner – Blue
- Components: 6 Lapis Lazuli, 1 Stick
- Pattern: place stick in bottom middle square; place all lapis lazuli in topmost squares
Banner – Brown
- Components: 6 Cocoa Beans, 1 Stick
- Pattern: place stick in bottom middle square; place all cocoa beans in topmost squares
Banner – Cyan
- Components: 6 Cyan Dye, 1 Stick
- Pattern: place stick in bottom middle square; place all cyan dye in topmost squares
Banner – Gray
- Components: 6 Gray Dye, 1 Stick
- Pattern: place stick in bottom middle square; place all gray dye in topmost squares
Banner – Green
- Components: 6 Cactus Green Dye, 1 Stick
- Pattern: place stick in bottom middle square; place all cactus green dye in topmost squares
Banner – Light Blue
- Components: 6 Light Blue Dye, 1 Stick
- Pattern: place stick in bottom middle square; place all light blue dye in topmost squares
Banner – Light Gray
- Components: 6 Light Gray Dye, 1 Stick
- Pattern: place stick in bottom middle square; place all light gray dye in topmost squares
Banner – Lime
- Components: 6 Lime Dye, 1 Stick
- Pattern: place stick in bottom middle square; place all lime dye in topmost squares
Banner – Magenta
- Components: 6 Magenta Dye, 1 Stick
- Pattern: place stick in bottom middle square; place all magenta dye in topmost squares
Banner – Orange
- Components: 6 Orange Dye, 1 Stick
- Pattern: place stick in bottom middle square; place all orange dye in topmost squares
Banner – Pink
- Components: 6 Pink Dye, 1 Stick
- Pattern: place stick in bottom middle square; place all pink dye in topmost squares
Banner – Purple
- Components: 6 Purple Dye, 1 Stick
- Pattern: place stick in bottom middle square; place all purple dye in topmost squares
Banner – Red
- Components: 6 Rose Red Dye, 1 Stick
- Pattern: place stick in bottom middle square; place all rose red dye in topmost squares
Banner – White
- Components: 6 Bone Meal, 1 Stick
- Pattern: place stick in bottom middle square; place all bone meal in topmost squares
Banner – Yellow
- Components: 6 Dandelion Yellow Dye, 1 Stick
- Pattern: place stick in bottom middle square; place all dandelion yellow dye in topmost squares
Carpets
Carpet – Black
- Components: 2 Black Wool
- Pattern: place black wool in first and second column, middle row
Carpet – Blue
- Components: 2 Blue Wool
- Pattern: place blue wool in first and second column, middle row
Carpet – Brown
- Components: 2 Brown Wool
- Pattern: place brown wool in first and second column, middle row
Carpet – Cyan
- Components: 2 Cyan Wool
- Pattern: place cyan wool in first and second column, middle row
Carpet – Green
- Components: 2 Green Wool
- Pattern: place green wool in first and second column, middle row
Carpet – Grey
- Components: 2 Grey Wool
- Pattern: place grey wool in first and second column, middle row
Carpet – Light Blue
- Components: 2 Light Blue Wool
- Pattern: place light blue wool in first and second column, middle row
Carpet – Light Gray
- Components: 2 Light Gray Wool
- Pattern: place light gray wool in first and second column, middle row
Carpet – Lime
- Components: 2 Lime Wool
- Pattern: place lime wool in first and second column, middle row
Carpet – Magenta
- Components: 2 Magenta Wool
- Pattern: place magenta wool in first and second column, middle row
Carpet – Orange
- Components: 2 Orange Wool
- Pattern: place orange wool in first and second column, middle row
Carpet – Pink
- Components: 2 Pink Wool
- Pattern: place pink wool in first and second column, middle row
Carpet – Purple
- Components: 2 Purple Wool
- Pattern: place purple wool in first and second column, middle row
Carpet – Red
- Components: 2 Red Wool
- Pattern: place red wool in first and second column, middle row
Carpet – White
- Components: 2 White Wool
- Pattern: place white wool in first and second column, middle row
Carpet – Yellow
- Components: 2 Yellow Wool
- Pattern: place yellow wool in first and second column, middle row
Fences
Acacia Fence
- Components: 4 Acacia Wood Planks, 2 Sticks
- Pattern: place both sticks in lower middle column (center square and bottom middle square); place acacia wood planks on either side of sticks
Birch-Wood Fence
- Components: 4 Birch-Wood Planks, 2 Sticks
- Pattern: place both sticks in lower middle column (center square and bottom middle square); place birch-wood planks on either side of sticks
Dark Oak Fence
- Components: 4 Dark Oak-Wood Planks, 2 Sticks
- Pattern: place both sticks in lower middle column (center square and bottom middle square); place dark oak-wood planks on either side of sticks
Jungle-Wood Fence
- Components: 4 Jungle-Wood Planks, 2 Sticks
- Pattern: place both sticks in lower middle column (center square and bottom middle square); place jungle-wood planks on either side of sticks
Oak-Wood Fence
- Components: 4 Oak-Wood Planks, 2 Sticks
- Pattern: place both sticks in lower middle column (center square and bottom middle square); place oak-wood planks on either side of sticks
Spruce-Wood Fence
- Components: 4 Spruce-Wood Planks, 2 Sticks
- Pattern: place both sticks in lower middle column (center square and bottom middle square); place spruce-wood planks on either side of sticks
Nether Brick Fence
- Components: 6 Nether Bricks
- Pattern: place nether bricks in all six lower squares (leave top row empty)
Wool
Black Wool
- Components: 1 Ink Sack, 1Wool
- Pattern: place the ink sack in the center square; place the wool directly to the left of it (left column, second row)
Blue Wool
- Components: 1 Lapis Lazuli, 1Wool
- Pattern: place the lapis lazuli in the center square; place the wool directly to the left of it (left column, second row)
Brown Wool
- Components: 1 Cocoa Bean, 1Wool
- Pattern: place cocoa bean in the center square; place wool directly to the left of it (left column, second row)
Cyan Wool
- Components: 1 Cyan Dye, 1Wool
- Pattern: place cyan dye in the center square; place wool directly to the left of it (left column, second row)
Gray Wool
- Components: 1 Gray Dye, 1Wool
- Pattern: place gray dye in the center square; place wool directly to the left of it (left column, second row)
Green Wool
- Components: 1 Cactus Green Dye, 1Wool
- Pattern: place cactus green dye in the center square; place wool directly to the left of it (left column, second row)
Light Blue Wool
- Components: 1 Light Blue Dye, 1Wool
- Pattern: place light blue dye in the center square; place wool directly to the left of it (left column, second row)
Light Gray Wool
- Components: 1 Light Gray Dye, 1Wool
- Pattern: place light gray dye in the center square; place wool directly to the left of it (left column, second row)
Lime Wool
- Components: 1 Lime Dye, 1Wool
- Pattern: place lime dye in the center square; place wool directly to the left of it (left column, second row)
Magenta Wool
- Components: 1 Magenta Dye, 1Wool
- Pattern: place magenta dye in the center square; place wool directly to the left of it (left column, second row)
Orange Wool
- Components: 1 Orange Dye, 1Wool
- Pattern: place orange dye in the center square; place wool directly to the left of it (left column, second row)
Pink Wool
- Components: 1 Pink Dye, 1Wool
- Pattern: place pink dye in the center square; place wool directly to the left of it (left column, second row)
Purple Wool
- Components: 1 Purple Dye, 1Wool
- Pattern: place purple dye in the center square; place wool directly to the left of it (left column, second row)
Red Wool
- Components: 1 Red Dye, 1Wool
- Pattern: place red dye in the center square; place wool directly to the left of it (left column, second row)
Yellow Wool
- Components: 1 Dandelion Yellow Dye, 1Wool
- Pattern: place dandelion yellow dye in the center square; place wool directly to the left of it (left column, second row)
Stained Glass
Stained Glass – Black
- Components: 1 Ink Sack, 8 Glass Blocks
- Pattern: place ink sack in center square; fill remaining squares with glass
Stained Glass – Blue
- Components: 1Lapis Lazuli, 8 Glass Blocks
- Pattern: place lapis lazuli in center square; fill remaining squares with glass
Stained Glass – Brown
- Components: 1 Cacao Bean, 8 Glass Blocks
- Pattern: place cacao bean in center square; fill remaining squares with glass
Stained Glass – Cyan
- Components: 1 Cyan Dye, 8 Glass Blocks
- Pattern: place cyan dye in center square; fill remaining squares with glass
Stained Glass – Gray
- Components: 1 Gray Dye, 8 Glass Blocks
- Pattern: place gray dye in center square; fill remaining squares with glass
Stained Glass – Green
- Components: 1 Cactus Green Dye, 8 Glass Blocks
- Pattern: place cactus green dye in center square; fill remaining squares with glass
Stained Glass – Light Blue
- Components: 1 Light Blue Dye, 8 Glass Blocks
- Pattern: place light blue dye in center square; fill remaining squares with glass
Stained Glass – Light Gray
- Components: 1 Light Gray Dye, 8 Glass Blocks
- Pattern: place light gray dye in center square; fill remaining squares with glass
Stained Glass – Lime
- Components: 1 Lime Dye, 8 Glass Blocks
- Pattern: place lime dye in center square; fill remaining squares with glass
Stained Glass – Magenta
- Components: 1 Magenta Dye, 8 Glass Blocks
- Pattern: place magenta dye in center square; fill remaining squares with glass
Stained Glass – Orange
- Components: 1 Orange Dye, 8 Glass Blocks
- Pattern: place orange dye in center square; fill remaining squares with glass
Stained Glass – Pink
- Components: 1 Pink Dye, 8 Glass Blocks
- Pattern: place pink dye in center square; fill remaining squares with glass
Stained Glass – Purple
- Components: 1 Purple Dye, 8 Glass Blocks
- Pattern: place purple dye in center square; fill remaining squares with glass
Stained Glass – Red
- Components: 1 Rose Red Dye, 8 Glass Blocks
- Pattern: place rose red dye in center square; fill remaining squares with glass
Stained Glass – White
- Components: 1 Bone Meal, 8 Glass Blocks
- Pattern: place bone meal in center square; fill remaining squares with glass
Stained Glass – Yellow
- Components: 1 Dandelion Yellow Dye, 8 Glass Blocks
- Pattern: place dandelion yellow dye in center square; fill remaining squares with glass
Stained Glass Pane (16 Variations): Black | Blue | Brown| Cyan | Gray | Green | Light Blue | Light Gray | Lime | Magenta | Orange | Pink | Purple | Red | White | Yellow
- Components: 6 Stained Glass Blocks (needs to be all of the same color)
- Pattern: place stained glass blocks in all six lower squares (leave top row empty)
Stained Clay
Stained Clay – Black
- Components: 1 Ink Sack, 8 Hardened Clay
- Pattern: place ink sack in center square; fill remaining squares with hardened clay
Stained Clay – Blue
- Components: 1 Lapis Lazuli, 8 Hardened Clay
- Pattern: place lapis lazuli in center square; fill remaining squares with hardened clay
Stained Clay – Brown
- Components: 1 Cocoa Bean, 8 Hardened Clay
- Pattern: place cocoa bean in center square; fill remaining squares with hardened clay
Stained Clay – Cyan
- Components: 1 Cyan Dye, 8 Hardened Clay
- Pattern: place cyan dye in center square; fill remaining squares with hardened clay
Stained Clay – Gray
- Components: 1 Gray Dye, 8 Hardened Clay
- Pattern: place gray dye in center square; fill remaining squares with hardened clay
Stained Clay – Green
- Components: 1 Green Dye, 8 Hardened Clay
- Pattern: place green dye in center square; fill remaining squares with hardened clay
Stained Clay – Light Blue
- Components: 1 Light Blue Dye, 8 Hardened Clay
- Pattern: place light blue dye in center square; fill remaining squares with hardened clay
Stained Clay – Light Gray
- Components: 1 Light Gray Dye, 8 Hardened Clay
- Pattern: place light gray dye in center square; fill remaining squares with hardened clay
Stained Clay – Lime
- Components: 1 Lime Dye, 8 Hardened Clay
- Pattern: place lime dye in center square; fill remaining squares with hardened clay
Stained Clay – Magenta
- Components: 1 Magenta Dye, 8 Hardened Clay
- Pattern: place magenta dye in center square; fill remaining squares with hardened clay
Stained Clay – Orange
- Components: 1 Orange Dye, 8 Hardened Clay
- Pattern: place orange dye in center square; fill remaining squares with hardened clay
Stained Clay – Pink
- Components: 1 Pink Dye, 8 Hardened Clay
- Pattern: place pink dye in center square; fill remaining squares with hardened clay
Stained Clay – Purple
- Components: 1 Purple Dye, 8 Hardened Clay
- Pattern: place purple dye in center square; fill remaining squares with hardened clay
Stained Clay – Red
- Components: 1 Red Dye, 8 Hardened Clay
- Pattern: place rose red dye in center square; fill remaining squares with hardened clay
Stained Clay – White
- Components: 1 Bone Meal, 8 Hardened Clay
- Pattern: place bone meal in center square; fill remaining squares with hardened clay
Stained Clay – Yellow
- Components: 1 Dandelion Yellow Dye, 8 Hardened Clay
- Pattern: place dandelion yellow dye in center square; fill remaining squares with hardened clay
Conclusion
Phew! That was a long list! Hopefully, you found a Minecraft recipe that you needed!
Let’s recap our Minecraft recipes article:
Table of Contents
- 21 Most Essential Minecraft Recipes
- Other Minecraft Recipes
- Armor Recipes
- Diamond
- Gold
- Iron
- Leather
- Basic Recipes
- Block Recipes
- Slabs
- Bricks & Blocks
- Stairs
- Fence Gates
- Decoration Recipes
- Banners
- Carpets
- Fences
- Wool
- Stained Glass
- Stained Clay
There are definitely a lot more recipes than these – after all, 379 craftable items! – but we’ve kept this list of the Minecraft recipes we feel are the most common and are hard to figure out. Happy crafting!
Be sure to check out our other Minecraft guides below:
- Blog Article: Minecraft Enchantments
- Blog Article: Minecraft Color Codes
- Blog Article: Minecraft Commands
- Blog Article: How to Make a Minecraft Server
- Blog Article: Minecraft Forge
Are you ready to take your Minecraft experience to the next level and learn to code while doing it? Enroll in CodaKid’s free trial today!
