Is your child asking about computers and programming? Do you want to help them get started but need to know where to start? Scratch is a great way to introduce programming concepts to your kids. With Scratch, they can create their games, animations, and more. This blog post will show you how to get started with Scratch programming for kids. We’ll also share some of our favorite project ideas.
Scratch programming is a type of coding that helps you create your own interactive stories, games, and animations. With Scratch, you can code your project by dragging and dropping code blocks. Scratch is designed for ages eight and up, but people of all ages use it. It’s a great way to learn about coding and computer science. You can use Scratch to create anything you can imagine, from a simple game to a complex animation. Once you start coding with Scratch, you’ll be amazed at what you can create!
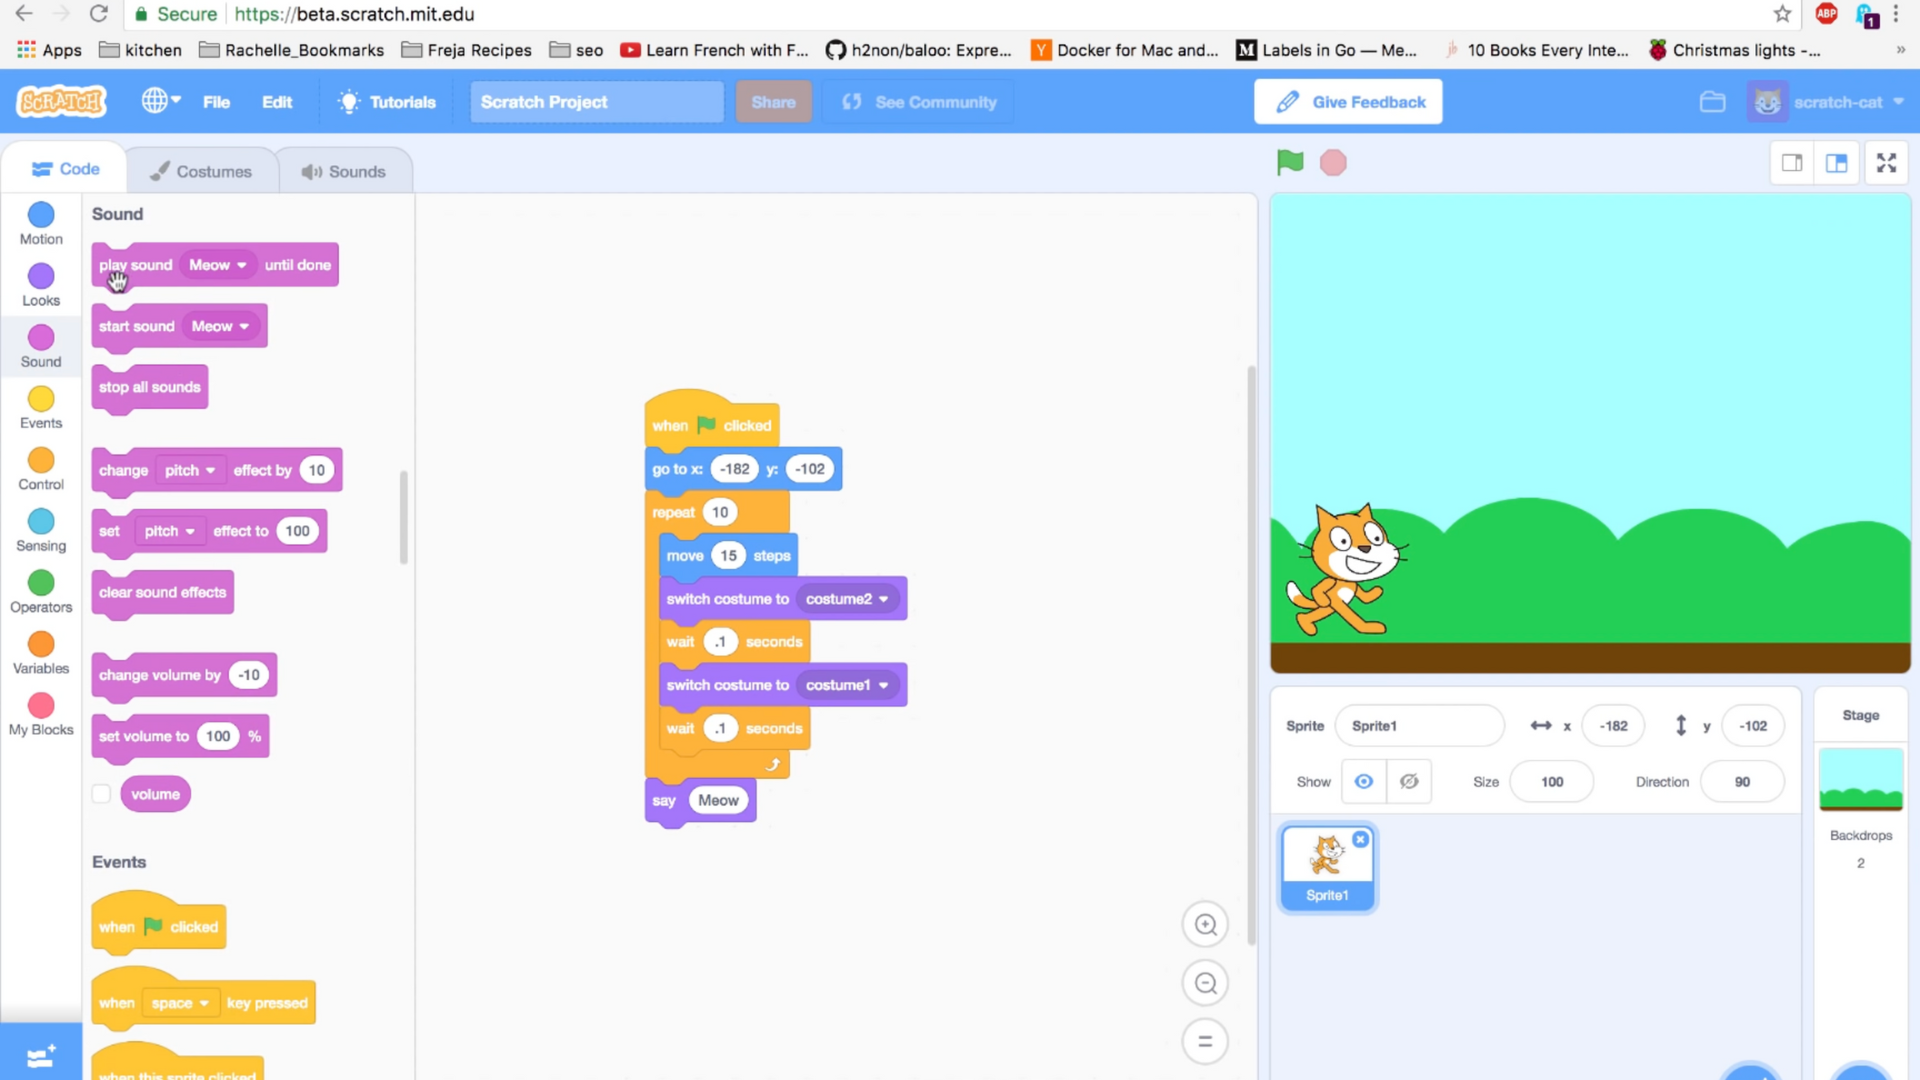
Table of Contents
What is Programming?
Programming is giving a computer instructions to follow to accomplish a task. This can be as simple as telling the computer to display a number on the screen, or it can be more complex, like creating a video game or a website. To write a program, you need to know a programming language. There are many different languages, but they all follow similar rules.
Once you learn one language, it is easier to understand others. Learning to program can be difficult, but it is also very rewarding. It allows you to create things that can be used by people all over the world. And, once you know how to program, you can always keep learning new things and improving your skills.
Block Coding
Block-based coding, also known as drag-and-drop programming, is a graphical way to write code that enables children to understand how coding works. Block-based coding is used in many popular coding languages, such as Scratch.
Children can drag blocks of code and snap them together like pieces of a puzzle. This kind of coding is easy to learn and can be a stepping stone for children who want to learn more complex programming languages when they are older. Even if children never become professional programmers, block-based coding can help them develop essential problem-solving and critical-thinking skills that they will use in other areas of their lives.
What is Scratch programming used for?
Scratch programming is an excellent tool for creating interactive media, such as stories, games, and animations. It’s easy to learn and use, and it’s a great way to get started in programming. Scratch is also a great way to share your creations with others. You can publish your Scratch projects online, and anyone can view them and play them. And if you want to take your Scratch skills to the next level, you can join the Scratch community and explore all the amazing things people create with Scratch.
What is the Scratch Programming Community?
The Scratch community is a worldwide network of child coders who create and share interactive projects. Scratch is a programming language that enables users to create animations, games, and stories. The community provides a supportive and collaborative environment for young coders to learn from each other and develop their skills. With over 92 million registered users, the Scratch community is a vibrant and ever-growing force in child coding.
The projects created by Scratchers can be shared with others in the community and can be remixed and modified by other users. The Scratch website also features several forums and message boards where users can communicate with each other and a directory of user-created resources such as tutorials and sample codes.
In addition to the online community, there is also an offline community of Scratchers who meet in person to collaborate on projects or attend events such as conferences and workshops. The Scratch community is a supportive and friendly environment for anyone interested in learning to program or create interactive media.
Introduction to the Scratch Interface
The Scratch interface consists of four main areas: the Code Editor, the Stage, the Scripts Area, and the Toolbar. The Code Tab is where you write and edit your code. The Stage is where you see your project come to life. The Scripts Area is where you drag blocks of code to create scripts. And the Toolbar contains blocks that you can use in your scripts.
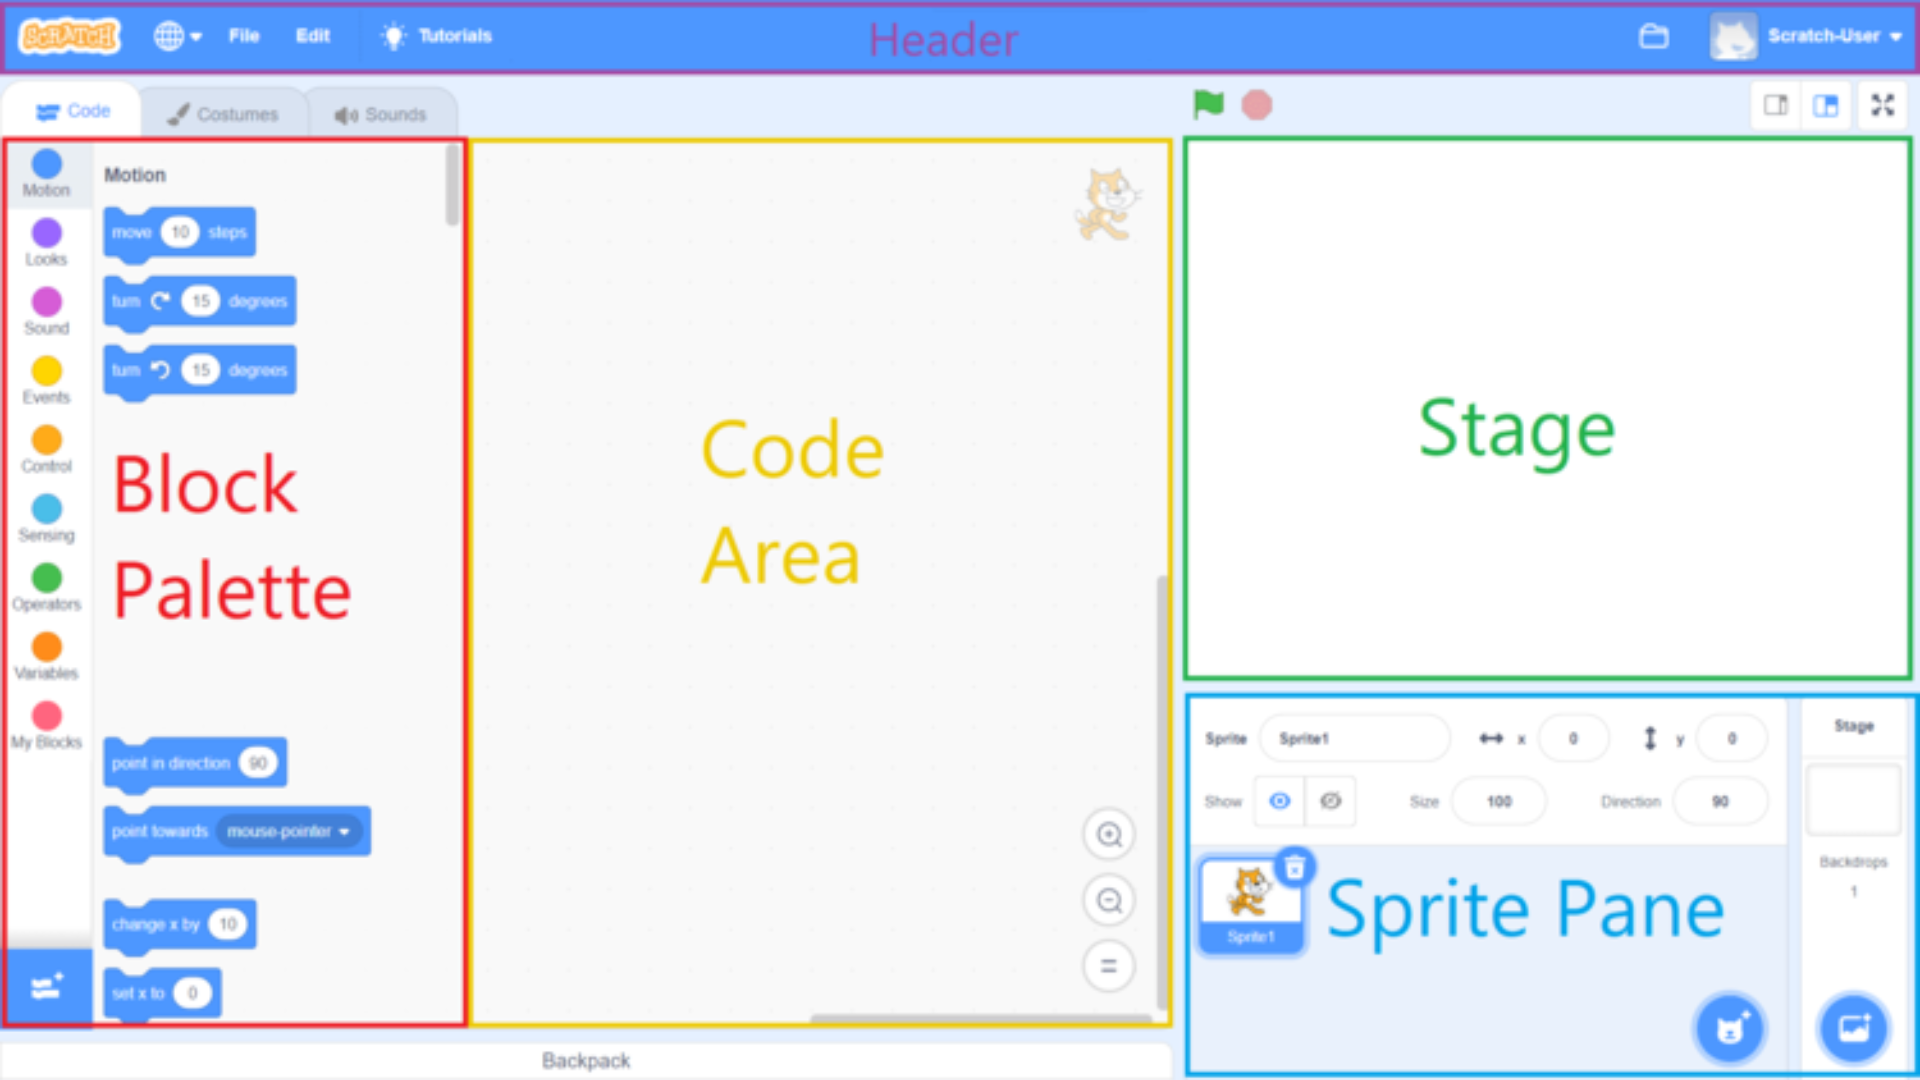
Block Palette
The Block Palette is a critical component of the Scratch programming interface. It contains a list of all the blocks used to create scripts, which can be dragged into the Code Area. The Block Palette is divided into categories to help users find the right block for their needs. The categories are:
- Motion
- Looks
- Sound
- Variables
- Events
- Control
- Sensing
- Operators
- My Blocks
The blocks in each category have a different function. For example, the Motion category includes blocks for moving sprites around the Stage, while the Operators category includes blocks for performing mathematical operations.
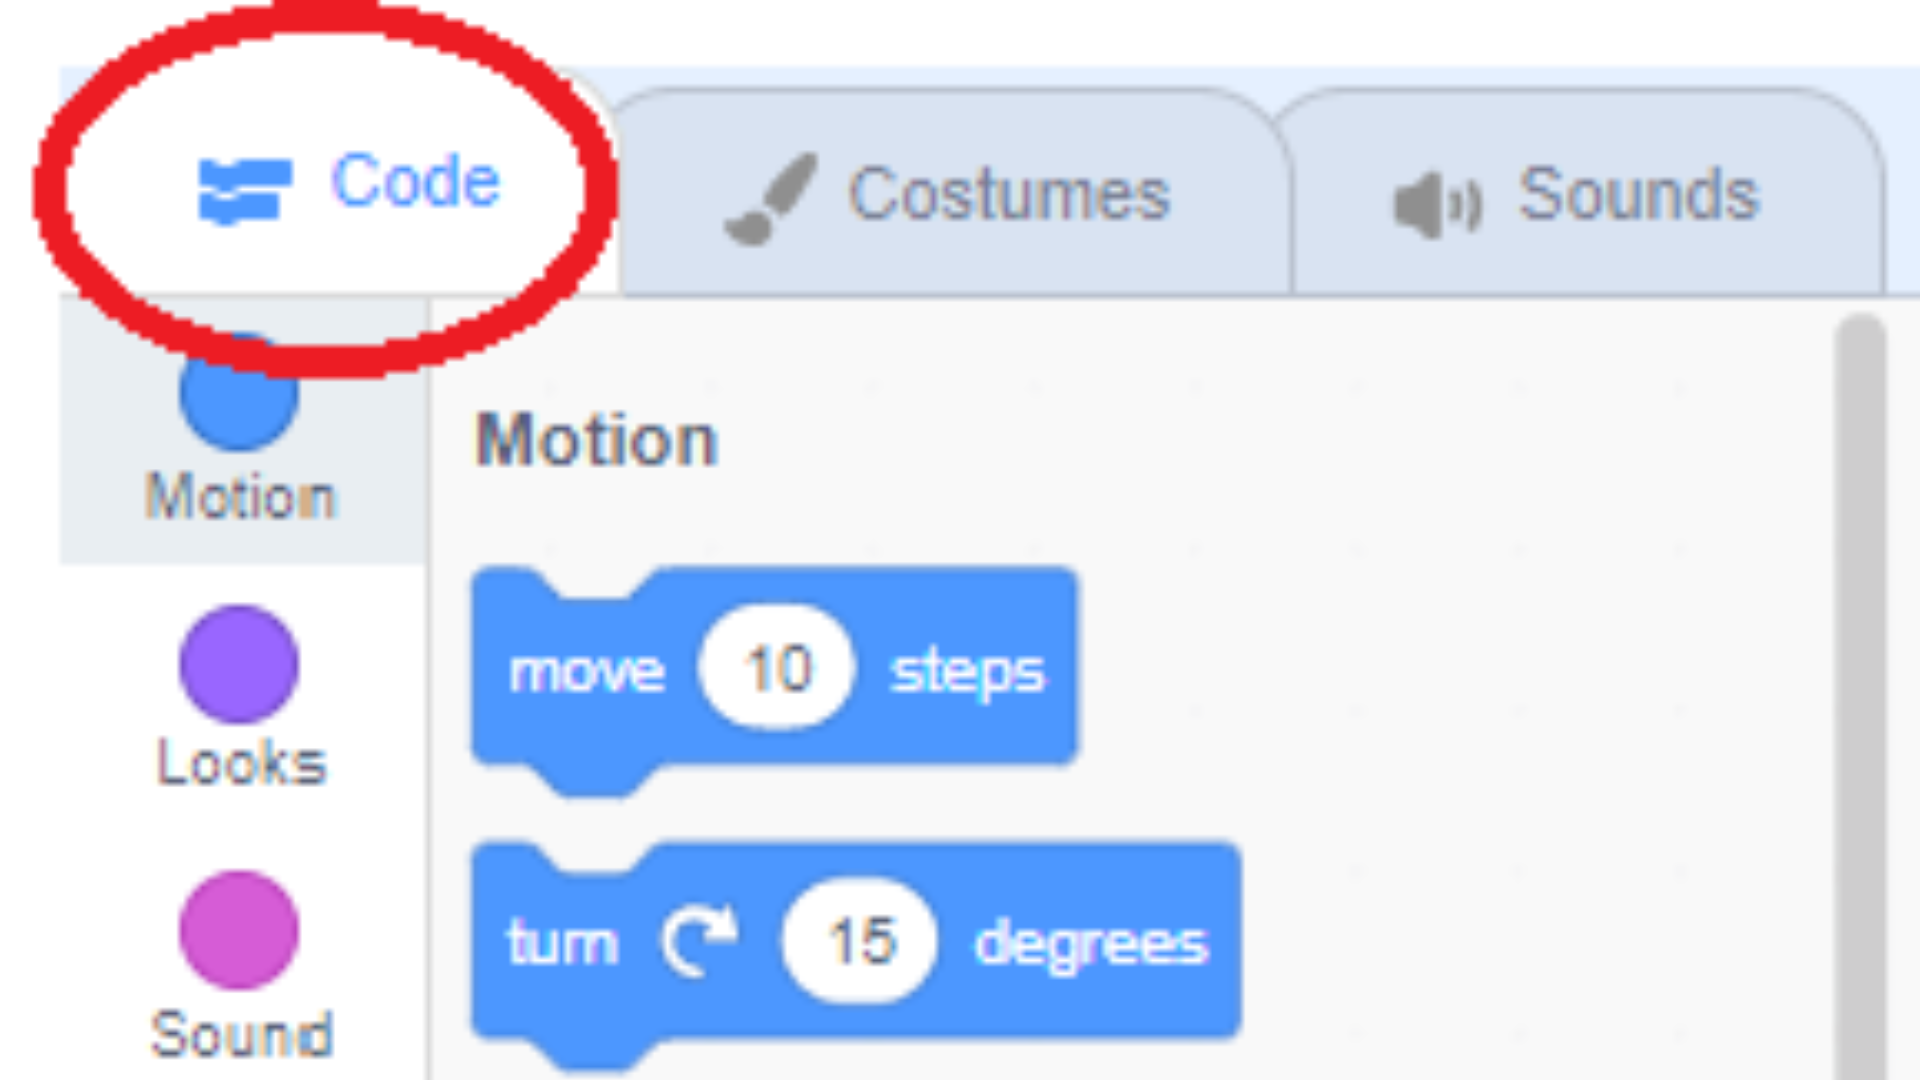
Users can also search for blocks using the Search bar at the top of the Block Palette. By default, the Block Palette is displayed on the left side of the screen when the Code button is clicked; however, it can be moved to the right side.
When first starting with Scratch programming, it is important to become familiar with the Block Palette and what each category of blocks entails. Otherwise, it won’t be easy to create scripts. Understanding how to use the Block Palette is fundamental to learning Scratch programming.
Code Area
The Code Area is where you write, edit, and run your code. It is located in the center of the screen when the Code button is pressed. The scripts that you make in the Code Area will control your sprite. You can test your code by pressing the green flag above the Code Area. When you finish coding, you can press the red stop sign to stop your code from running.
Stage
The stage is where your Scratch projects come to life. It’s the canvas where you build your sprites and backgrounds and add your Scratch code. The stage is also where you test your project and share it with others.
The stage is 640×480 pixels, and you can use the Scratch paint editor to create your custom backdrop. The stage is surrounded by some tools and controls, which can be used to modify sprites and scripts. Above the stage is the Green Flag, which starts all scripts in the project, and the Stop Sign, which stops all running scripts.
Below the stage is the Sprite Rename textbox, which can be used to rename sprites. The X and Y edit boxes control the sprite’s position. The Show/Hide checkbox determines whether a sprite is visible on the stage. The Size slider changes sprite size, and the Direction selector sets sprite direction. These tools and controls allow you to create sophisticated projects in Scratch.
Sprites
Sprites are the characters in your Scratch project; they can be animals, people, objects, or even simple shapes. To add a sprite, click the “Stage” tab and the “Sprites” button. You can either upload an image from your computer or choose from the Scratch library of images. Once you’ve selected an image, you can give your sprite a name and add it to the stage.
Start Coding!
Now that we’ve added our sprites and background, let’s take a look at how to code them. Scratch uses a visual programming language that makes it easy to create interactive projects. To start coding your sprite, double-click on it to open the Code Editor. The Code Editor has four tabs: Looks, Sound, Events, and Motion. In each tab, you’ll find blocks of code that you can drag onto the Scripts area to program your sprite.
For example, in the Looks tab, you’ll find blocks for changing the color of your sprite or making it say something on the stage. You’ll find blocks for playing sounds or songs in the Sound tab. In the Events tab, you’ll find blocks for responding to user input, such as mouse clicks or key presses. And in the Motion tab, you’ll find blocks for moving your sprite around on the stage or changing its size or orientation.
Once you’ve added some code to your sprite, you can test it out by clicking on the Stage tab and then clicking on the green flag icon in the top-right corner of the Stage area. This will run your project on Scratch!
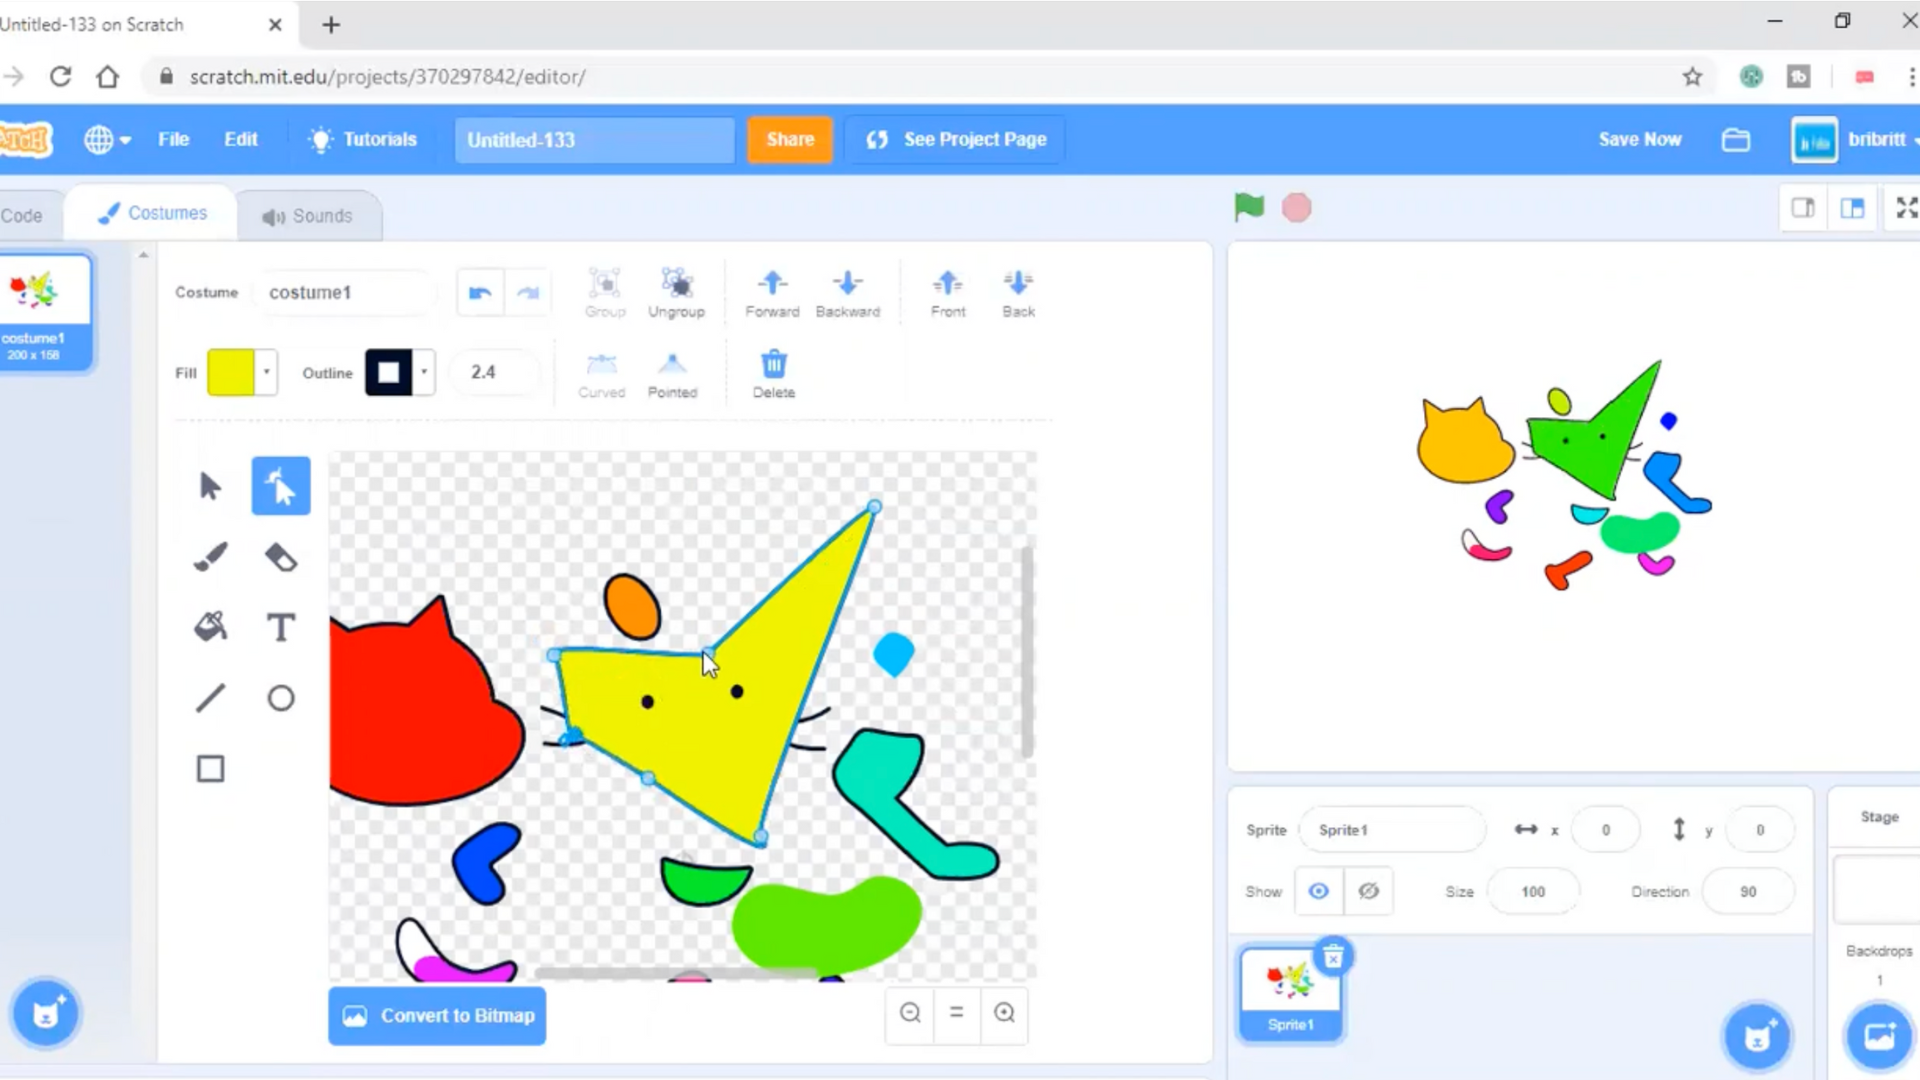
Paint Editor
The paint editor is a versatile tool that can be used to view, create, and edit a sprite’s costumes. The costume pane allows the user to switch between the sprite’s different costumes, while the tools pane provides various options for making edits, including a select tool, a reshape tool, a paintbrush, an eraser, and a fill tool.
In addition, the paint editor also includes a text tool, a line tool, a circle tool, and a rectangle tool. These tools can be used to create simple or complex shapes and add text to the sprite’s costumes. Overall, the paint editor is a powerful tool that can be used to create detailed and fun sprites.
Sound Editor
The sound editor is a powerful tool that allows users to make, view, and edit the sprite’s sounds. The sound editor has two main panes: the sound pane and the viewing area. The sounds pane allows users to switch between different sounds, while the viewing area will let users view the sound waves of the selected sound. The sound editor also has many sound effects tools that allow users to make the sound louder and softer, have effects, fade in or out, copy and paste, undo, and redo. These tools are essential for creating high-quality sounds for your sprite.
Benefits of Scratch Programming
Scratch Programming Promotes creativity
Scratch programming is a great way to promote creativity in young people. Unlike traditional programming languages, Scratch is designed to be accessible and easy to use. This means anyone can create their programs, regardless of prior experience. As a result, Scratch provides an excellent opportunity for young people to explore their creative potential.
In addition, Scratch programs can be shared online, allowing others to see and use them. This makes it easy for young programmers to get feedback and constructive criticism from their peers. Ultimately, Scratch programming is a powerful tool for promoting creativity and collaboration among young people.
Improves thinking and analytical abilities
Learning to code through Scratch programming has many benefits. For one, it helps improve thinking and analytical abilities. Coding requires breaking a problem into smaller pieces and finding a way to solve each step. In addition, coding also helps develop spatial awareness and logic skills.
Furthermore, Scratch programming is also a great way to learn about collaboration and communication. This is because when working on a coding project, it is often necessary to collaborate with others to complete the project. As a result, Scratch programming can help build essential life skills that will benefit any career.
It’s easy to understand
Scratch programming is simple to understand yet still offers many benefits. It is a great way to introduce young students to coding, as it uses a drag-and-drop interface that eliminates the need for complex syntax. This makes creating a program much more accessible and less daunting. As a result, Scratch provides an engaging and interactive way for kids to explore the world of programming.
Conclusion
Remember that learning to code is a process that requires plenty of time and practice. Like any skill worth acquiring, it will take some patience and effort on your part. Be prepared to devote yourself to several hours of coding each week if you want your children to learn to program effectively. Help them find the fun in problem-solving by exposing them to different applications of scratch programming – from making games to animating stories. With these tips in mind, you’ll be leading the charge in teaching kids how to code in no time!