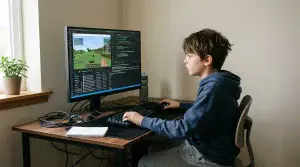
JavaScript is a dynamic coding language that is also an excellent choice for game development. In this blog we are going to learn about JavaScript and some of the best JavaScript games. Most importantly we are going to show you step-by-step how to build a high-quality JavaScript game that you can play with friends and family.
At CodaKid, JavaScript is one of our favorite coding languages and after this tutorial we think that you’ll see why.
Table of Contents
What is JavaScript?
JavaScript is a dynamic coding language that is considered a core technology of web development. With JavaScript, you can click on menu bars, fill out web forms, and interact with the page in various ways.
JavaScript can also be used in back end development with nodeJS. Large web applications such as Netflix, PayPal, Twitter, LinkedIn, among others have built their technology stacks on nodeJS.
JavaScript is also a popular video game development language as it allows you to run games in your web browser which makes it fun and easy for players.
At what age can kids start learning Javascript?

One crucial factor to consider when deciding whether or not to let your child learn JavaScript is their typing skills. If they have good typing skills, then JavaScript is an excellent language to learn. However, if they struggle with typing, a block-based language like Scratch might be better to start their coding journey.
While some people might think that kids are too young to start learning JavaScript, the truth is that coding is a lot like learning a foreign language. And research has shown that younger kids are, they are especially adept at learning new languages. So if your child is interested in coding, there’s no reason to wait.
Ultimately, whether or not to let your child learn JavaScript is up to you. But if they’re interested and have decent typing skills, there’s no reason why they can’t start learning this valuable skill today.
Can Javascript be a good first coding language for kids?
Fortunately, learning JavaScript is relatively easy, even for beginners. And thanks to its interactive nature, it can also be quite fun. If you’re interested in introducing your kids to it, there are plenty of simple javascript projects available online that can help them get started.
Coding a JavaScript project helps kids recognize bugs that can come along the way and how to fix them. By coding JavaScript projects regularly, your kids will become more proficient coders. They’ll also gain a deeper understanding of how to code in JavaScript and be able to apply their skills to new situations.
In addition, your children will have a polished product that they can show off to friends and family! So if your kids are looking to take their JavaScript skills to the next level, coding games are the way to go.
JavaScript is a fun and easy programming language for kids. You can do anything from making websites, mobile apps, or even games with it!
Free JavaScript Kids Coding Tutorial
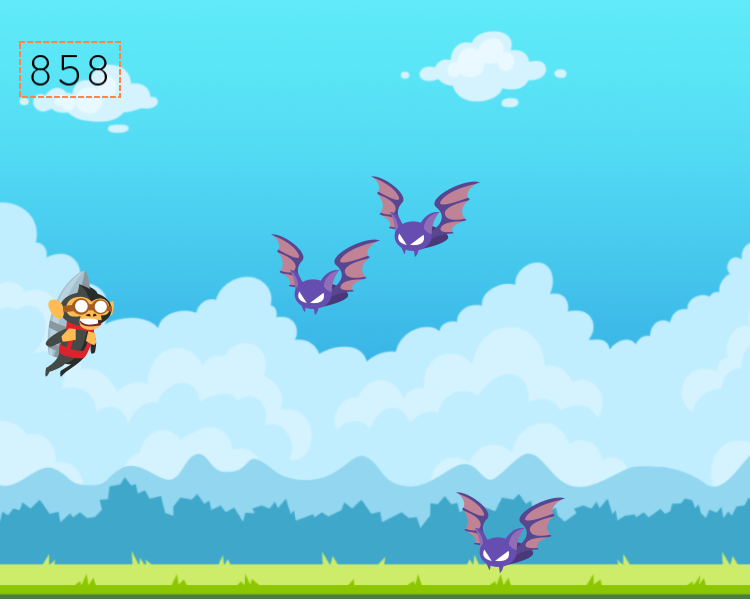
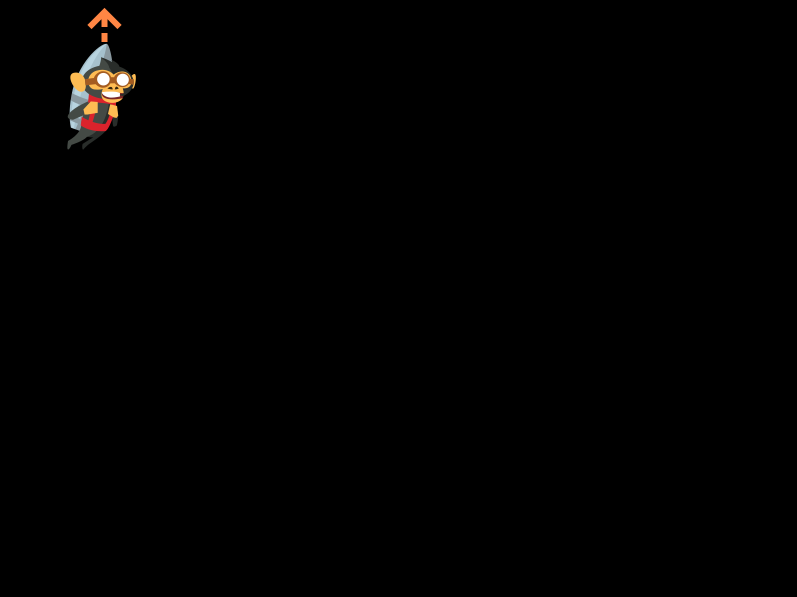
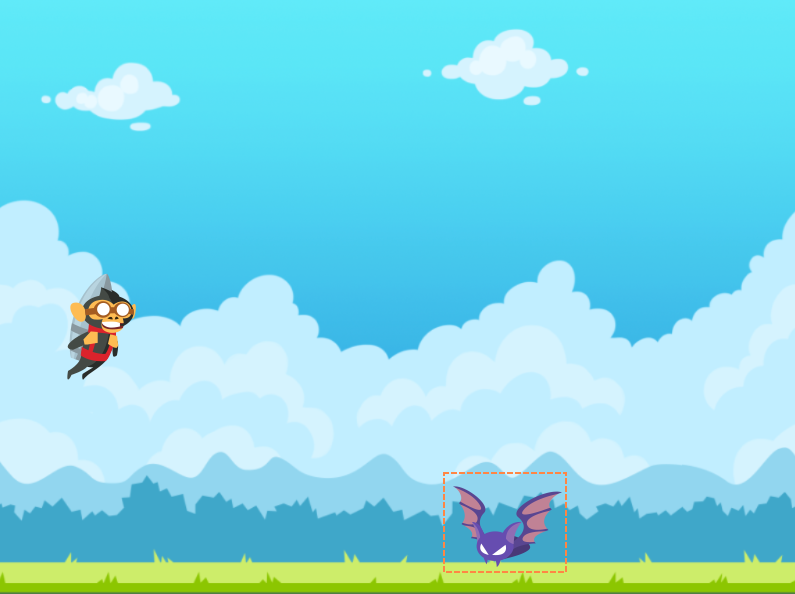
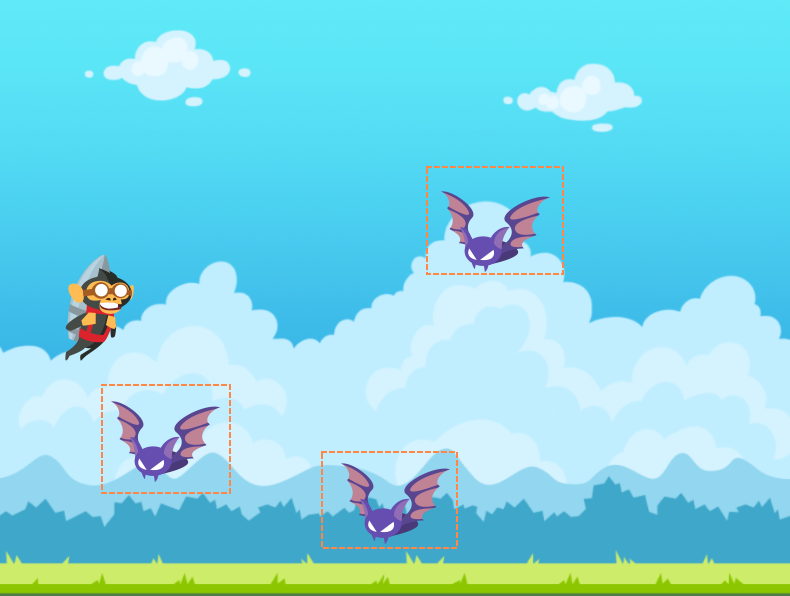
In this section, we are going to make a professional quality Infinite Flier game from the ground up. When we are done it will look like this! In this game, JetPack Monkey will need to fly through the landscape while avoiding the enemies. The longer you stay alive the more points you get.
Project Setup
We’re going to be building our project using JSFiddle, an awesome free tool that lets you build JavaScript projects in your browser without having to download anything!
1. To get started all you need to do is go to https://jsfiddle.net/. When you open the page you should already be on a blank project as in the image below.

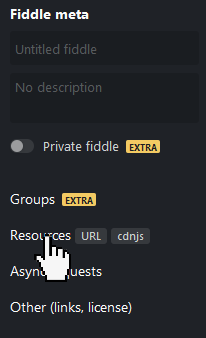
2. We’ll be using a game development framework called Phaser. Phaser handles a lot of the heavy lifting and lets us focus on just building our game! In order to use Phaser we’ll need to add it as a ‘Resource’ to our project.
a) Click on ‘Resources on the left sidebar
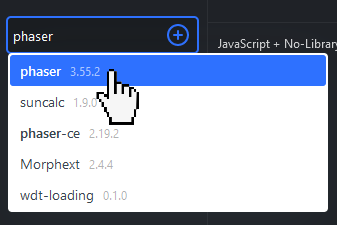
b) Type in ‘phaser’ then use the autocomplete to select the Phaser library
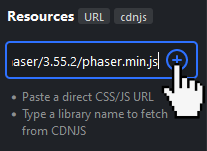
c) Click the big blue plus button
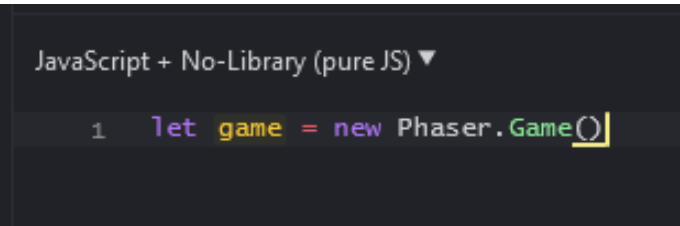
3. Now that we’ve loaded Phaser, we can use it to make a new ‘Game’ object. Click in the ‘JavaScript’ window and add the following code:
This line tells Phaser to build a new game for us, but we still need to specify some options when it’s created. Put your cursor in between the parentheses and add a pair of curly brackets “{ }”. Then hit “Enter” to add a new line in between them. Add the following code:
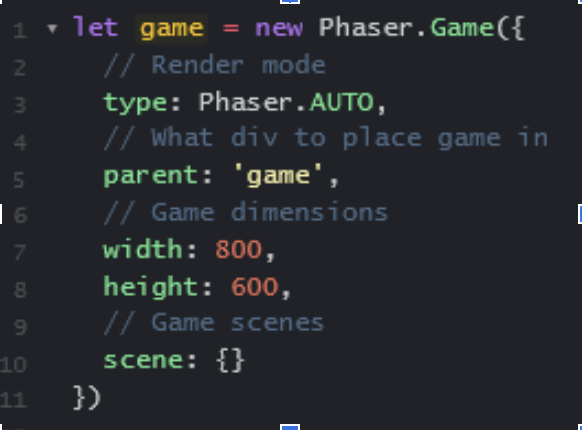
Tip: The lines that begin with “//” are called comments. They don’t affect the code in any way and you don’t need to include them in your code. We recommend doing it though so you can remind yourself of what the code does.
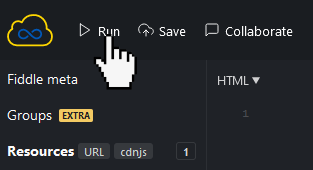
4. You can now test your code by clicking on the “Run” button in the top left. When you click this button you should see a black rectangle pop up in the “Result” window. This is our game, but there’s nothing in it yet!
Tip: If you put your cursor between the “Result” window and “CSS” window you can click and drag to resize them. Do this to make your “Result” window bigger so you can see your project better!
5. We’re almost ready to start adding gameplay, but first we need to set up two “Scenes” for our game. You can think of scenes in Phaser a bit like scenes in a movie. You can have one scene for your menu, one scene for your gameplay, one scene for credits, etc.
We’re going to add two scenes right now, a “preload” and a “create” scene. The preload scene runs first and loads all the assets we’ll need for our game like images and sounds. The create scene runs next and that’s where we’ll actually add our gameplay!
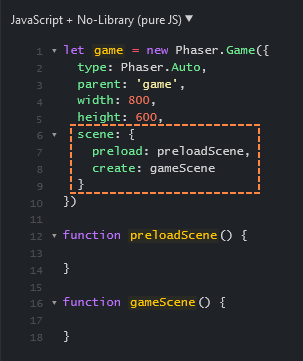
First we’ll add two functions as shown below:
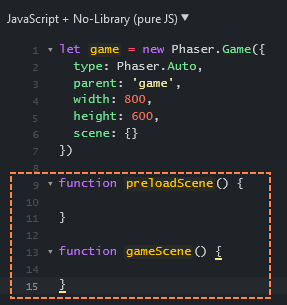
Then we’ll link them to our Phaser game:
Create the Player
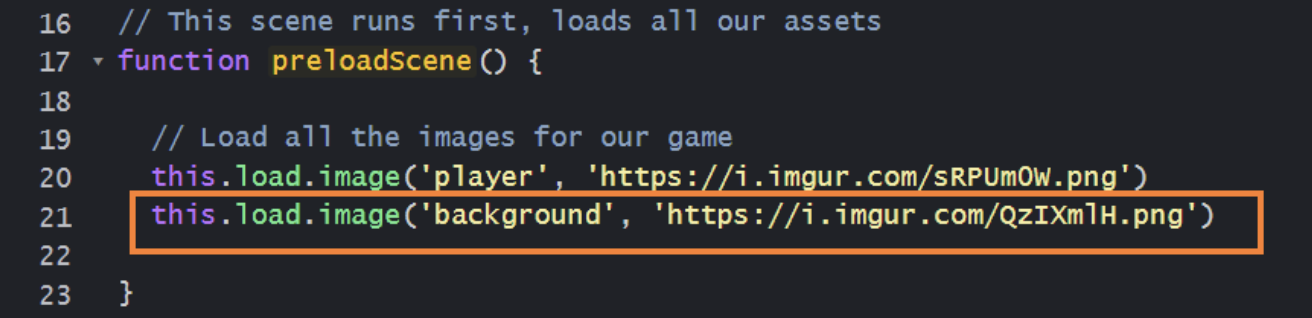
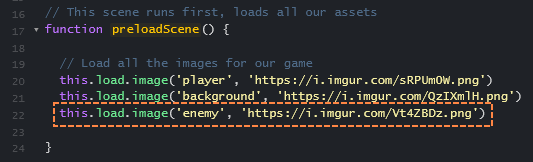
1. Now we’re finally ready to start adding our player character to the game! The first thing we need to do is load an image for our player. We’ll do this in our ‘preload’ scene because it runs before our gameplay scene. Add the following code to your ‘preloadScene()’ function:
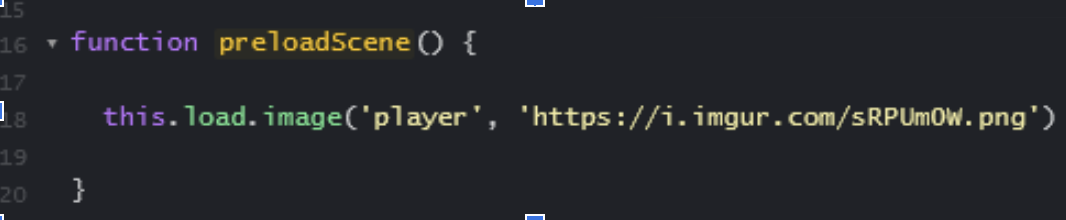
This line of code loads our image and saves it under the name ‘player’.
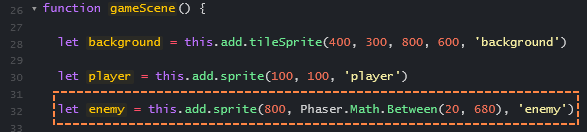
2. Now that we have an image for our player, we can create our player Sprite. A Sprite is a game object with an image and a position. Most of the objects in our game will be sprites!
Add the following code to your ‘gameScene()’ function:
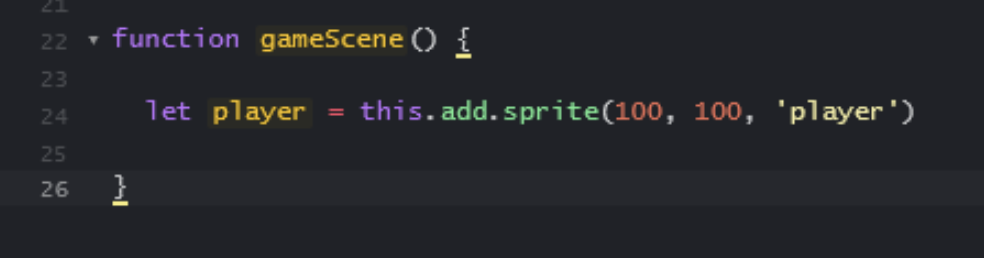
This line of code adds a new sprite at the position (X: 100, Y: 100) and uses the image we loaded in the last step. We’re saving our sprite in a variable called player.
Try hitting the “Run” button again, and this time, your player should appear on the screen!
If you don’t remember how to hit the Run button here is an image to help.
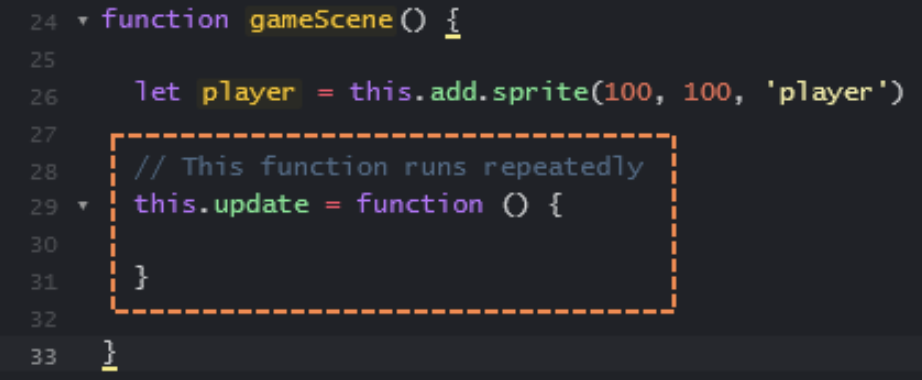
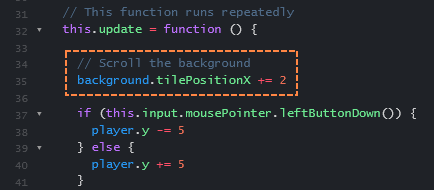
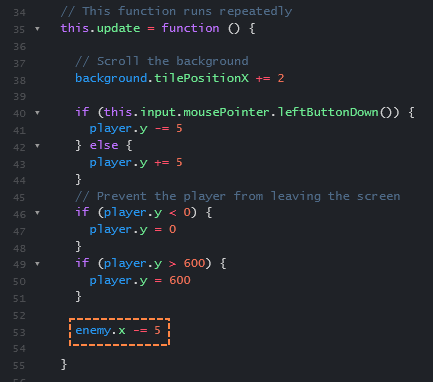
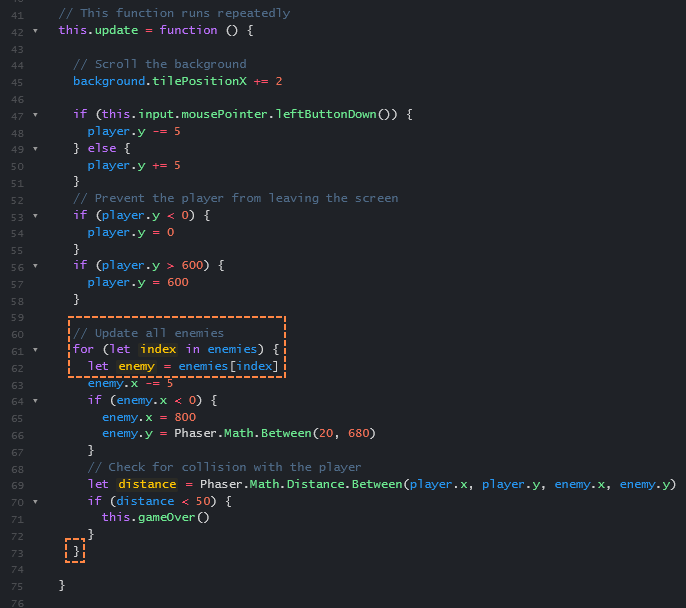
3. In order to make the player move we’ll need to add an update function. A function is a set of instructions for the computer to follow, and an update function is a function the computer will run over and over 30 times per second. Any code we put inside this function will be run repeatedly as long as the game is running.
Add the following code:
4. Now we can add code inside our function to move our player. Each sprite has an x and y position that controls their position on the screen. If we make the y value smaller, the sprite will move up the screen!
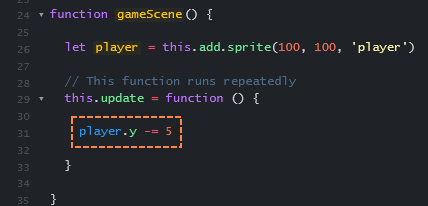
Tip: “-=” subtracts from a number.
If you click Run and test your game again your player should fly up off the screen and disappear!
5. It would be nice to have some control over when the player moves, so we’ll add some code to make the player only move when we hold down the mouse button.
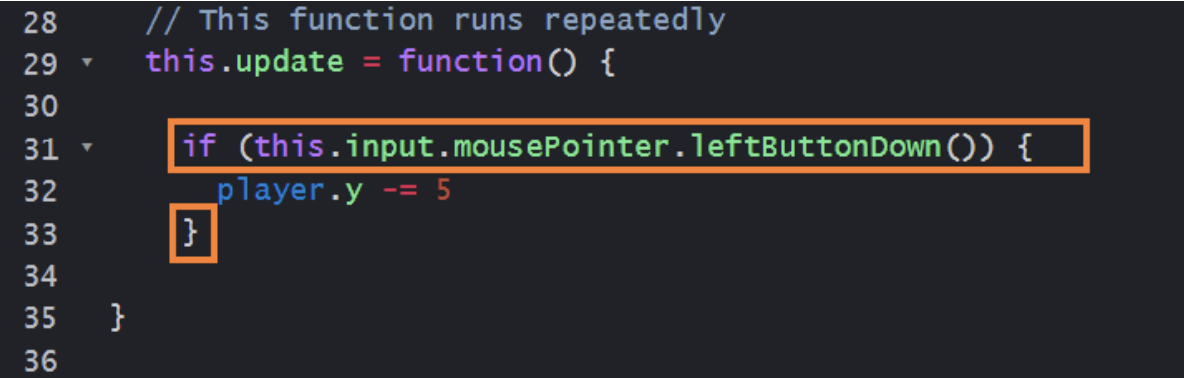
The line that begins with the word ‘if’ is called a conditional statement. Conditionals allow us to write code that only runs in certain circumstances. In this case, the player will only move if the mouse button is held down.
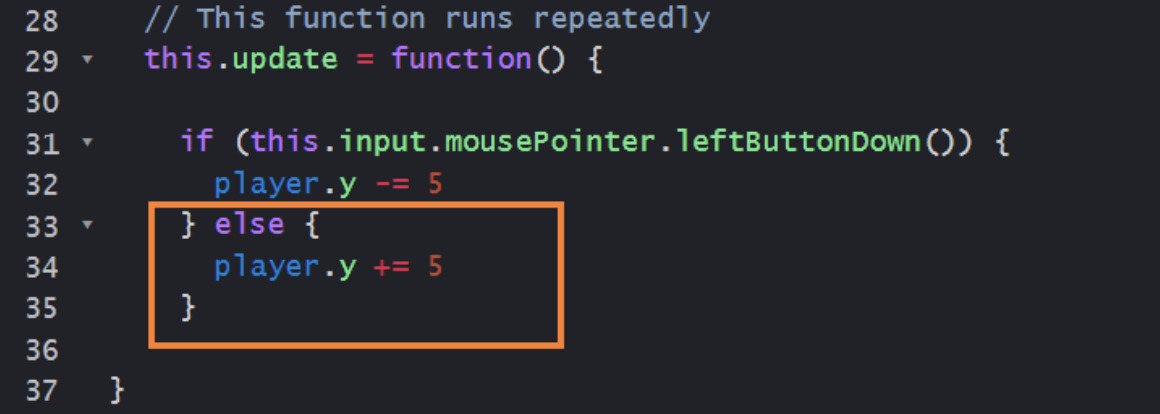
6. We can use the word ‘else’ to define what happens if the mouse button isn’t held down. We’ll tell the player character to move down the screen.
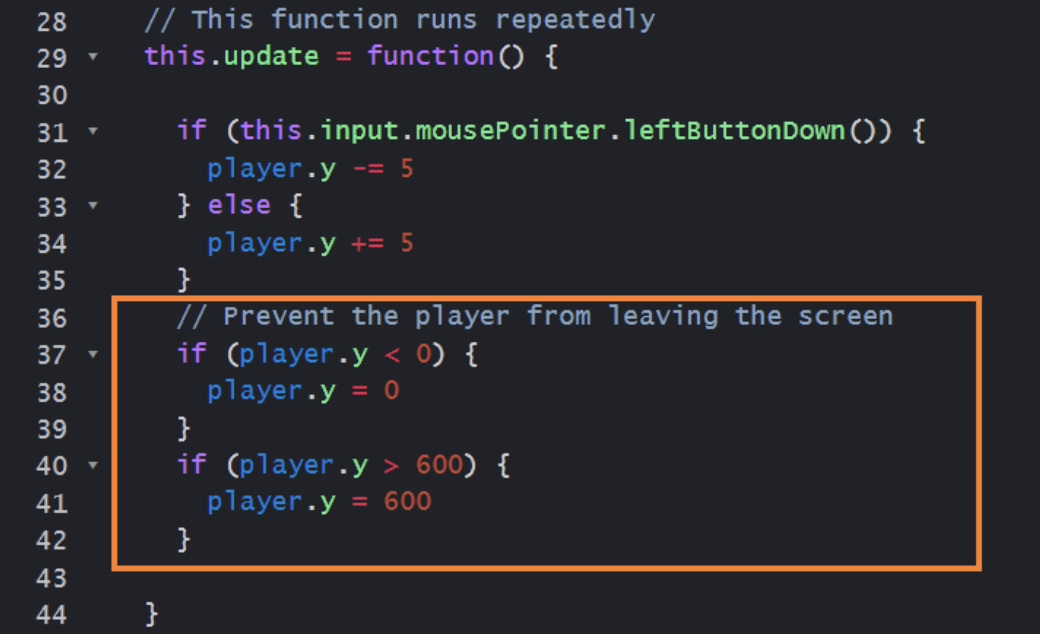
7. Now we can move our player up and down, but they move off the screen which ruins the game. We’ll use some more ‘if’ statements to prevent that.
A Moving Background
1. Now we’ll add a moving background to make it look like our character is moving. We’ll start by loading our new image just like we did for the player.
2. We’ll create our background in much the same way as we created our sprite, but our background will be a ‘TileSprite’. A TileSprite is very similar to a sprite except that a TileSprite can be ‘tiled’ meaning the image is repeated over and over to fill an area.
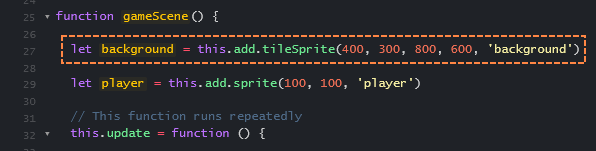
The first two numbers, 400 and 300, put the TileSprite in the center of the screen. The next two numbers set the width and height. We want it to fill the whole screen so we’ll use 800 and 600.
Make sure the line of code to create your background comes before your player sprite, otherwise the player will be behind the background and not be visible.
3. Now we’re going to scroll our background in the ‘update’ function. This line won’t actually move the tilesprite, but it will change the offset of the tiled image giving the illusion of movement!
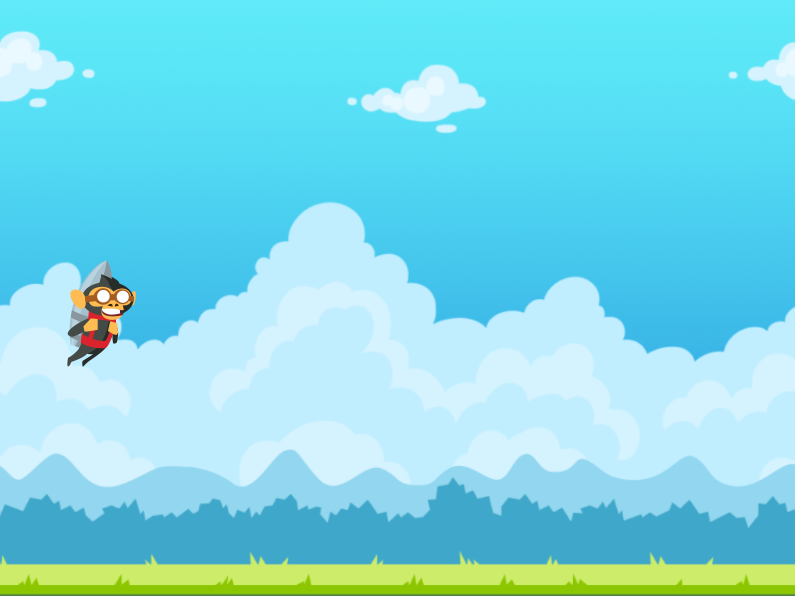
If you test your game you should have a background that looks like the image below!
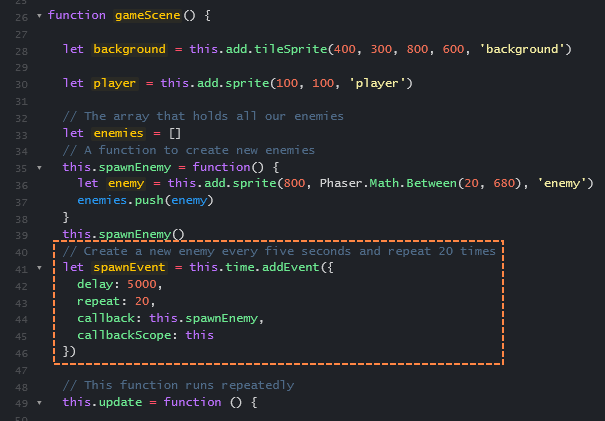
Create an Enemy
1. The enemy will work very similarly to our player. First we’ll load an image for the enemy in our preload scene.
2. Create your enemy just like you created your player sprite earlier. We’ll use the built-in function ‘Phaser.Math.Between’ to randomly choose a y position (vertical position) for our enemy.
3. We want our enemy to move from right to left, so add the following code in your ‘update’ function:
4. If you test the game now, the enemy should move across the screen, but when they reach the far side they’ll just keep going and disappear forever! To fix this we’ll add some code that teleports them back to the right side of the screen if they go too far.
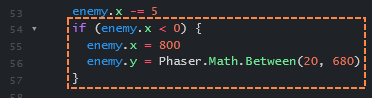
We’ll use ‘Phaser.Math.Between(20, 680)’ again to randomly give it a y position and add some variety to the game.
Now we have a controllable character, a moving background, and a moving enemy.
Great work so far!
Game Over
1. Our enemy is moving properly, but if you run into it nothing happens! We’ll need to add some code to end the game if the player collides with the enemy.
There are lots of ways to check for collisions between game objects, but the easiest way is to simply measure the distance between them. You can find the distance using the Pythagorean theorem, but Phaser also has a built-in function we can use.
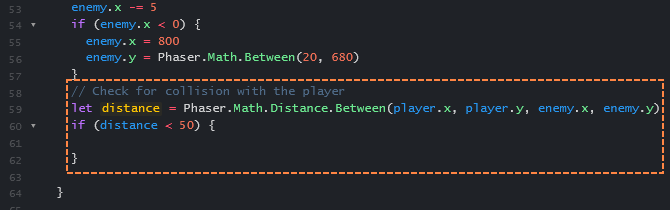
In this code we’re checking if the enemy and player are less than 50 pixels away from each other, but you can adjust this number to make the game easier or harder.
2. To keep our code clean and easy to read, we’ll put our game over code in its own function. Add a new function called ‘gameOver’ beneath the ‘update’ function.
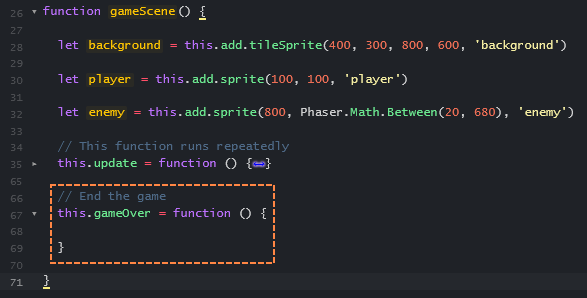
Then call the function if the player and enemy get too close to each other.

Now any code we put in this new function will be run whenever the player and enemy collide.
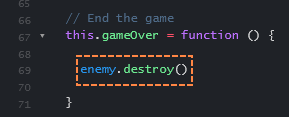
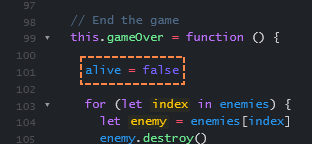
3. So what should happen when the game ends? Well for starters let’s get rid of the enemy. We can do this by running the enemy sprite’s ‘destroy’ function.
4. We also want to show some text on the screen so the player knows what happened. Add the following code to create some game over text.
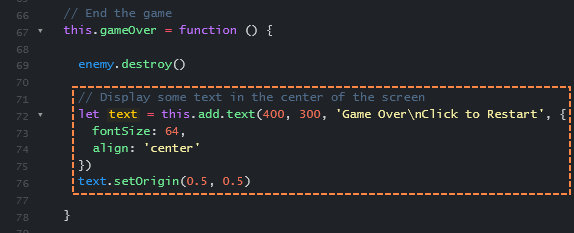
5. Finally we’ll add some code to let the player restart the game. We’ll set up a one time trigger to reset the scene if the player clicks anywhere on the screen.
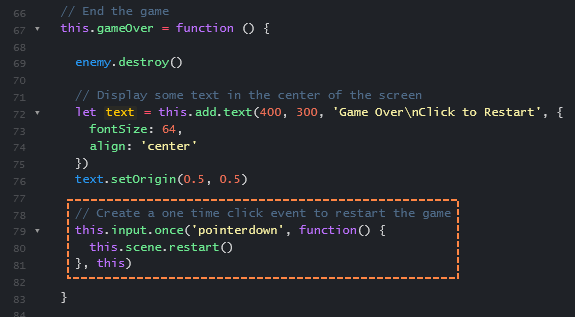
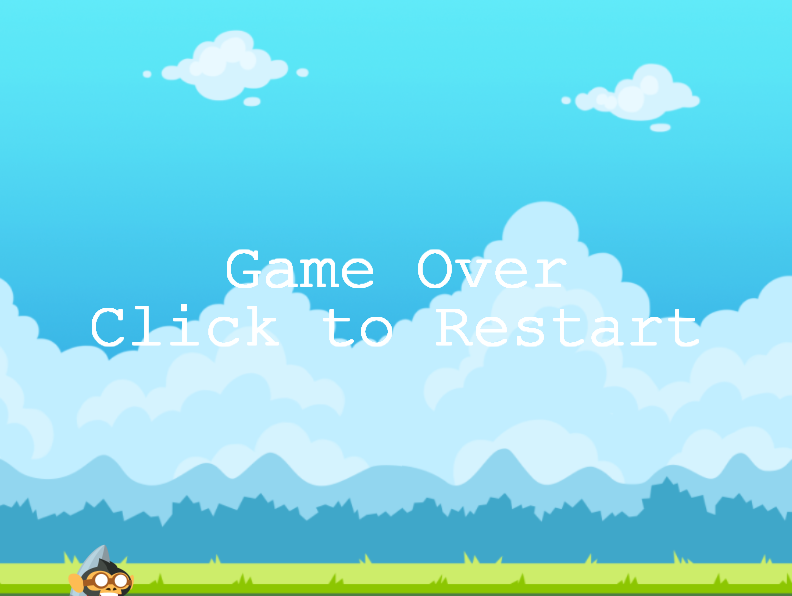
Now you can actually lose the game and restart! Our game is fully functional, but it’s a little too easy!
Endless Enemies
1. Our game would be a lot more fun if it got harder the longer you played. We can do this by adding more enemies over time!
To do this we’ll need two things: a list to keep track of the enemies, and a function to spawn new enemies. Replace your enemy spawning code with the code below.
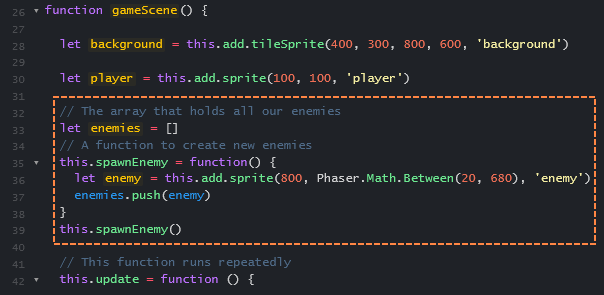
You can call ‘spawnEnemy()’ multiple times to spawn multiple enemies when the game starts!
2. Now that we have more than one enemy, we’ll need to move them all and check for collision with each one. We’ll put our enemy update code in a loop to make it run once for each enemy in the game.
3. We also need to destroy all the enemies when the game ends. Put your enemy destruction code in a similar loop so it runs once for each enemy.

4. Finally we’ll create a repeating event to spawn enemies. You can adjust the parameters of the event to change how often enemies spawn, and how many enemies spawn total.
The delay controls how much time passes between enemy spawns. It’s written in milliseconds, so 5000 = 5 seconds.
The repeat sets the total number of enemies to spawn.
Now our game will get harder and harder the longer you play so even the best players will be challenged!
Keeping Score
1. As our final feature we’ll add a score to our game so players can measure how well they do and compete for a high score!
We’ll start by adding a variable to keep track of the score, and some text on the screen to show the score. We’ll also add a variable to to keep track of whether the player is still alive or has lost the game.
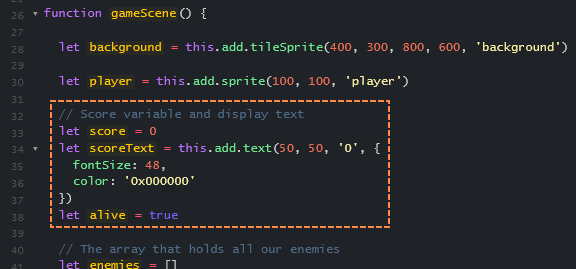
2. In our ‘update’ function, we’ll check if the player is still alive, and if so we’ll increase the score by one. We’ll also update the text on the screen to show the current score.
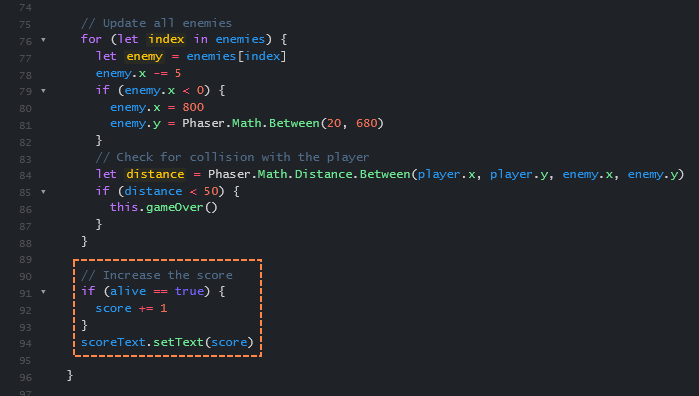
3. When the game ends we’ll simply set the ‘alive’ variable to false to the score stops going up.
And there we go! Congratulations you’ve written an entire JavaScript game complete with enemies and a scoring system!
What are some of the best JavaScript games?
Below are some cool JavaScript games that you can check out. Just click on the game title link to launch and play!
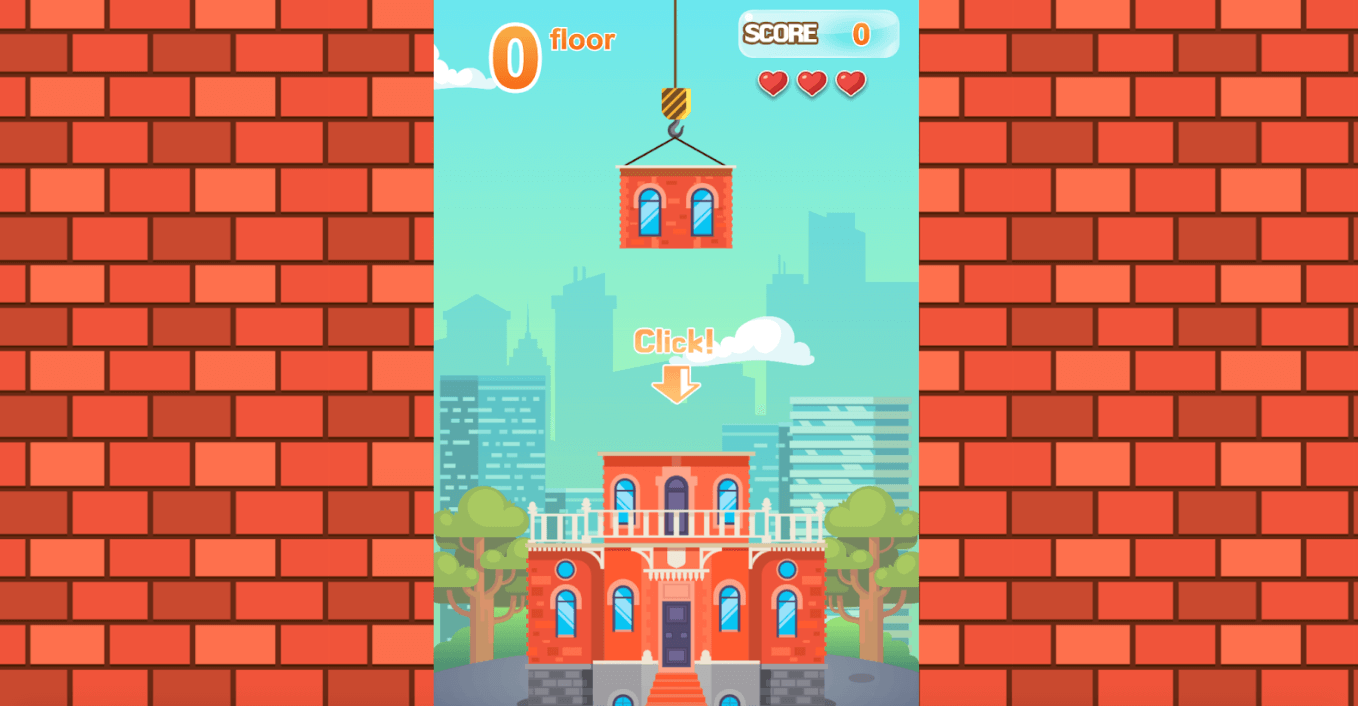
Tower Building (MIT)
The goal of the Tower Building is to construct a tower with multiple floors coupled with a swinging crane. Consider a smaller version of Tower Bloxx Deluxe. However, As a JavaScript game, it has good graphics and is challenging, making it a favorite among gamers.
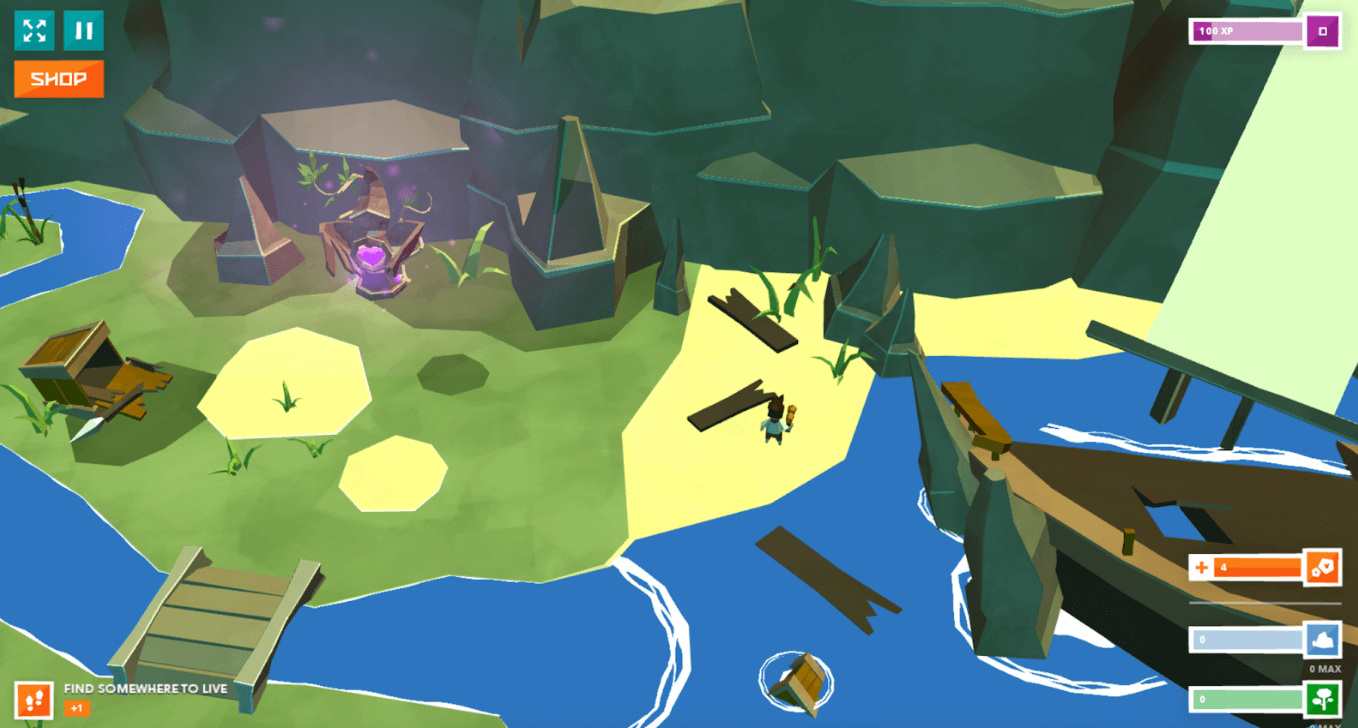
Polycraft
Polycraft is a 3D action tower defense game that combines character action and strategy in a new way. The game begins on an unknown island’s beach. By exploring the island, the player can assist the Wildlings and collect resources for constructing a base from which to begin a new life. The main goal of this game is to Craft towers and walls with the help of your Wildlings to protect your base from the ferocious Ferals(enemies). The player needs to adventure out of the base to find the Ferals’ caves and destroy them with a mighty shotgun.
Developing new strategies to fortify the base and defend it from hordes of invading Ferals is critical. After defeating the enemies and successfully defending the base player can become a hero on a living, breathing, ever-growing, persistent island!
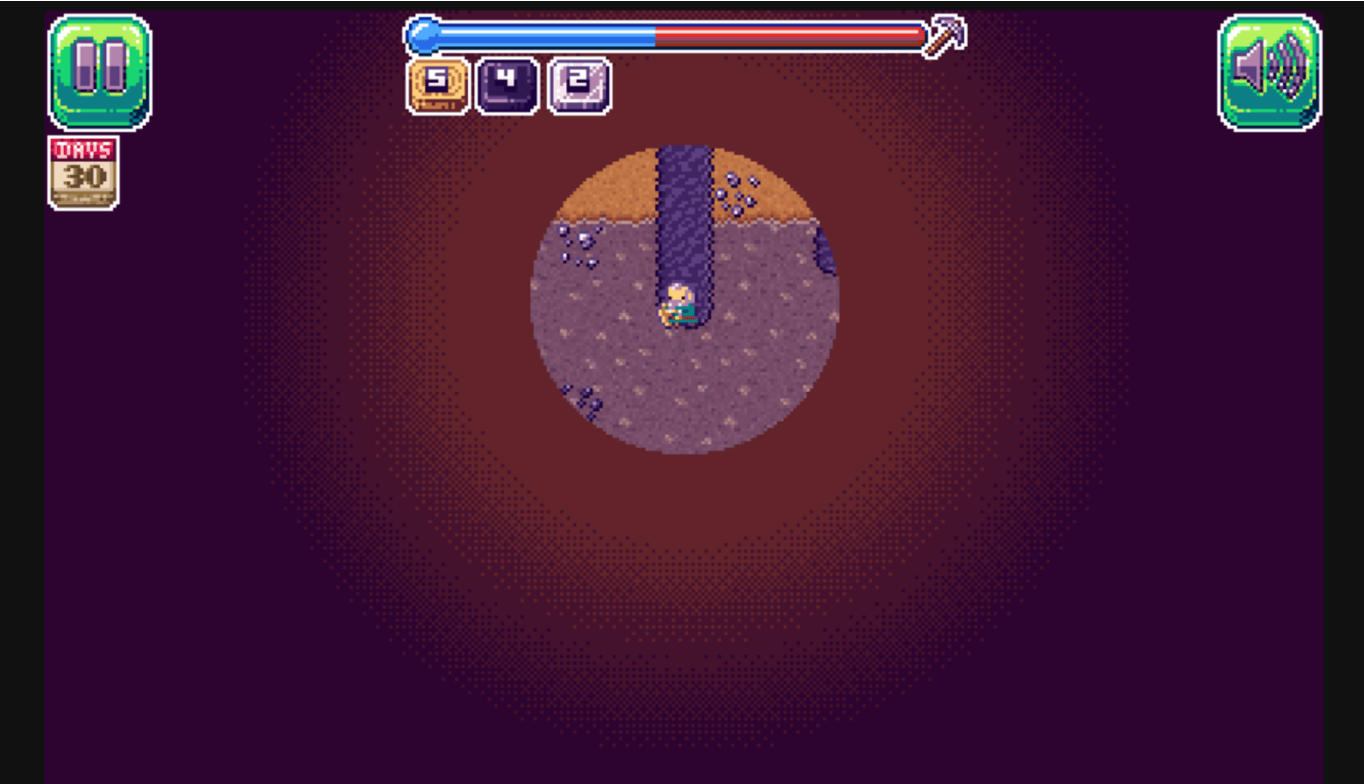
Miner Dash
Miner Dash is a progressive online game in which you play as a hyperactive miner with only one goal to reach the Earth’s core within 30 days.
To get there, you’ll have to dig your way below the Earth around your tiny cabin, collecting a variety of dazzling resources along the way. The limited collection of resources and the humble wooden pickaxe with which you begin will only take you so far. This is where recipes and crafting come into play.
You’ll instantly unlock a new recipe in your guidebook as you uncover a new layer following your sweaty labor of everyday digging. Each recipe includes a picture of the item as well as the order in which the materials needed to make it are listed.
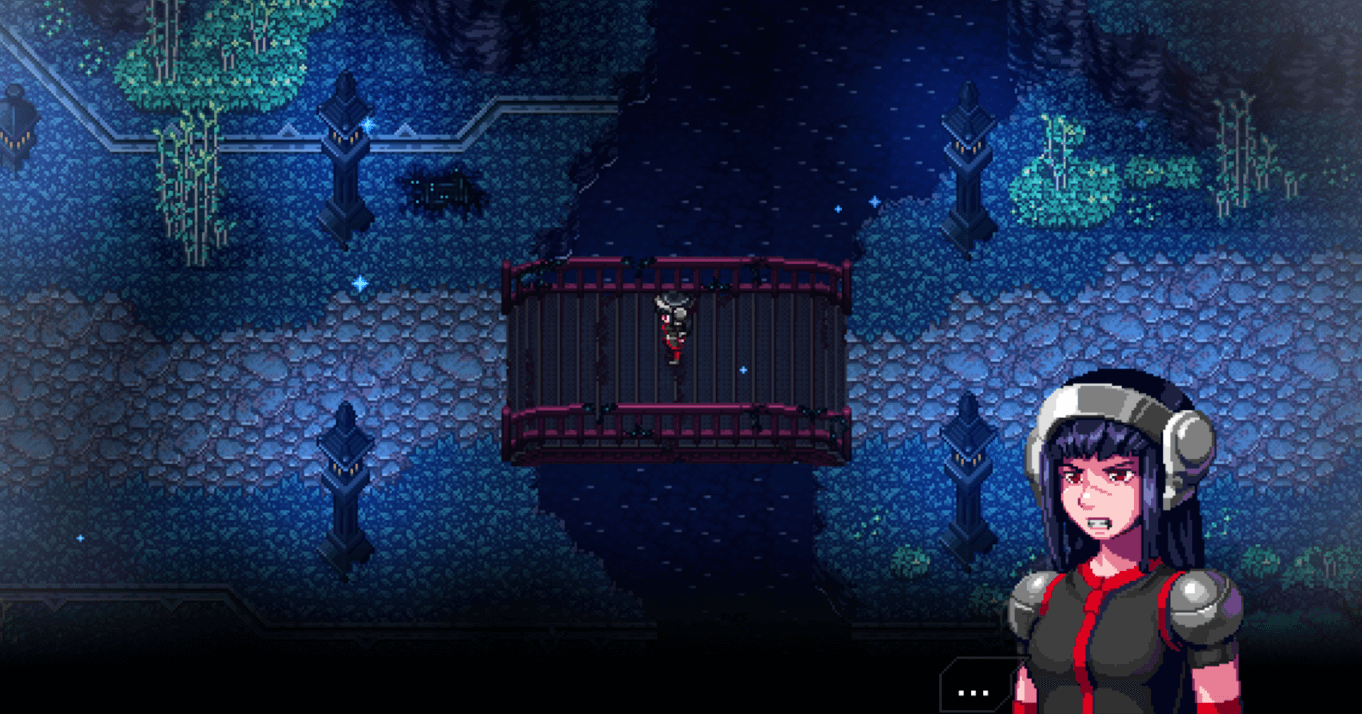
CrossCode
CrossCode is a two-dimensional top-down action role-playing video game in which the player controls Lea. Players explore an overworld where they can fight or solve puzzles to progress. The player can switch between multiple “elements” during the fighting and during solving puzzles, each of which grants Lea different puzzle-solving and assault powers.
The player unlocks more elements as the game advances by visiting various dungeons, each of which culminates in a boss battle. The complexity of both fighting and puzzles can be customized in the game’s options menu.
Which other types of games can you develop using Javascript?
JavaScript is a powerful language for creating both 2D and 3D games. There are many different tools available, each having its unique learning curve – but they all offer benefits that make them worth considering when designing high-quality gaming experiences!
For example, HTML5 canvas provides fast response times while still being able to produce rich graphics; HaXePunk offers easy implementation through tutorials on their site if you’re new at making these types of frameworks/libraries yourself or just want some help getting started quickly without feeling overwhelmed by options.
JavaScript is a powerful programming language that can be used for various purposes, from building web applications to creating games. It is common to use a game engine or rendering library. This allows developers to take advantage of many features and capabilities.
Game engines provide a set of pre-built components that can be used to create games more quickly and efficiently. On the other hand, Rendering libraries offer a way to render graphics on the screen. Both of these tools are essential for game development, and kids who learn to incorporate them into their programs will be taking the next step toward making their dream game come to life.

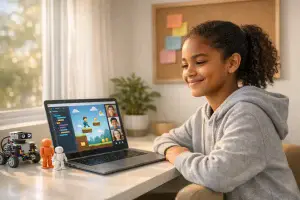
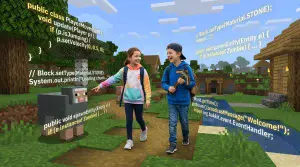
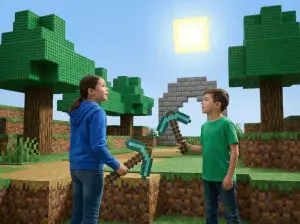
CodaKid’s award-winning JavaScript coding courses for ages 8+ provide the perfect way to learn JavaScript programming with the professional text editor Atom! Kids make amazing custom mods for Minecraft that they can share with family and friends.
CodaKid’s instructors are professional software engineers who make learning to code fun and engaging! With over 8o courses in JavaScript, Java, Lua, HTML/CSS, Scratch, Python, C# and more, students will learn to code while making fun games, apps, and websites that they can be proud of. Enroll today and see why CodaKid has been featured on CNN, Inc, CBS, and more!