Minecraft is a game that encourages exploration, world interaction, creative thinking, and crafting. There’s just something so satisfying about mining, gathering, and combining seemingly random objects to create something functional.
(Psst! Parents – not sure what Minecraft is? Check out our Minecraft Guide for Parents!)
From weapons to furniture to building materials, there’s a lot to discover and a lot that can be done with Minecraft’s highly interactive world and its components.
Our focus for this article is crafting Minecraft potions.
Table of Contents
What are Minecraft Potions?
In Minecraft lore, potions are consumable or throwable items that give players a specific status effect. They can restore Health Points, enhance Strength or Speed, improve Leaping, and the like.
But they can also do the exact opposite; damage HP, penalize Speed, weaken Resistances, etc.
These items are incredibly handy to have when you’re playing Minecraft Survival Mode (or even Minecraft Adventure Mode) as both buffs and weapons. Crafting them can be a little tricky, but the results are ultimately worth the experience.
How to Make Potions in Minecraft
Knowing how to make Minecraft potions may not be on the same level as knowing how to make a Minecraft server, but it’s still a pretty lengthy process – initially. Once you get the hang of it (and once you start hoarding ingredients), you should have no problems crafting potions in your sleep!
Gather Your Resources
Ingredients are the base of all potions. You’ll need several components to successfully craft a potion, and ingredients are definitely one of those non-negotiable one.
The bad news is that procuring ingredients can be pretty risky. We’re talking Nether risky. As in, “five of the ingredients you need can only be found in the Nether” risky.
This means you’ll need to:
- Build a portal
- Enter the underworld
- Defeat monsters
- Find a Nether Fortress (without getting lost)
For this step, you definitely want to plan accordingly. We recommend armors and weapons with enchantments. And snowballs. As many snowballs as you can manage. They’re quite effective against Blazes and ridiculously easy to craft: just dig snow with a shovel.
Once you’re in the Nether, look for the closest Nether Fortress ASAP. You’ll find Nether Wart (ingredient) growing in soul sand (optional but highly recommended ingredient) at the bottom of the entrance staircase. Mine those as quickly as you can.
Try to locate a Blaze spawner, too. If you kill the Blaze, it’ll drop a Blaze Rod (you’ll need this later on).
If you don’t want to get hopelessly lost, consider leaving markers that highlight the way back to the portal. Remember that each block traveled in the Nether is eight blocks traveled in the Overworld.
If the Nether is proving too tough, try switching to “Peaceful” mode.
Alternatively – and if you already know what are Minecraft mods – you can look into mods that even the Nether playing field.
Once you make it safely out of the Nether, go about gathering the other ingredients in the Overworld. There are plenty!
List of Ingredients
Overworld Ingredients
- Dragon’s Breath – dropped by an Ender Dragon
- Glistering Melon – craft using one (1) Melon and eight (8) Gold Nuggets
- Golden Carrot – craft using one (1) Carrot and eight (8) Gold Nuggets
- Phantom Membranes – dropped by Phantoms
- Pufferfish – catch using a Water Bucket or a Fishing Rod
- Rabbit’s Foot – dropped by slain Rabbits
- Spider Eye – dropped by slain Spiders and Witches
- Sugarcraft using one (1) Sugar Cane
- Turtle Shell – craft using five (5) Scutes (dropped by Baby Turtles)
Nether Ingredients
- Blaze Rods – dropped by Blazes in Nether Fortresses
- Ghast Tear – dropped by Ghasts (look for the ones hovering over lava)
- Magma Cream – dropped by Magma Cubes OR craft using one (1) Blaze Powder and one (1) Slimeball
- Nether Wart – located in Nether Fortresses; grows in Soul Sand
- Soul Sand – optional; used to grow Nether Wart in the Overworld
Overworld Potion Modifiers
- Fermented Spider Eye – craft using one (1) Spider Eye, one (1) Brown Mushroom, and one (1) Sugar
- Glowstone Dust – mine from Glowstones
- Gunpowder – dropped by Creepers, Ghasts, and Witches; also found in chests
- Redstone – mine from Redstone Ore
Are you ready to take your Minecraft skills to the next level? Enroll in CodaKid’s free trial today!
Craft Your Tools
Once you have all your ingredients, you then need to craft your other tools and resources: a brewing stand (can’t brew potions without it), a cauldron (optional if you have a water source nearby), glass bottles (you need to pour and store your potions somehow), and Blaze powder (fuel for your brew).
Thankfully, all these components are infinitely easier to procure compared to Nether ingredients.
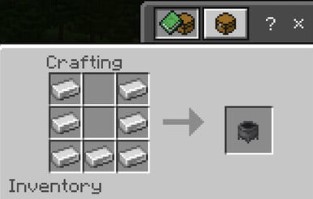
Brewing Stand
Pretty much exactly what the name implies. This is what you’ll use to brew your potions.
You’ll need three (3) Cobblestone blocks and one (1) Blaze rod.

- Step 1 – Open Crafting Table
- Step 2 – Place one (1) Cobblestone block in each of the three bottom squares on the crafting grid; then place one (1) Blaze Rod in the middle square
- Step 3 – Once it’s crafted, drag your completed Brewing Stand down into your Hotbar
Cauldron (Optional)
If you have a source of water nearby, a Cauldron isn’t necessary. But if you have Iron to spare, it can make crafting potions in Minecraft a lot easier.
See, you need to fill empty glass bottles with water first in order to craft potions. That would require you to go to a water source. A Cauldron would be like having a little pool of water right next to your Brewing Stand.
One Iron Bucket of water can fill a cauldron. You can then right-click the Cauldron (like you would the source of water) with an empty glass bottle to fill it up. This drains 1/3 of the Cauldron’s contents.
You can fill up three bottles with water in one sitting.
Another neat trick is transferring existing potions to an empty Cauldron. The process is pretty much the same; right-click an empty Cauldron with a full potion bottle and the contents will transfer.
You can fill up the Cauldron with three bottles of the same potion.
You can also fill up three empty bottles with whatever potion is in the Cauldron.
But, again, brewing potions near a water source works just as well. You just won’t have the extra storage/transfer options.
To craft a Cauldron, you’ll need seven (7) Iron Ingots.
- Step 1 – Open Crafting Table
- Step 2 – Add all seven (7) Iron Ingots to the outer squares of the crafting grid, forming a “U.”
- Step 3 – Once it’s crafted, drag your completed Cauldron down into your Hotbar
Bottles
You need a way to store your finished potions and bring them along. You’ll need three (3) Glass blocks.
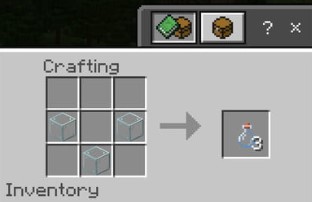
- Step 1 – Open Crafting Table
- Step 2 – Place one (1) Glass block in the first and third square on the crafting grid’s middle row
- Step 3 – Place one (1) Glass block in the middle square on the crafting grid’s bottom row ( final shape should be a small “v” formation)
- Step 4 – This will give you three (3) Glass Bottles. Drag them down into your Hotbar
Blaze Powder
Almost done!
The last thing you need to make potions in Minecraft is Blaze Powder. This is essentially the fire that fuels your brewing stand. It’s pretty simple, actually! All you need is a Blaze Rod.
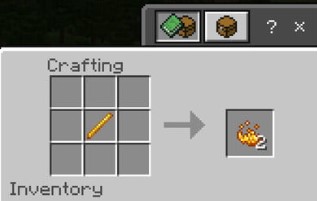
- Step 1 – Open Crafting Table
- Step 2 – Place Blaze Rod into any crafting grid square
- Step 3 – Final result should be Blaze Powder (x2)
- Step 4 – Drop Blaze Powder(s) into your inventory
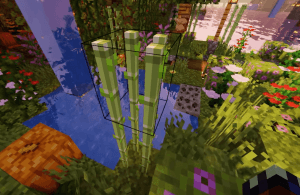
Optional Side Quest: A Nether Wart Farm
We mentioned earlier that you could find Nether Warts growing in Soul Sand at the steps leading to a Nether Fortress. If you managed to gather Soul Sand, you can create a Nether Wart farm. Nether Wart is used to create an Awkward Potion (more of that later) which is basically the foundation of all potions.
Cultivating it in the Overworld saves you from yet another harrowing death trip to the Nether.
Simply place Soul Sand blocks on the ground and plant one (1) Nether Wart in it. Harvest normally when fully grown.
Just as there are Minecraft mods that teach kids creativity and out-of-the-box thinking, the base game itself can teach kids a lot about being patient and resourceful.
Awkward Potion: Your First Potion
Now that you’ve got all your tools and ingredients, you’re ready to brew an Awkward Potion. As we said, you can’t craft other potions until you have an Awkward Potion ready to go.
- Step 1 – Fill empty Glass Bottles with water (using either a source of water or your Cauldron)
- Step 2 – Open Brewing Stand
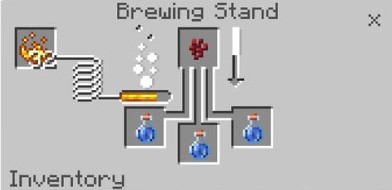
- Step 3 – You’ll see three lower squares on the Brewing Stand grid designated with a “bottle” icon; place one (1) filled Glass Bottle in each square
- Step 4 – Place one (1) Nether Wart in the top square
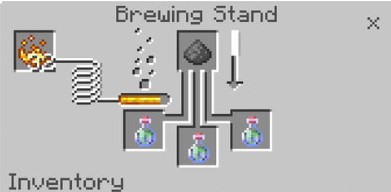
- Step 5 – You’ll see a square in the top left corner designated with a “fire” icon; place one (1) Blaze Powder there
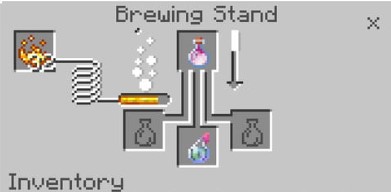
This process takes about 20 seconds and converts all three Water Bottles into Awkward Potions.
By itself, an Awkward Potion doesn’t do anything. You’ll have to add other ingredients to make it usable. Adding modifiers – like Glowstone Dust or Gunpowder – can make the effects more powerful and/or last longer.
Types of Craftable Potions
As you explore the wonderful world of making potions in Minecraft, let us introduce you to a couple of concepts you need to know—specifically the different types of potions you can craft and the different types of effects.
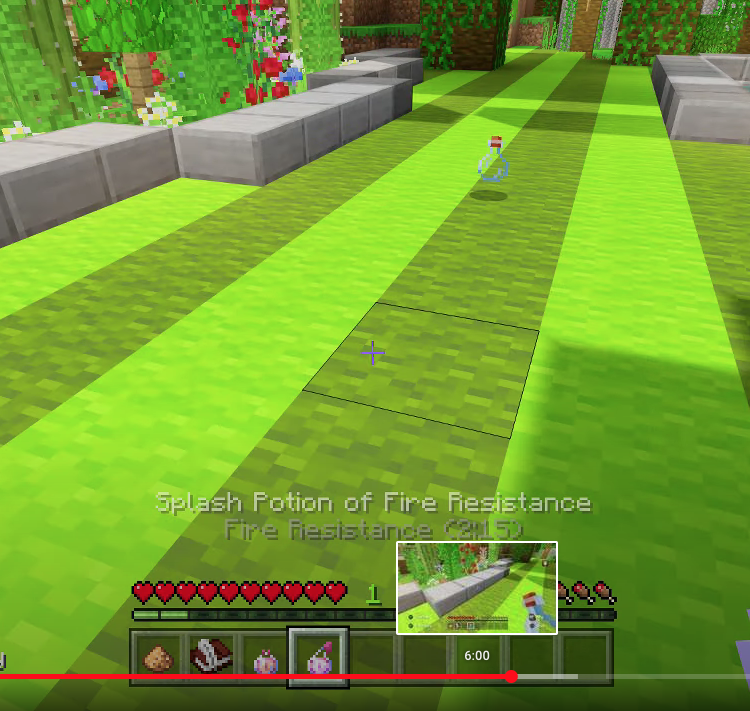
First up: the types of potions. You really only have two: potions you can drink and “Splash” potions, or potions you can throw.
Drinkables vs Throwables
Most Minecraft potions that have an Awkward Potion base are meant to be consumed. These drinkable potions have specific effects and durations and are pretty much useless if thrown (unless converted to a Splash potion).
Splash potions, on the other hand, are great for dealing with damage or managing multiple opponents. Their results are either short-lived or lingering, depending on the ingredients and components used.
Lingering Splash & Extended Potions
You can add more ingredients to an existing consumable or Splash potion to prolong their effects.
Crafting a Splash Potion
To craft a Splash Potion, you need one (1) Gunpowder, one (1) Blaze Powder, and three (3) Regular Potions i.e., the potion you want to turn to a Splash potion. Say you want to create a Splash Healing Potion. You have to craft a Healing Potion first (recipe below). You want to create a Splash Potion of Poison? Craft Poison first (recipe below).
For this example, let’s craft a Splash Potion of Poison
- Step 1 – Open Brewing Stand
- Step 2 – Place one (1) Potion of Poison in each of the three bottom squares
- Step 3 – Place one (1) Gunpowder in the top square
- Step 4 – Place one (1) Blaze Powder in the top left square
Crafting a Lingering Splash Potion
Lingering Splash Potions are great for maximizing damage. Much like Splash Potions, you’ll need to craft a Regular Potion first and turn it into a Splash Potion in order to achieve a Lingering Splash Potion. You’ll also need one (1) Dragon’s Breath and one (1) Blaze Powder.
For this example, let’s use a Splash Potion of Poison to create a Poison Cloud.
- Step 1 – Open Brewing Stand
- Step 2 – Place one (1) Splash Potion of Poison in one of the three bottom squares
- Step 3 – Place one (1) Dragon’s Breath in the top square
- Step 4 – Place one (1) Blaze Powder in the top left square
Splash potions are usually potions with Negative effects since it doesn’t make sense to consume a Poison or Slowness potion yourself. However, there is a Splash Potion of Healing, which you can use to heal your friends from far away.
On that note, Minecraft potions can also be categorized by three effects: Positive, Negative, and Mixed. Examples of Positive Potions would be Healing Potions, Night Vision Potions, and Strength Potions. Examples of Negative Potions would be, as we mentioned, Poison or Slowness. These are the ones you want on-hand when you’re braving Survival or Adventure mode.
And if you decided to play around with deadly mods – like, say, a Dragon Minecraft mod – you definitely want as many positive potions in your inventory as possible.
Mixed Potions, as the name suggests, combines one negative effect to balance one positive effect. A good example of this would be Turtle Master Potion. You get heightened Resistance for 20 seconds, but you’re also Slowed for the same amount of time.
In the next section, we break down all possible potions into their ingredients, effects, and duration.
Potion Recipes
Positive Potions
| POTION | INGREDIENTS | EFFECTS/ DURATION |
| Fire Resistance | Awkward Potion Magma Cream | 3:00 |
| Enhanced Fire Resistance | Fire Resistance Potion Redstone Dust | 8:00 |
| Healing | Awkward Potion Glistering Melon | +4 HP |
| Enhanced Healing | Healing Potion Glowstone Dust | +8 HP |
| Invisibility | Night Vision Potion Fermented Spider Eye | 3:00 |
| Extended Invisibility | Invisibility Potion Redstone Dust | 8:00 |
| Leaping | Awkward Potion Rabbit’s Foot | +0.50 3:00 |
| Enhanced Leaping | Leaping Potion Glowstone Dust | +0.50 8:00 |
| Extended Leaping | Leaping Potion Redstone Dust | +1.25 1:30 |
| Night Vision | Awkward Potion Golden Carrot | 3:00 |
| Extended Night Vision | Night Vision Potion Redstone Dust | 8:00 |
| Regeneration | Awkward Potion Ghast Tear | +1 HP every 2.5 seconds 0:45 |
| Enhanced Regeneration | Regeneration Potion Glowstone Dust | +1 HP every 2.5 seconds 1:30 |
| Extended Regeneration | Regeneration Potion Redstone Dust | +1 HP every 1.2 seconds 0:22 |
| Slow Falling | Awkward Potion Phantom Membrane | 1:30 |
| Extended Slow Falling | Slow Falling Potion Redstone Dust | 4:00 |
| Strength | Awkward Potion Blaze Powder | +3 melee damage 3:00 |
| Enhanced Strength | Strength Potion Glowstone Dust | +3 melee damage 8:00 |
| Extended Strength | Strength Potion Redstone Dust | +6 melee damage 1:30 |
| Swiftness | Awkward Potion Sugar | +20% movement speed 3:00 |
| Enhanced Swiftness | Swiftness Potion Glowstone Dust | +40% movement speed 1:30 |
| Extended Swiftness | Swiftness Potion Redstone Dust | +20% movement speed 8:00 |
| Water Breathing | Awkward Potion Pufferfish | 3:00 |
| Extended H2O Breathing | Water Breathing Potion Redstone Dust | 8:00 |
Negative Potions
| POTION | INGREDIENTS | EFFECT/ DURATION |
| Harming | Healing or Poison Potion Fermented Spider Eye | 6 pts. Damage |
| Enhanced Harming | Harming Potion Glowstone Dust | 12 pts. Damage |
| Poison | Awkward Potion Spider Eye | -1 HP every 2.5 seconds 0:45 |
| Enhanced Poison | Poison Potion Glowstone Dust | -1 HP every 1.2 seconds 0:21 |
| Extended Poison | Poison Potion Redstone Dust | -1 HP every 2.5 seconds 1:30 |
| Slowness | Leaping or Swiftness Potion Fermented Spider Eye | -15% speed 1:30 |
| Enhanced Slowness | Slowness Potion Glowstone Dust | -15% speed 4:00 |
| Extended Slowness | Slowness Potion Redstone Dust | -60% speed 0:20 |
| Weakness | Awkward Potion Fermented Spider Eye | Melee damage -4 1:30 |
| Extended Weakness | Weakness Potion Redstone Dust | Melee damage -4 4:00 |
Mixed Potions
| POTION | INGREDIENTS | EFFECT/ DURATION |
| Turtle Master | Awkward Potion Turtle Shell | Slowness IV Resistance III 0:20 |
| Enhanced Turtle Master | Turtle Master Potion Glowstone Dust | Slowness IV Resistance III 0:40 |
| Extended Turtle Master | Turtle Master Potion Redstone Dust | Slowness IV Resistance IV 0:20 |
Conclusion
To recap our Minecraft potions guide, here is what we covered:
Table of Contents:
- What are Minecraft Potions?
- How to Make Potions in Minecraft
- Gather Your Resources
- List of Ingredients
- Craft Your Tools
- Optional Side Quest: A Nether Wart Farm
- Awkward Potion: Your First Potion
- Types of Craftable Potions
- Drinkables vs Throwables
- Lingering Splash & Extended Potions
- Potion Recipes
Now that you know how to make potions in Minecraft, you’re definitely better equipped to take on the world. These portable, stat-boosting, enemy-damaging items may essentially be quick-fixes, but they could make all the difference in a life-or-death situation. It’s all about timing and resource management, after all.
If you’re interested in knowing more about how Minecraft can teach coding for kids, feel free to reach out to us about our Minecraft modding class and other Minecraft Coding Courses online!