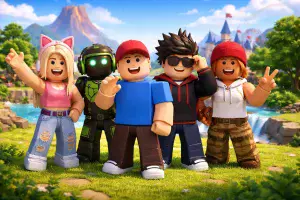
Roblox defines itself as a global platform where millions of users can gather to “imagine, create, and share experiences in immersive, user-generated 3D worlds.” Kids probably know Roblox best because of popular games like Theme Park Tycoon 2, Jailbreak, and MeepCity. But what many of them might not realize is that those games were conceptualized, coded, and created by their fellow Roblox users.
Related Reading:
- 7 Best Roblox Games for Kids in 2021
- 5 Awesome Roblox Games You Can Make at Home
- 5 Ways Roblox Studio is Inspiring the Next Generation of Engineers, Innovators, and Entrepreneurs
This has established Roblox as a community of gamers and coders focused on spreading creativity. The Roblox platform helps encourage this by providing different tools and programs for users to use.
One of our favorite tools is the Roblox shirt template.
Table of Contents
Creating Roblox Clothing
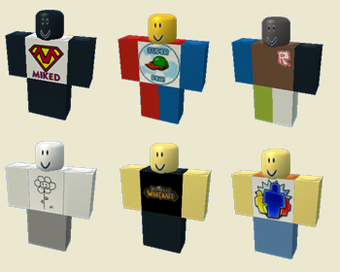
When you join Roblox, you are asked to create your 3D avatar. The game already offers plenty of customization options and items for you to make your character unique. But for those who want to stand out, you can design and create one-of-a-kind clothes for your avatar to wear. All you need is a template, some form of image editing software (there are plenty of free ones that are really intuitive!), and some practice.
Some Roblox players enjoy the artistic freedom they find in being able to design their in-game clothes. Others love how it further encourages creativity.
And, bonus, you get to play around with making 3D graphics!
Shirt vs. T-Shirt vs. Pants
Before choosing a design, it’s important to note that Roblox shirts differ from Roblox t-shirts. Roblox t-shirts are more decals applied to the front of your avatar’s torso. Think like a logo or design on the front of a graphic tee. A custom Roblox t-shirt doesn’t wrap around the avatar’s body.
On the other hand, Roblox shirts wrap all the way around the avatar’s body. They include the clothing item’s back, front, collar, and sleeves. They’re completely 3D, giving you more control over the design.
So you could, in theory, create a Roblox shirt with different-colored sleeves and two completely different designs for the back and front. When you create a Roblox t-shirt, you can only change the front.
Any Roblox user can make a Roblox t-shirt. However, if you want to make a Roblox shirt or pants, you’ll need a Roblox Builder’s Club membership.
Knowing the difference between the two items helps you make a more informed decision when choosing which one to make. Once you know what you want, please scroll down to find our detailed step-by-step guide (plus templates!) on how to make them.

What Are The Roblox Clothes Templates?
The Roblox clothes template is a digital file that can be used to create custom clothing for avatars in the online game Roblox. The template can be downloaded for free from the official Roblox website, and it is compatible with all major image editing software programs. Once the template is downloaded, users can add their images and text to create unique designs.
The finished product can then be saved and uploaded to the Roblox platform, where other players can purchase it. In addition to being a fun way to personalize avatars, the Roblox clothes template can also be used for educational purposes. For example, students can use the template to design their own virtual outfits for characters in a history or science project. The possibilities are endless!
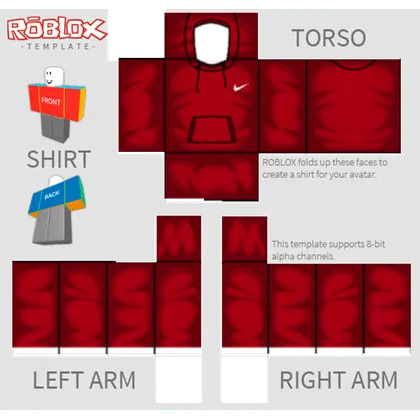
Roblox Shirt Template
A shirt template for Roblox is a digital file that can be used to create a shirt design. The template can be found on the Roblox developer site, including a front and back view of the shirt. To use the template, you will need to download it and then open it in an image editing program. Once you have the template open, you can start designing your shirt. You will need to keep in mind the size and shape of the shirt when you are designing, as well as the placement of the seams. Once you are happy with your design, you can save it and then upload it to Roblox.
Roblox T-Shirt Template
If you want to know how to make a Roblox t-shirt, keep reading! It’s the easiest to make out of the three, so we highly recommend this option for beginners.
- Decide what design you’d like. Remember, this will only be seen on your avatar’s front. Simpler designs will work best for a first try.
- Once you know what you want, create the image, resize it to 128 x 128 pixels, and save it as a .PNG file.
- If you don’t want to create it from scratch or don’t know how, you can always download some online (with permission, of course!). There are plenty of websites that offer free PNG files for personal use. Try TopPNG or Pinterest for some great graphics.
- Once your design is sized to 128 x 128 pixels and saved as a .PNG file, upload it to Roblox or test it out.
How to Upload T-Shirts to Roblox:
- Go to the Roblox “Create” page.
- In the left-hand column, you’ll see options to upload designs for either Shirts, Pants, or T-Shirts. Select T-Shirts.
- Click on Choose File and select your design.
- Name your design. Make it as fun or as creative as you’d like!
- Hit the Upload button. Congratulations – you’ve uploaded your custom Roblox t-shirt!
How to Test Roblox T-Shirts:
If you want to make sure your t-shirt looks exactly like you envisioned before uploading it to Roblox, you can test it out using the Roblox Studio. Here’s how:
- Go to “Roblox Studio” and open the Plugins tab. Select Build Rig (Rig Builder).
- A pop-up menu will display the type of rigs you can build. Select whichever one you want. This should bring up a basic avatar – standard frame, no cosmetics whatsoever – for you to test on.
- Go to the “Explorer” window. Under Workspace, you should see a Dummy option with a + button next to it. Click on the + button.
- You’ll see options to insert a Shirt Graphic (Roblox t-shirt) or Clothing (Roblox shirt or pants) object. Select Shirt Graphic.
- Look under the Appearance tab in the “Properties” window. You’ll find three options: Graphic, ShirtTemplate, and PantsTemplate. Select the row next to the Graphic option and choose the . PNG image you uploaded to Roblox.
- The Dummy in your workspace should now be wearing your custom t-shirt!
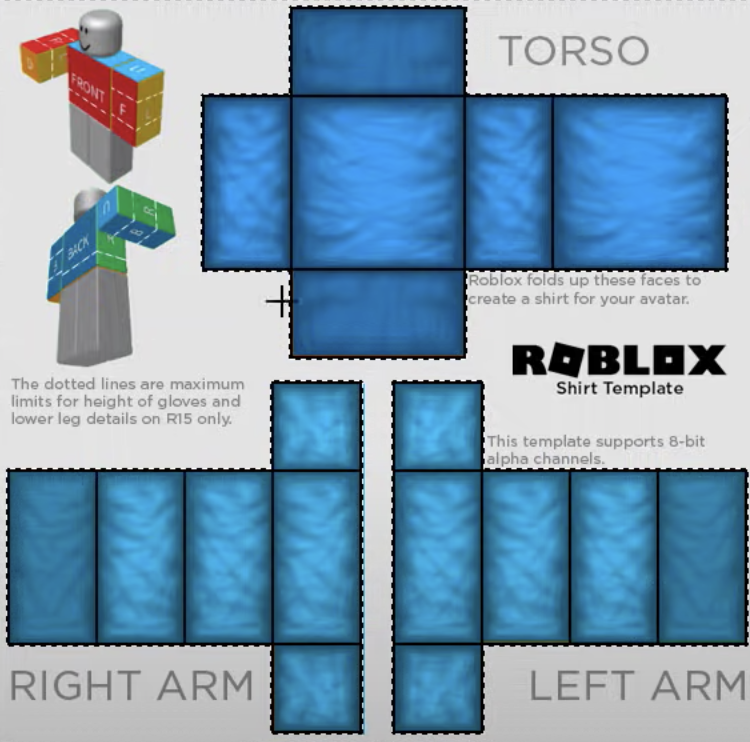
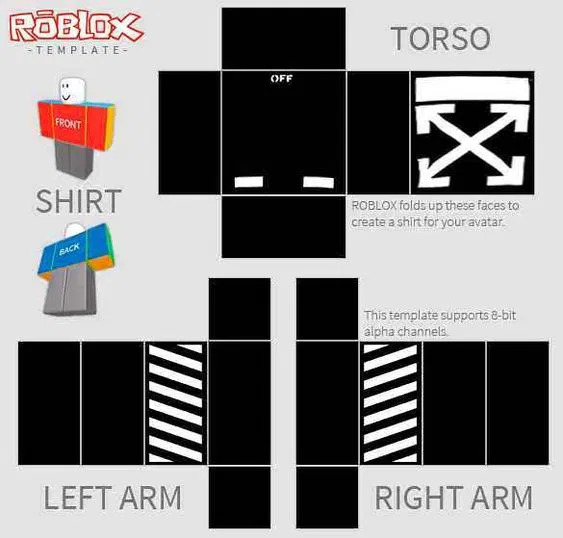
Roblox Shirt Template
The Roblox shirt, as we mentioned, wraps around your avatar. So there are more pieces to be aware of. It’s definitely not as easy as making a Roblox t-shirt, but having the Roblox shirt template keeps it fairly within the beginner-friendly category for 3D graphics!
Depending on what you’re planning to make, you’ll need to save either of these templates (Right-click on the template and choose Save image as…):
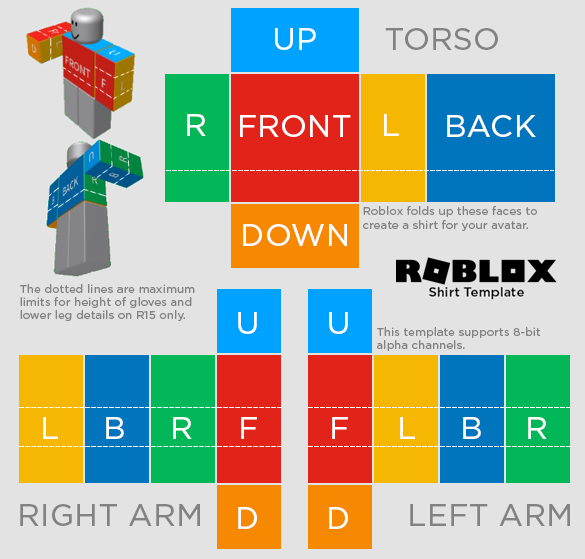
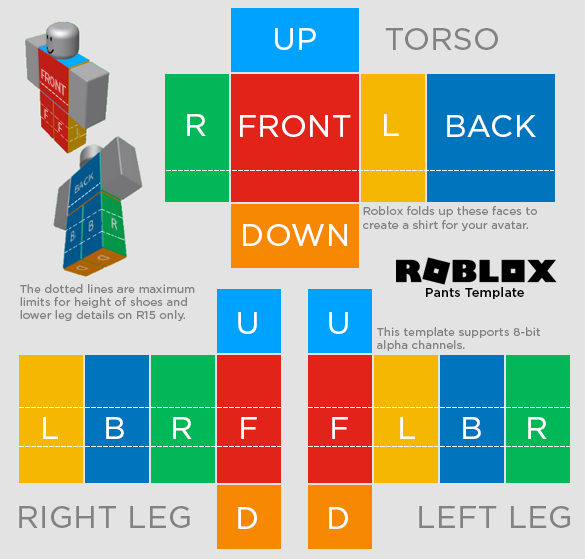
You can save both if you’re going to make both a shirt and some pants.
- The idea is for your design to follow the templates’ outlines, boxes, and restraints. This way, once the image is “folded” along the lines set by the template, you’ll have a three-dimensional piece of clothing in-game.
- Open the template in your chosen image editing software. The most popular one is Photoshop, but we understand that not everyone has it. Don’t worry; plenty of free-to-use programs out there will do just as well! Try GIMP or Paint.NET for starters.
- Each section of the template represents a specific part of the shirt and indicates where they’ll go on your avatar’s body. Each section also has a specific size.
- If you’re having trouble deciphering the Roblox shirt template, refer to our table below:
| Section | Size | Area |
| Large Square | 128 x 128 pixels | Front and back of avatar’s torso |
| Small Square | 64 x 64 pixels | Top and bottom of avatar’s arms and legs |
| Wide Rectangle | 128 x 64 pixels | Top and bottom of avatar’s torso |
| Tall Rectangle | 64 x 128 pixels | R & L: sides of the avatar’s torso L, B, R & F: sides of the avatar’s arms and legs |
- Apply your design to each part. Use the sizes to help you trim and resize your design as needed.
- Remember: this is a 3D graphic. Rather than apply a different design to each section, treat it as one cohesive clothing item. Think of how the sleeves will attach to the front and back, how the shoes will attach to the pants, etc.
- Save your design as a . PNG file, upload it to Roblox, or test it out.
How to Upload Shirts to Roblox:
- Go to the Roblox “Create” page.
- In the left-hand column, you’ll see options to upload designs for either Shirts, Pants, or T-Shirts. Select Shirts.
- Click on Choose File and select your design.
- Name your design. Make it as fun or as creative as you’d like!
- Hit the Upload button. Congratulations – you’ve uploaded your custom Roblox shirt!
What Is Roblox Clothing ID?
Roblox is a popular online game that allows players to create their own virtual worlds. One of the features of Roblox is the ability to customize your avatar with different clothing and accessories. Each piece of clothing has a unique ID number that can be used to identify it within the game. The ID number is also known as the “clothing code” or the “avatar code.”
When you purchase an item of clothing from the Roblox catalog, you can add the item to your avatar using its ID number. You can also find clothing IDs by searching for them in the Roblox database.
- Go to the “Catalog” tab and then click on the “Search” box.
- Type in the name of the clothing item you are looking for, and then click on the “Search” button. This will bring up a list of all the items that match your search term and their ID numbers.
- You can then use these ID numbers to add the items to your avatar.
How Do You Find Your Roblox Clothing ID?
The ID number for Roblox clothing can be seen at the URL on a player, group, asset, or item page. To find the ID number, follow these steps:
- Tap on “Avatar Shop” to go to the avatar shop.
- Tap on the URL at the top of the page to see the clothes ID.
By following these simple steps, you can find the ID number for any piece of Roblox clothing. With this information, you can easily add clothes to your avatar and ensure that it always looks its best.
How Do You Put A Price On A Shirt On Roblox?
Requirements
If you have Roblox Premium, you’re allowed to sell your own T-Shirts that you have made. If you don’t have Roblox Premium, you can’t sell T-Shirts but only wear them on your avatar.
Clothing items cannot be sold for free; the minimum amount for Shirts/Pants is 5 Robux and for T-Shirts is 2 Robux. Robux earned from selling clothes and other avatar items are held in pending status for up to 30 days before being released for you to use.
Consequently, if you’re interested in selling your own clothes on Roblox, necessary requirements are either to have Roblox Premium or be willing to sell your clothing items for the minimum price. Thanks for reading!
Set a price
- Go to the Create section located in the bar at the top of the Roblox website.
- Choose either Shirts, Pants, or T-Shirts in the left column, depending on what you are selling.
- Click the gear to the right of the item you want to sell.
- Click Configure, then select Sales.
- On the Sales page, click to turn on the “Item for Sale” option.
- Enter the amount of Robux for which you want to sell your clothing.
- Click the Save button.
Conclusion
You can now customize your Roblox avatar by creating and selling your own shirts. So have fun, be creative, and start making some cash! It might take a bit of practice at first – and a lot of trial and error! But with a Roblox shirt template to guide you and an intuitive image-editing program, it won’t be long before you’re breezing through the process!