Table of Contents
Mobile Game Design: 5 Simple Steps to Get Started
Mobile game design lets you create games for smartphones and tablets while learning coding basics. It’s a fun way to develop problem-solving and logical thinking skills, even for beginners. Here’s a quick overview of the process:
- Pick a Simple Game Idea: Start with easy-to-build concepts like tapping or swiping games.
- Plan Gameplay and Characters: Outline how the game works, design characters, and map out the game loop.
- Design for Touch Screens: Use intuitive controls and ensure the interface is clean and responsive.
- Build a Prototype: Use beginner-friendly tools like Scratch or advanced platforms like Roblox Studio to create a playable version.
- Test and Improve: Gather feedback, adjust difficulty, and refine gameplay to make it more engaging.
These steps help you create your first mobile game while learning key coding and design principles.
Best Coding Curriculum for Kids & Teens (2026 Roadmap): Roblox, Minecraft, Python, AI
Step 1: Pick a Simple Game Idea
The first step in designing a mobile game is choosing a concept that’s straightforward to create and fun to play. Start with an idea that’s easy to build so you can complete your first game and learn from the process.
Focus on games that rely on one or two basic actions. Simplicity in the core mechanics makes coding and testing much easier. But simple doesn’t mean dull – many successful mobile games thrive on basic ideas executed well. Starting small also gives you the flexibility to add features later as you gain experience.
Brainstorm Game Ideas
Start by thinking about actions that feel natural on touchscreens, like tapping, swiping, dragging, or matching. These mechanics are intuitive and work well on mobile devices. Jot down any ideas that come to mind, even if they seem overly simple at first – great games often evolve from basic concepts.
Think about themes that excite you. Love animals? Create a game where players tap to feed different creatures. Fascinated by space? Maybe a game where players swipe to dodge asteroids. Choosing a theme you care about will help keep you motivated during development.
If you’re new to game design, try creating small digital games or interactive animations as a starting point. For example, you could make a game where players tap colored circles before they vanish or swipe to match shapes in a pattern. These kinds of projects teach you essential skills without overwhelming you with complexity.
Don’t stress about originality. Many successful games borrow familiar ideas and put their own spin on them. The key is to pick something you can realistically build with your current skills.
Look at Existing Games for Ideas
Exploring existing games is a great way to refine your ideas and understand what makes mobile game designs engaging. Check out some simple titles on your app store. Pay close attention to how they use touch controls, their visual style, sound effects, and how quickly the rules become clear.
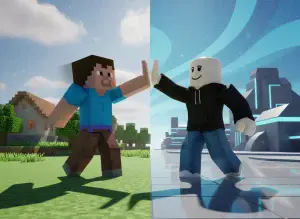
Games like Minecraft and Roblox are excellent examples to learn from. Both are available on mobile game design platforms and are often used in coding courses for beginners. Minecraft’s block-based mechanics show how simple actions can lead to complex gameplay, while Roblox demonstrates the variety of game types you can create, from obstacle courses to puzzles.
You can also browse Scratch projects for inspiration. Scratch, a block-based programming platform, features many games with simple mechanics that translate well to mobile. Look for projects that use actions like jumping, collecting items, or avoiding obstacles. These mechanics can spark ideas for your own game.
As you explore, think about questions like: What happens when you tap the screen? How do these games teach the rules without long instructions? What keeps you coming back to play again? Answering these questions will help you identify the elements that make a game successful.
Define Your Game Concept
After brainstorming and studying existing games, it’s time to clearly define your idea. Writing down your concept helps you stay focused and makes the development process smoother. You don’t need a detailed document – just clear answers to a few key questions.
Start by identifying your audience. Is your game for you and your friends? Or younger kids? Knowing your audience will guide decisions about difficulty, visuals, and overall style.
Next, decide which platform to use for building your game. Beginner-friendly platforms like Scratch, Code.org, Blockly, and MIT App Inventor are great for creating interactive games and animations. These tools use block-based coding, making it easy to drag and drop commands instead of typing complex code. If you’re interested in 3D games, Roblox Studio is another option to consider.
Finally, outline how your game will work. Describe the core mechanic in a sentence or two, like: “Players tap falling objects before they hit the ground”, or “Players swipe to match three colors in a row.” Include what happens when players succeed and what happens when they fail. This simple outline becomes your blueprint for the project.
Stick to the essentials for now. You can always add more features later, but starting with a clear, achievable goal makes it much easier to complete your first game. With your concept defined, you’re ready to start planning gameplay and characters.
Step 2: Plan Your Gameplay and Characters
After nailing down your game concept, the next step is to map out how everything in your game will work together. This phase is all about creating a detailed plan for how players interact with your game, what they’ll experience on-screen, and what keeps them coming back for more. By planning your gameplay structure and characters upfront, you’ll save time and avoid headaches later when it’s time to start coding.
Think of this step as building a roadmap. You’re deciding what happens when a player taps the screen, how they progress, and what makes the game engaging. The more detailed your plan now, the smoother the development process will be. Here’s how to lay the groundwork for turning your ideas into a playable game.
Create a Game Loop
The game loop is the heartbeat of your game – the cycle of actions and reactions that keeps the gameplay flowing. It’s the foundation of player interaction, and understanding it is essential for crafting a smooth, enjoyable experience, especially for mobile game design devices.
To start, identify the core actions of your game. What does the player do? What happens as a result? When does the round or level end? For example:
- In a tapping game: Players tap on falling objects, their score increases, objects fall faster, and the game ends when too many are missed.
- In a matching game: Players swipe to match colors, matches disappear, new ones appear, and the round ends when the timer runs out.
Aim to define three to five repeating actions. This ensures your game has enough variety to stay engaging but isn’t so complex that it becomes hard to build or confusing to play.
For mobile games, simplicity is key. Each round should take less than a minute so players can enjoy it during quick breaks. Also, think about how difficulty ramps up. For instance, objects might fall faster with each round, or new obstacles could appear. The goal is to make progression feel natural, not overwhelming.
Once your game loop is clear, you can shift focus to designing characters and rewards to enhance the player’s experience.
Design Characters and Rewards
Now it’s time to bring your game’s core elements to life. Start by sketching basic designs for your characters, obstacles, and rewards. These don’t need to be elaborate – simple shapes work just fine at this stage.
Begin with your main character or the primary element players control. If it’s a moving character, sketch it in different poses or from various angles. If it’s an object, like a paddle or basket, show how it looks both stationary and in motion. Keep the design simple and recognizable for small screens.
Next, design obstacles or enemies. Make sure they stand out from the main character by using contrasting colors or distinct shapes. On mobile game design devices, where the screen is small, clarity is more important than intricate details.
Don’t forget to sketch rewards, like coins, stars, or power-ups. These should be visually distinct and easy to spot during fast-paced gameplay. As you design, keep mobile game design screen sizes in mind. Interactive elements should be large enough to tap easily – roughly the size of a fingertip, about half an inch (1.3 cm) across – but not so big that they clutter the screen.
Label your sketches with notes about their behavior. For instance, jot down how high a character can jump or how fast an obstacle moves. These details will be invaluable when you start building your game.
Make a Game Design Sheet
A game design sheet pulls all your planning together into one organized document. Think of it as a one-page cheat sheet that lists the key details of your game. It keeps you focused and ensures you won’t forget important decisions as you move forward.
Start by writing the name of your game and a one-sentence summary at the top. Then, break the document into sections:
- Controls: List how players interact with the game. Be specific, like “Tap anywhere to make the character jump” or “Swipe left or right to move the basket.”
- Game Loop: Outline the cycle you defined earlier. Include what starts a round, what players do during gameplay, and what ends it. Add notes on scoring – how points are earned and what the goal is.
- Characters and Objects: Write a list of everything that appears in the game, from the main character to obstacles and rewards. Add brief notes about each item’s behavior.
- Levels or Progression: Explain how the game gets harder. For instance, the first level might have slow-moving obstacles, the second level could add more, and the third level might make them faster. Even if you’re starting with just one level, planning for progression can help with replayability.
- Feedback: Document the visual and sound effects for player actions. What happens when they score? What sound plays when they lose? Clear feedback is essential for mobile game design, where rounds are quick, and players need instant responses.
- Win and Lose Conditions: Define what winning looks like – whether it’s reaching a certain score, surviving for a set time, or completing all levels. Also, clarify what causes a loss, like running out of time or hitting an obstacle.
Accessible Design Sheet
Keep your design sheet accessible – whether it’s a physical copy or a digital file. This document will be your go-to reference when you start coding in the next steps.
While it might seem like this planning phase slows you down, it actually speeds up development. With a clear plan, you won’t waste time second-guessing decisions or figuring things out on the fly. Instead, you can focus all your energy on bringing your vision to life.
Step 3: Design for Touch Screens
Mobile games rely on simple touch controls like tapping, swiping, or pinching. The key to a great gaming experience lies in making these interactions feel intuitive and responsive, allowing players to dive into the fun without struggling to figure out how things work.
Make Controls Easy to Use
Touch controls should be straightforward and easy to grasp. Place essential controls, like jumping, attacking, or moving, where they’re comfortably within reach of the player’s thumb. Stick to familiar gestures such as tapping, swiping, and dragging, and steer clear of overly complicated multi-finger actions. Adding customizable control options can also cater to different play styles and make the game more accessible to a wider range of players.
Give Clear Feedback
Every action a player takes should be met with immediate feedback. Use animations, color changes, or sound effects to confirm taps and swipes, making the game feel more responsive. Adding haptic feedback, like subtle vibrations for critical actions, can further enhance the connection between the player and the game. Always test these feedback features on actual devices to ensure they work as intended.
Follow Mobile Design Guidelines
A clean, uncluttered interface is crucial for small screens. Organize visuals and controls so players can focus on gameplay without distractions. Use readable fonts and high-contrast colors to ensure text is legible, even on smaller displays. Decide early if your game works best in portrait or landscape mode, and stick with that orientation consistently. Lastly, prioritize quick load times and smooth performance to keep players engaged and the experience seamless. Once touch controls are polished, you’ll be ready to move on to prototyping your game.
Step 4: Build a Basic Prototype
Now that you’ve mapped out your plan in Step 2, it’s time to bring your game ideas to life. A prototype is like a rough draft – it focuses on testing the core mechanics of your game without worrying about polished graphics or final designs. This stage is all about experimentation and figuring out what works.
Choose a Game Development Tool
The right tool depends on your age, experience, and coding goals. If you’re a younger beginner or just dipping your toes into game development, block-based coding platforms like Scratch, Code.org, Thunkable, or MIT App Inventor are fantastic starting points. These platforms use visual blocks that snap together like puzzle pieces, making it easy to grasp how commands interact and form the backbone of your game.
If you’re ready to dive into text-based programming, platforms like CodaKid can help you learn languages like Python, JavaScript, and Java through hands-on, project-based lessons. CodaKid uses professional tools that game developers rely on, giving you a taste of what it’s like to work on real-world projects. Plus, their video tutorials and support team guide you every step of the way.
Starting with real code comes with a big advantage: the skills you learn can be applied to more complex projects down the road. While block-based tools are great for learning the basics, text-based programming opens the door to advanced customization and deeper game mechanics.
Turn Paper Designs into Digital Games
Take your paper sketches and translate them into a digital prototype. Begin by setting up a simple game scene using basic shapes as placeholders – think squares, circles, and rectangles. For example, if your game involves a character jumping over obstacles, use a square for the player and rectangles for the hurdles.
Focus on coding one feature at a time. Start with basic movement, like left and right controls, and then add jumping. Once that’s working, introduce moving obstacles. Test each new feature as you go to make sure everything runs smoothly.
If your game includes a scoring system, keep it simple at first. For example, award one point each time the player avoids an obstacle or collects an item. The goal at this stage is to create a playable loop – a basic version of the game where players can start, interact, and see results, whether that’s earning points, winning, or losing.
Using placeholders like colored rectangles or circles keeps your prototype lightweight and flexible. This way, you can quickly test and tweak gameplay without getting bogged down by visual details.
Once your prototype is functional, it’s time to sharpen your skills and take your game to the next level.
Learn with CodaKid Courses
To refine your prototype and expand your game development skills, CodaKid offers structured courses designed to teach you through real projects. These courses focus on building actual games, so you’re not just memorizing code – you’re applying it from day one. Starting at $29/month, their courses cover everything from game development to AI programming.
If you’re interested in creating mobile games, CodaKid offers lessons tailored for mobile platforms. You’ll learn how to implement touch controls, design user-friendly interfaces for smaller screens, and optimize performance for mobile devices.
The self-paced format makes it easy for kids and teens to learn at their own speed. Video tutorials break down complex concepts into manageable steps, and if you hit a roadblock, their help desk provides guidance without simply handing you the answer. This approach helps you build problem-solving skills alongside coding expertise.
As you complete courses, you’ll earn certificates of completion – a great way to showcase your skills. These certificates can be shared with teachers, added to your portfolio, or kept as milestones to celebrate your progress.
With a working prototype in hand, you’re ready to gather feedback and polish your game into something truly engaging.
Step 5: Test and Improve Your Game
With your prototype up and running, it’s time to make it shine by testing and fine-tuning. This process helps you uncover what’s working, what isn’t, and how to turn your game into an engaging experience.
Test Your Game
Start by playing through your game yourself. Pay attention to moments where you feel frustrated, confused, or bored. Does the character respond the way you expect? Are the controls intuitive and easy to use? Does the game feel too easy or impossibly hard? These are all clues about areas that might need adjustment.
Once you’ve done your own playthrough, hand the game to someone else. Watching others play is incredibly revealing. Whether it’s a friend, sibling, or parent, resist the urge to explain or intervene – just observe. You’ll quickly notice if they hesitate, tap the wrong spot, or lose interest.
Take note of where people struggle, like tapping frantically because the jump button only works on the ground or losing interest because there’s no clear sense of progress. Even small details matter, such as “confused by the score not updating” or “tried to swipe instead of tap.”
After they’re done, ask testers a few simple questions: What did you enjoy? Was anything confusing? Did anything annoy you? Would you play it again? These honest answers often reveal blind spots you might miss because you’re so familiar with your own game.
Use what you learn to make immediate adjustments.
Balance Difficulty and Fun
A great game strikes the right balance between being challenging and enjoyable. If testers breeze through without effort, it’s time to up the challenge. If they’re failing repeatedly in the first 30 seconds, it’s too hard.
Tweak one element at a time to see how it changes the experience. For example, if the game feels too easy, try increasing the speed of obstacles or making collectibles smaller. If it’s too hard, slow down enemy movements or enlarge safe zones to give players more breathing room.
Think about adding difficulty progression so the game starts off easy and gradually ramps up. For instance, in an endless runner, obstacles could appear every five seconds initially, then every three seconds after 50 points, and every two seconds after 100 points. This keeps new players from feeling overwhelmed while still challenging experienced ones.
Rewards are another critical factor. Players need to feel like they’re making progress to stay engaged. Small wins, like unlocking a new character skin after 100 points or displaying a “Great Job!” message for beating a high score, can go a long way. Introducing new elements, like obstacles or power-ups, also keeps things fresh and exciting.
Once you’ve made changes, test them with the same group if possible. They’ll be able to tell you if the adjustments improved the experience or if more work is needed.
Organize Your Feedback
To keep track of all the input you’re getting, use a simple system to organize feedback. A table is a great way to break things down into manageable categories.
| Strengths | Improvements | Priority |
|---|---|---|
| Touch controls feel smooth | Score doesn’t update consistently | High |
| Character design is appealing | Game gets boring after 2 minutes | High |
| Sound effects are enjoyable | Jump button placement is awkward | Medium |
| Loading time is quick | Instructions aren’t clear | Medium |
| Colors look appealing | No pause button | Low |
The Priority column helps you focus on what matters most. High-priority issues are critical – things that make the game less fun or cause it to malfunction. Medium-priority problems affect the overall experience but don’t completely disrupt gameplay. Low-priority items are nice-to-have features you can tackle later.
Group similar feedback together. If multiple testers mention that the jump button is hard to reach, it’s a clear sign you need to fix it. On the other hand, if only one person suggests changing the background color, it’s probably not urgent.
Update your table after every testing round. As you address issues and add improvements, move items from the “Improvements” column to “Strengths.” This not only tracks your progress but also keeps you motivated by showing how far your game has come.
Don’t overwhelm yourself by trying to fix everything at once. Focus on two or three high-priority items at a time. Test, refine, and repeat. Each round of feedback gets you closer to a game that’s polished, balanced, and – most importantly – fun to play.
Conclusion
You’ve successfully completed five key steps: choosing a straightforward idea, planning gameplay and characters, designing for touch, prototyping, and testing.
Celebrate Your Achievement
Take a moment to appreciate what you’ve accomplished. You started with an idea and transformed it into a playable game – something you can now share with friends and family.
Along the way, you learned how to make a character jump, detect collisions, and build scoring systems. You probably also realized that game design goes beyond coding – it’s about planning, testing, and gathering feedback. These skills will be invaluable as you move forward with future projects.
Small wins, like finishing your first game, build the confidence needed to take on bigger, more intricate challenges. Every successful game developer started with a project just like yours.
This is just the first step in your game design journey.
What’s Next?
Becoming skilled in mobile game design means continually building, testing, and refining. You could improve your current game with new levels or dive into a fresh project to explore new genres or multiplayer features.
If you’re eager to expand your coding knowledge, platforms like CodaKid offer courses to help you advance. You can dive deeper into programming concepts, explore various game engines, and even work with professional tools used by developers. Their self-paced courses cover everything from Roblox game creation to Minecraft modding, as well as programming languages like Python and JavaScript – languages that power many mobile games.
Keep creating. Each game you build will be better than the last because you’ll learn something new every time. Your first mobile game is just the start of an exciting journey in game design.
FAQs
What are some easy-to-use tools for creating a mobile game prototype?
If you’re new to mobile game design, there are plenty of beginner-friendly tools to help you turn your ideas into playable games. Platforms like Scratch, GameSalad, and Construct 3 are excellent starting points. They rely on visual programming, which means you can design and test your games without diving into coding right away. These tools are user-friendly and make it easy to experiment with game mechanics and layouts.
When you’re ready to take things further and learn coding, platforms like CodaKid provide step-by-step courses. They teach programming languages like Python and JavaScript, enabling you to create more advanced and intricate mobile games. It’s a fantastic way to sharpen your skills and bring your game ideas to life!
What’s the best way to gather and use feedback to make my mobile game better?
To make your mobile game design better, begin by collecting feedback through user testing, surveys, and reviews. Ask players about their experiences – what they loved, what frustrated them, and what they’d like to see improved.
Once you’ve gathered this feedback, look for common themes or repeated concerns. Focus on addressing changes that will have the most noticeable effect on gameplay. Listening to real players and making updates based on their input is a powerful way to enhance your game and keep it engaging!
How can I design user-friendly touch controls for mobile games?
Creating easy-to-use touch controls is key to making mobile game design enjoyable. Start by keeping the layout straightforward and responsive – don’t clutter the screen with too many buttons or gestures. Experiment with different setups to find what feels most natural, and make sure the controls work well on both small and large screens.
Stick to familiar gestures like taps, swipes, and pinches, as most players already know how to use them. Add clear visual feedback, like highlighting buttons when pressed, so players can see their actions are working. Lastly, conduct thorough playtesting with a variety of age groups to ensure the controls are simple, engaging, and fun for everyone.