
Web development is a valuable skill for homeschoolers, offering hands-on learning, problem-solving, and creativity. It’s perfect for kids of all ages – from beginners exploring basic HTML to teens building full websites with JavaScript. Plus, the job market for web developers is strong, with average salaries around $85,000 in the U.S. and growing demand in STEM fields. Here’s what makes free web development a great fit for homeschoolers:
- Interactive learning: Immediate feedback keeps kids engaged.
- Critical thinking: Debugging teaches resilience and logical reasoning.
- Accessible tools: Free platforms like freeCodeCamp, Code.org, and Khan Academy make learning easy.
- Age-specific pathways: Block-based coding for younger kids, text-based coding for older learners.
- Future-ready skills: Prepares students for digital literacy and high-demand jobs.
Whether your child is 6 or 18, web development offers a step-by-step journey – from simple projects like personal webpages to advanced skills like responsive design and JavaScript interactivity. With free resources and structured courses, parents don’t need technical expertise to guide their kids.
This guide covers everything from starting with HTML basics to finding the best free tools and progressing to intermediate skills. Let’s dive in!
Table of Contents
Best Coding Curriculum for Kids & Teens (2026 Roadmap): Roblox, Minecraft, Python, AI
The Three Core Technologies: HTML, CSS, and JavaScript (Free Web Development for Homeschoolers)
Every website you visit – whether a personal blog or a massive social media platform – relies on three key technologies working in harmony. Think of it like building a house: HTML provides the framework, CSS decorates it, and JavaScript brings it to life with functionality.
Grasping how these three technologies interact is a crucial first step for homeschoolers exploring web development. This knowledge allows them to build websites that are not only functional but also visually engaging and interactive. As WebDevHub.dev puts it:
“HTML = the skeleton, CSS = the outfit, JavaScript = the brain that responds and acts”.
Each technology plays a specific role, and they are designed to work together seamlessly. For instance, CSS is typically linked in the <head> of an HTML file, while JavaScript is often placed near the end of the document to ensure the structure loads first. Let’s break down each one, starting with HTML.
What is HTML?
HTML, or HyperText Markup Language, is the foundation of every web page. It uses tags to define the structure and meaning of content – like headings, paragraphs, images, or links. For example, wrapping text in <h1> tags creates a main heading, while <p> tags define a paragraph. A typical HTML element includes an opening tag, the content itself, and a closing tag.
Beginners should start by mastering basic tags like <h1> and <p>. As they advance, they can explore semantic tags like <header>, <main>, and <nav>, which provide more meaning than generic <div> tags. As NourKitab explains:
“Semantic HTML is not just about neatness, it’s about accessibility and searchability”.
These tags make websites easier for screen readers to interpret, benefiting visually impaired users, and also help search engines better understand the content.
Every HTML project begins with a standard structure: <!DOCTYPE html> to declare the document type, followed by <html>, <head> for metadata, and <body> for visible content. The main file is usually named index.html since browsers look for this by default.
What is CSS?
CSS, or Cascading Style Sheets, is what transforms a plain website into something visually appealing. Without CSS, every webpage would look like black text on a white background. CSS handles colors, fonts, spacing, and layouts. For example, tools like Flexbox are great for aligning items in one direction (like navigation bars), while CSS Grid is ideal for two-dimensional layouts.
One core concept in CSS is the “Box Model”, which defines how elements are spaced and styled. It controls margins (space outside borders), padding (space inside borders), and the borders themselves. Beyond basic styling, CSS allows for creative touches like transitions and animations. For instance, a button can change color or “lift” slightly when hovered over with a mouse.
For homeschool projects, it’s a good idea to start with styles for smaller screens and then use media queries to adapt for larger devices. Once the design is in place, JavaScript takes over to make the page interactive.
What is JavaScript?
JavaScript is where websites become dynamic and interactive. While HTML and CSS create static pages, JavaScript adds life by enabling animations, form validation, and real-time updates. Anytime you click a button, fill out a form, or see content change without refreshing the page, JavaScript is working behind the scenes.
JavaScript interacts with the Document Object Model (DOM), which is like a tree structure representing the page. It can read and update HTML and CSS dynamically. For instance, a simple script might display an alert when a button is clicked or validate a form before submission. As students grow more confident, they can create interactive quizzes, real-time games, or even apps that update data dynamically.
To keep projects organized and scalable, it’s best to store HTML, CSS, and JavaScript in separate files. This separation makes it easier to manage each part of the code as projects grow in complexity.
Learning Pathways by Age Group (Free Web Development for Homeschoolers)
Age-Appropriate Web Development Learning Pathways for Homeschoolers
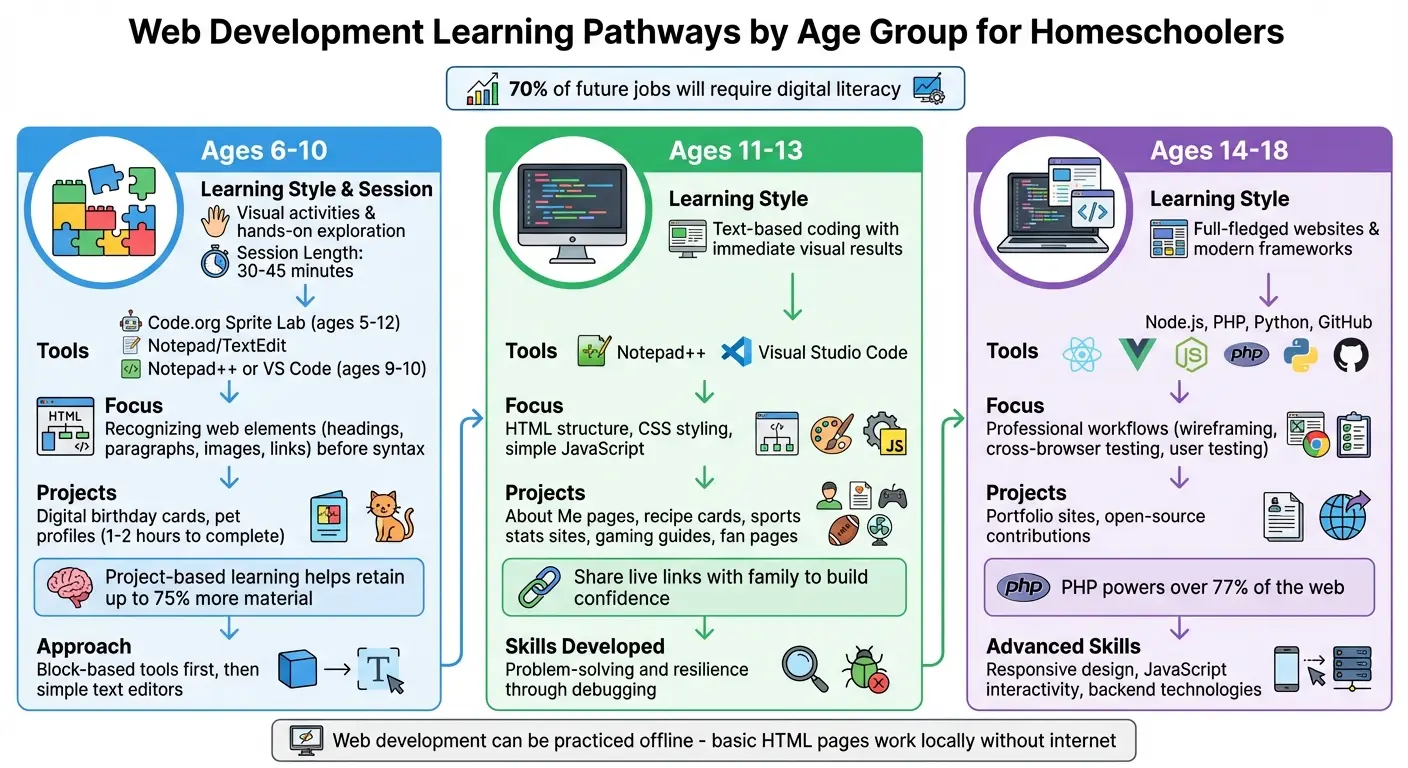
Introducing web development early is essential, as 70% of future jobs will require digital literacy. These pathways are designed to provide free, tailored resources for homeschool education. Web development is especially suited for younger learners because it can be practiced offline – basic HTML pages can be written and tested locally without needing internet access or external databases. These age-specific approaches offer structured guidance, helping learners progress step-by-step toward mastering web development.
For Ages 6-10
Young children learn best through visual activities and hands-on exploration. For ages 6-8, focus on recognizing web page elements like headings, paragraphs, images, and links, rather than diving into syntax. Start with block-based tools, such as Code.org’s Sprite Lab (ideal for ages 5-12), before moving to simple text editors like Notepad (Windows) or TextEdit (Mac).
Keep coding sessions short – 30 to 45 minutes – to maintain their attention. Engage their interests by creating projects around their favorite topics, like a website about a pet, a hobby, or a game. Simple projects, such as digital birthday cards or pet profiles, can be completed in 1-2 hours and are highly effective. Research shows project-based learning helps students retain up to 75% more material compared to traditional methods.
Parents don’t need technical expertise to guide their kids. Focus on playful learning and celebrate small achievements, like changing a font color or adding an image. For ages 9-10, introduce basic HTML structure and CSS selectors using tools like Notepad++ or Visual Studio Code.
For Ages 11-13
At this stage, learners are ready for text-based coding with immediate visual results. Seeing their code come to life in a browser boosts engagement. Encourage them to work on projects tied to their interests, such as sports stats, gaming guides, or fan pages for their favorite shows or hobbies like Pokémon.
Projects like “About Me” pages or recipe cards are perfect for teaching HTML structure, CSS styling, and file linking. Gradually introduce simple JavaScript for interactive features, like buttons that change colors or display messages. Emphasize that mistakes are part of the process, helping them develop problem-solving skills and resilience.
Once they complete a project, have them share live links with family to build their confidence and showcase their progress.
For Ages 14-18
High schoolers can transition from basic layouts to creating full-fledged websites and using modern frameworks. With a solid foundation in HTML, CSS, and JavaScript, they can explore advanced tools like React, Vue.js, and backend technologies such as Node.js, PHP, or Python. PHP, for instance, powers over 77% of the web.
Introduce professional workflows, such as wireframing, cross-browser testing, and user testing, to mimic real-world development cycles. Encourage them to contribute to open-source projects on GitHub, where they can improve documentation or fix bugs, gaining experience with large-scale codebases. As web development expert Itamar Haim explains:
“A visual builder like Elementor gets you 95% of the way there. Learning CSS and JavaScript is the key to mastering that last 5% and delivering truly unique, custom client work”.
For structured learning, platforms like CodaKid offer self-paced courses in JavaScript, Python, and web development. These courses use professional tools and emphasize project-based learning, allowing teens to create portfolio-worthy work with help desk support.
Tip: Start with local projects to ensure a safe learning environment. Once they’re comfortable, use platforms like Replit or Glitch with parental controls or anonymous usernames to maintain privacy.
Free Web Development Learning Resources for Homeschoolers
Finding the right platform can make a world of difference in your homeschooler’s web development journey. These platforms cater to various learning styles and skill levels, offering everything from guided tutorials to hands-on projects and community support.
Interactive Tutorial Platforms
For students who thrive on structured lessons and instant feedback, interactive platforms are a great starting point. Code.org is a standout option for K–12 learners, boasting over 1.94 billion Hours of Code and more than 107 million student accounts. Their Web Lab (ages 12–18) introduces HTML and CSS through a browser-based editor, while App Lab (ages 13–18) combines block-based and text-based JavaScript coding for creating interactive apps. As high school teacher Laura Fuhrmann noted:
“This curriculum ignited a passion for programming in my students, and now I’m looking at a group of students that have been inspired to be the next generation of coders”.
Another excellent resource is MDN (Mozilla Developer Network), which offers a “Learning Web Development” pathway. The integrated MDN Playground lets learners test code directly in the browser. Updated throughout 2024, the MDN Curriculum provides a clear path from beginner concepts to industry-relevant skills. For younger students or those just starting out, W3Schools offers “Try it Yourself” examples, allowing users to practice HTML, CSS, and JavaScript in real time.
Hands-On Project Resources
Turning knowledge into practical skills is essential, and project-based platforms make that possible. HTML Free Codes is a great choice, offering a code editor and over 40 step-by-step lessons designed to help students build their portfolios. Since 2008, more than 50,000 students have used this platform, with a 96% success rate among those who complete its tutorials. Jennifer L., a high school computer science teacher, shared her experience:
“I’m a teacher using this site to teach my high school students web development. The structured curriculum and interactive examples make learning HTML fun and engaging”.
Code.org also emphasizes projects, offering ready-to-build examples like a “Maria Bonita Catering” business website or interactive “Choose Your Adventure” stories in App Lab. For more advanced learners, MDN’s “Test Your Skills” challenges focus on specific tasks, such as styling a CSS box model or writing JavaScript functions.
Community Learning Platforms
For students who benefit from collaboration and support, community-driven platforms are invaluable. freeCodeCamp provides a globally accessible curriculum available in 190 countries. Over 100,000 graduates have landed jobs at major companies like Amazon and Spotify. The platform offers local study groups, forums, and project feedback. Software Engineer Shawn Wang from Amazon credited freeCodeCamp with building his confidence:
“I only gained confidence that I could code by working through the hundreds of hours of free lessons on freeCodeCamp”.
These platforms create opportunities for learners to connect, share their work, and tackle challenges together. As Emma Bostian, a Software Engineer at Spotify, explained:
“Studying JavaScript as well as data structures and algorithms on freeCodeCamp gave me the skills and confidence I needed to land my dream job”.
| Platform | Target Age | Primary Focus | Key Feature |
|---|---|---|---|
| Code.org Web Lab | 12–18 | HTML, CSS | Browser-based editor, no installation |
| Code.org App Lab | 13–18 | JavaScript | Block or text-based apps |
| MDN Learning | 14+ | HTML, CSS, JS | Professional-grade curriculum |
| HTML Free Codes | 12+ | HTML | Live playground, 96% success rate |
| freeCodeCamp | All Ages | Full Stack | Global community, 100,000+ graduates |
With these resources, homeschoolers can easily progress from learning the basics to building real-world web development projects, supported by vibrant communities and expert-designed tools.
Getting Started: Setup and First Projects (Free Web Development for Homeschoolers)
Setting Up Your Coding Environment
Getting your homeschooler started with web development is easier than you might think, thanks to a variety of free tools. Visual Studio Code is a fantastic, free text editor that works on all major platforms. It even has a handy Live Preview extension, so your child can see their code changes instantly. Modern browsers like Google Chrome, Mozilla Firefox, and Apple Safari also come equipped with built-in Developer Tools, perfect for testing and debugging code.
For younger kids (ages 6–10), you can skip the hassle of installing software altogether. Instead, try browser-based platforms like Code.org Web Lab or the W3Schools TryIt Editor. These tools are simple, require no installation, and work seamlessly on affordable Chromebooks (starting at about $150). For older students (ages 13–18), using software like Visual Studio Code offers a more professional experience and allows them to work offline. If your child wants to edit images for their projects, tools like the built-in Windows Photos app or macOS Preview are great for basic tasks like cropping and resizing.
Once the tools are ready to go, the next step is diving into a project that excites your child.
Choosing Your First Project
With the setup complete, it’s time to bring coding to life with a fun project. The best first project is one that connects to something your child loves. Whether it’s a “Pet Profile” page, a “Favorite Game Fan Site”, or a “Digital Hobby Poster”, picking a topic they’re passionate about makes coding more engaging.
The complexity of the project should match their age and skill level. For kids aged 6–10, creating a simple personal webpage is a great way to introduce basic HTML and CSS. For those aged 11–13, something like a digital recipe book or a restaurant menu can help them practice organizing content with lists and tables. Older students (ages 14–18) can take on more advanced projects, like interactive quizzes or portfolio sites that use JavaScript and responsive design. Even small projects – like a single webpage with a few paragraphs, an image, and some color – are worth celebrating as milestones.
How Parents Can Support Learning
You don’t need to know how to code to support your child’s learning journey. Your role is to provide structure, encourage progress, and help them see mistakes as opportunities to learn rather than failures. Start by creating a distraction-free workspace and setting a routine: younger kids can do 20–30 minute sessions, while older students can handle 45–60 minutes, 2–3 times a week. If your household is busy, noise-canceling headphones can make a big difference.
One effective way to reinforce learning is the “Teach-Back” method – ask your child to explain what they’ve learned. This helps them retain knowledge and builds confidence. Work together to set SMART goals (Specific, Measurable, Achievable, Relevant, Time-bound), such as “Complete three HTML lessons this week” or “Add two new pages to my website by Friday.” Tracking progress with a learning journal or digital portfolio can also help them stay motivated.
If your child wants to publish their projects online, make sure they do so safely. Supervise their activity, ensure they use anonymous usernames, and avoid sharing personal details like real names or addresses.
Moving from Beginner to Intermediate Skills (Free Web Development for Homeschoolers)
Building on HTML and CSS with JavaScript
Once your homeschooler is comfortable creating static webpages with HTML and CSS, the next step is adding interactivity with JavaScript. This programming language brings websites to life – think buttons that react when clicked, forms that validate user input, or animations triggered by scrolling.
Start small with projects that introduce one interactive feature at a time. For example, you can create a button that counts clicks, a simple calculator, or a background that changes color with user interaction. These projects teach key concepts like variables, functions, and event listeners. For students aged 12–15, slightly more involved projects like quiz games, to-do lists, or infinite runners can provide a fun challenge while remaining achievable.
Learning Intermediate Topics
As students gain confidence, they can move on to mastering more advanced skills, like responsive design and collaborative coding. Responsive design, using tools like CSS Flexbox and Grid, ensures websites look great on any device – a must-have skill in today’s mobile-first world.
Another important step is learning version control with Git. This tool allows students to save versions of their code, experiment without fear of losing work, and collaborate with others. For older students (15 and up), exploring APIs can unlock real-world projects, such as creating a weather app that fetches live data. These skills set the stage for tackling more complex projects and align with the goal of equipping homeschoolers with practical web development tools.
The Value of Structured Courses
As students progress, following a structured curriculum becomes increasingly important. While free resources are great for getting started, a guided learning path can speed up development by providing a clear sequence of topics. This approach reduces the overwhelm of choosing what to learn next and ensures each lesson builds on the last.
Platforms like CodaKid (https://codakid.com) offer self-paced courses starting at $29/month, covering real programming languages like JavaScript and Python. These courses include project-based lessons, video tutorials, live help desk support, and certificates of completion. For students who thrive with personalized attention, CodaKid also provides private 1:1 lessons for $249/month, which include weekly sessions and a tailored curriculum. This structured approach helps students transition from beginner to intermediate levels with confidence and clarity.
Conclusion (Free Web Development for Homeschoolers)
Teaching web development to your homeschooler equips them with skills that align with the demands of a rapidly evolving digital world. According to the World Economic Forum, by 2025, 97 million new jobs will emerge due to shifts in the division of labor between humans and machines, with over 60% of these roles tied to computer-related fields within STEM disciplines. Starting early gives your child a head start in developing these sought-after problem-solving abilities.
One of the standout aspects of web development education is the immediate feedback it provides. Seeing instant visual results keeps learners engaged and reinforces their progress. Studies indicate that students retain up to 75% more information when learning through hands-on projects compared to traditional teaching methods. This approach shifts your child from being a passive user of technology to an active creator who understands how the web functions. Whether they’re mastering HTML basics or exploring advanced interactive features, this learning journey prepares them to innovate in the digital space.
The best part? There’s an abundance of free resources available to make web development accessible to homeschooling families. Platforms like freeCodeCamp, Khan Academy, and W3Schools offer detailed learning paths at no cost, allowing students to learn at their own pace. For those ready to move beyond the basics, structured programs like CodaKid provide step-by-step guidance and support, helping students confidently transition from beginner to more advanced skills.
FAQs (Free Web Development for Homeschoolers)
How do I choose the best free web development starting point for my homeschooler child’s age?
The best starting point for coding depends on your child’s age, abilities, and interests:
- Elementary (K-5): Introduce coding with visual programming tools like Scratch. These platforms make learning fun and interactive while covering basic concepts.
- Middle School (6-8): Dive into foundational web languages such as HTML, CSS, and JavaScript. These are great for building simple websites and understanding how the web works.
- High School (9-12): Take on more advanced topics like working with APIs, creating responsive designs, and using professional-grade tools.
Adjust the curriculum to match your child’s pace and make the experience both manageable and enjoyable.
Can my child learn web development safely without sharing personal info online?
Yes, your child can learn web development safely without sharing personal information online. Tools like Visual Studio Code and GitHub Pages allow them to practice and showcase projects without exposing personal data publicly. Additionally, many free learning resources are designed with young learners in mind, offering built-in privacy measures.
To keep things secure, supervise their online activities, encourage the use of age-appropriate platforms, and remind them not to share personal details on public sites or while working on projects.
When should we move from HTML/CSS to JavaScript and Git?
Once your homeschool student has a good handle on HTML (for structure) and CSS (for design), it’s time to move on to JavaScript and Git. This shift usually makes sense when they feel confident creating static web pages.
Start with JavaScript to introduce interactivity. Focus on foundational concepts like variables, functions, and events. Once they’ve mastered these basics, introduce Git. Version control becomes crucial as projects get more complex, helping them manage changes and collaborate effectively.