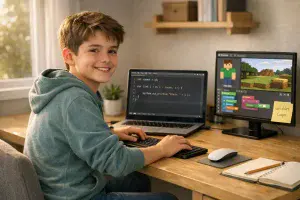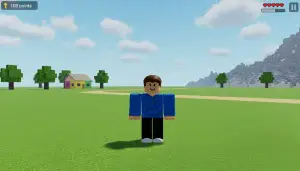
What started as a seemingly simple sandbox survival video game in 2009 has since blown up to become one of the most popular and influential platforms of all time. Despite it being more than 10 years, Minecraft continues to draw in new and curious players while simultaneously keeping the loyalty of older gamers.
Aside from new updates, open worlds, and seemingly endless in-game options, Minecraft manages to stay fun, interesting, and relevant thanks to the hundreds of thousands of community-created mods being released every month.
If you’re a Minecraft player interested in exploring the wild (and sometimes whacky) world of Minecraft mods, you might want to start by installing Minecraft Forge for your game. This step-by-step tutorial will teach you how to do it.
(And if you want to learn Minecraft Modding with Java or how to make a Minecraft mod)
Table of Contents
What is Minecraft Forge?
Minecraft Forge is a free, open-source server that allows players to install and run Minecraft mods. It was designed with the intent to simplify compatibility between community-created game mods for Minecraft: Java Edition.
This platform essentially makes it possible for all Minecraft players to download, install, and run mods without needing extensive tech and/or programming knowledge.
What are Minecraft Mods?
The word “mod” or “mods” stands for modifications. In Minecraft, these are changes or alterations made to the original game, usually with the intent to improve or add on to existing elements.
Some mods focus on Minecraft game design. They’re created and installed for purely aesthetic reasons (i.e., better colors, better textures, etc.) Other mods add new and functional elements to the game itself, like new characters or collectible items. There are even extremely ambitious mods out there capable of adding completely new worlds.
If you want a little more information on Minecraft mods, here’s a handy updated guide for you/your parents. Or ask us about our Minecraft modding classes if you want a full hands-on experience taught by a professional.
Give your child the gift of CodaKid!
Can You Install Minecraft Mods on Bedrock Edition?
Before you continue, it’s important to know which version of Minecraft you’re using. This guide is for Minecraft: Java Edition, because Minecraft Forge is a modloader designed for Java Edition.
Traditional Java Edition mods that use Forge cannot be installed on Minecraft: Bedrock Edition using the same process described in this guide.\
Java Edition vs. Bedrock Edition
If you’re playing Minecraft: Java Edition, you can use Forge to install compatible mods.
For Minecraft: Bedrock Edition, you’ll need to use Bedrock’s own customization options, such as add-ons, rather than Minecraft Forge.
| Minecraft Edition | Can You Use Minecraft Forge Mods? |
|---|---|
| Java Edition | Yes |
| Bedrock Edition | No |
If you’re not sure which edition you have, check the Minecraft Launcher before continuing. Once you’ve confirmed that you’re using Java Edition, you can follow the Forge installation steps below.
Preparing for Installation
Before you install Minecraft Forge, there are a few things you need to do on your Minecraft Launcher. The screenshots below will be from a Native launcher. If you’re using a .jar launcher, the steps are essentially the same—only the UI and interaction are different.
Step 1. Check your Play button. You’ll need to have a drop-up menu button or arrow to the right of it, like so:
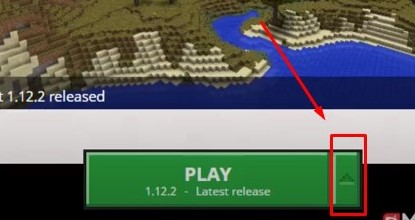
This arrow allows you to launch different releases. You’ll need to have a different release to launch in order to fully import Minecraft Forge.
Step 1a. To enable this, go to Step 2.
Step 1b. If you already have this feature enabled, feel free to skip this part and jump straight to the Installation section. But if you want to double-check your versions (or add a new one), keep going.
Advanced Settings
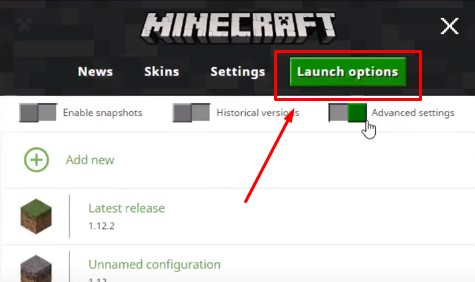
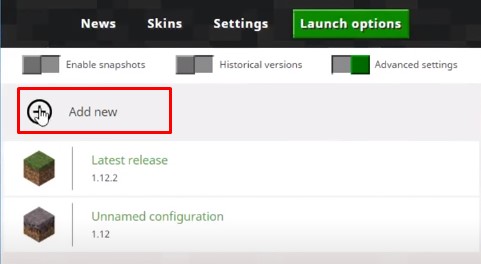
Step 2. Go to Launch Options on your launcher and turn on your Advanced Settings.
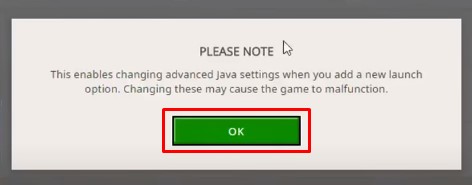
If you get a pop-up box, just click OK.
Step 3. Click on the Add New option.
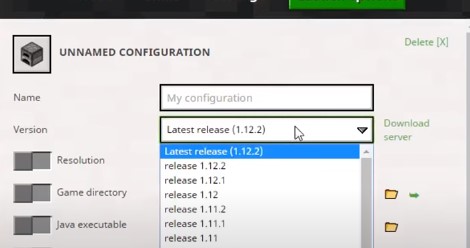
Select the Minecraft version you’re looking for from the drop-down menu. You can change the icon to something different so you can quickly tell it apart. You have the option to change the Resolution values, if you wish, to suit your screen.
Step 4. Go to the JVM Arguments. Look for the “1G” in the first combination of letters in the sentence.
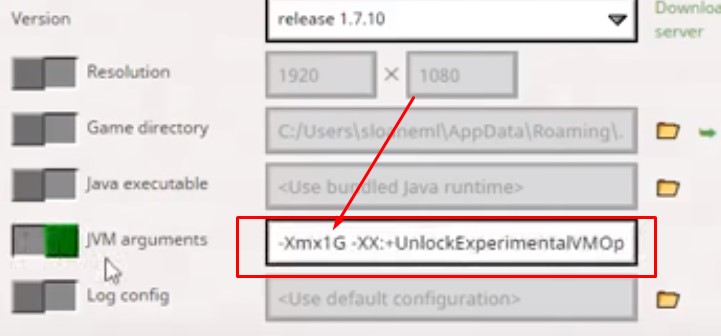
This represents 1GB of your RAM, which basically means that the game is automatically allocated 1GB of your total RAM.
It’s highly recommended that you allocate half of your current RAM to the game. So, say you have 16GB of RAM. You would change the “1G” to “8G.” This is because you may need more than 1GB when playing Minecraft with mods.
Step 5. Go back to the News screen. Your Play button should now have an up arrow or drop-up menu arrow next to it.
Installing Minecraft Forge
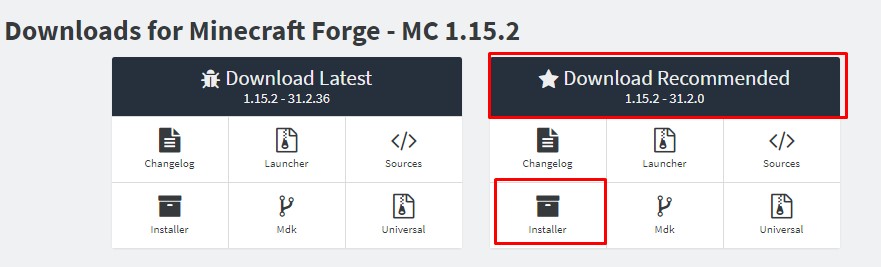
Step 1. Go to https://files.minecraftforge.net/ and download the Installer version compatible with your system and setup. If you’re using Windows, feel free to download the Windows Installer. For Mac/Linux, download the regular Installer.
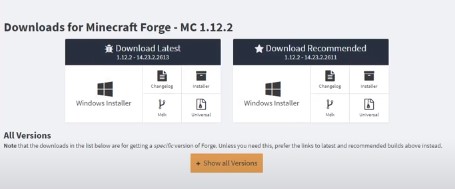
Choose between the Latest Tab and the Recommended Tab. For beginners, we highly recommend (no pun intended) the Recommended Tab. The Latest Tab typically contains a new beta version that may not have been thoroughly tested.
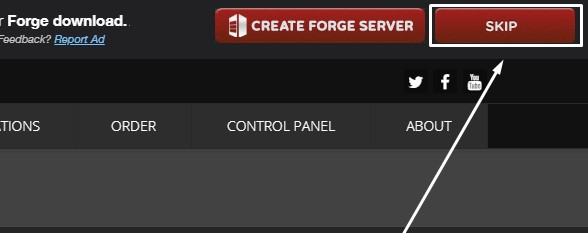
Step 2. Wait for the countdown to run all the way through, and then hit the Skip button. That will prompt the download to start automatically.
Step 3. Run the installer program and select “Install Client.” The files will automatically be installed to the default install directory (.minecraft folder).
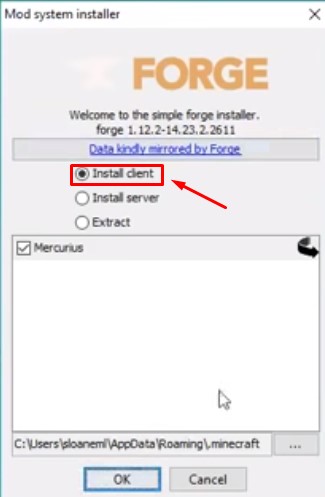
Optional: You can change the install directory for the Minecraft Forge files by clicking the “…” button next to the box with the directory address. If you want easy access to the files, we recommend creating a temporary folder on your Desktop and setting that as the install directory.
IMPORTANT!
If you have other versions of Forge installed, make sure you have NO existing mods in the mods folder. Otherwise, Forge won’t load.
3a. You’ll notice that there’s a line that says “Mercurius” with a box next to it (below the “Extract” option). This box is checked by default. Mercurius is simply an analytics tracking mod. Quite useful if you care about stats, but not at all necessary. You can always uncheck the box.
Step 4. Hit OK. All libraries and Forge files will immediately begin downloading into the specified folder.
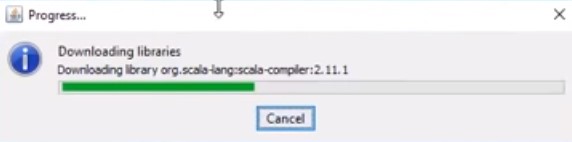
Wait until all files have been downloaded before moving on to Step 5. This should only take a minute or two.

Step 5. Exit your Minecraft Launcher, and then start it again. Go back to Launch Options and click on Add New.
Step 6. Click on the Version drop-down menu and scroll all the way to the bottom.
You should see something along the lines of “release 1.12.2” (or whatever version you downloaded and are using) and the name forge after it. Select it.

Again, change the Resolution values as you see fit and the RAM allocation (refer to Preparing for Installation section). Hit the Save button.
Step 7. Go back to the News screen and click the up arrow next to the Play button. You should see the option to play the version with “forge” in the name.
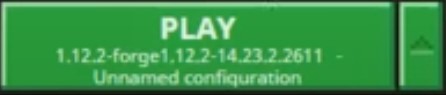
Choose that option and hit Play.
Step 8. When the Minecraft landing screen opens, check the lower-left corner. You should see the line “Powered by Forge” and then whatever version you chose.
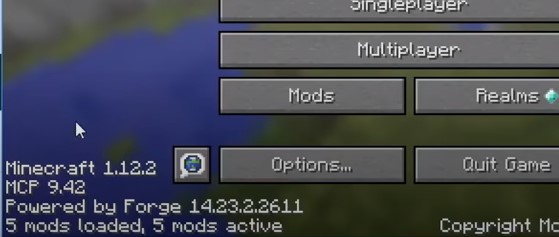
You will also have an option for Mods. This will tell you Minecraft Forge has been successfully installed.
How to Install Minecraft Mods With Forge
Well done! Now that Minecraft Forge is installed, you’re ready to add compatible mods to your game.
Installing Minecraft Forge allows Minecraft Java Edition to load compatible mods, but Forge itself does not automatically install mods. You will need to download each mod separately and place it in your Minecraft mods folder.
Before you begin, make sure the mod you choose is compatible with your Minecraft version and Forge. Once you’ve found a compatible mod, follow these steps.
Step 1. Choose a Compatible Minecraft Mod
Find a Minecraft mod you want to install and check its download page for the Minecraft version and modloader it supports. Because this guide uses Forge, make sure the mod is compatible with Forge and your version of Minecraft.
For example, if you’re playing Minecraft 1.20.1, look for a version of the mod specifically designed for Minecraft 1.20.1 and Forge.
Step 2. Download the Mod
Download the compatible version of the mod from a reputable Minecraft mod platform. Minecraft Java Edition mods are commonly provided as .jar files.
Pay attention to where your browser saves the downloaded file. Most browsers save downloads in your computer’s Downloads folder.
Step 3. Open Your Minecraft Folder
On Windows, press Windows + R on your keyboard to open the Run window. Enter %appdata%\.minecraft and press Enter.
This will open the folder where Minecraft stores many of its game files.
Step 4. Open the mods Folder
Inside the .minecraft folder, look for a folder named mods. Open it and place the downloaded mod .jar file inside.
If you don’t see a mods folder, don’t worry. You can create one inside the .minecraft folder. Right-click an empty area, select New > Folder, and name the folder mods.
Step 5. Launch Minecraft With Forge
Open the Minecraft Launcher and select the Forge installation you created earlier. Then click Play to start Minecraft.
When Minecraft starts, Forge will look in the mods folder and load compatible mods.
Step 6. Check That Your Mod Loaded
Once Minecraft has started, open the Mods menu to check that your mod is listed.
If the mod doesn’t appear or Minecraft crashes when you launch the game, check that the mod matches your Minecraft version and Forge installation. Some mods may also require additional dependencies to work correctly.
Where Is the Minecraft Mods Folder?
If you’re installing Minecraft mods for the first time, finding the correct folder can be confusing. Minecraft Forge looks for compatible mods in a folder called mods inside your Minecraft directory.
How to Find the Minecraft Mods Folder on Windows
Follow these steps to find your Minecraft mods folder:
Press Windows + R on your keyboard to open the Run window.
Type
%appdata%\.minecraftinto the text box.Press Enter.
Your Minecraft folder will open. Look for a folder named
mods.Open the
modsfolder and place your downloaded Minecraft mod.jarfiles inside it.
If you’ve installed Minecraft somewhere other than the default location, your Minecraft files may be stored in a different folder.
What If I Don’t Have a mods Folder?
Don’t worry if you can’t find a mods folder. If you’re using Minecraft Forge and the folder hasn’t been created yet, you can create one yourself.
Open your .minecraft folder, right-click an empty area, and select New > Folder. Name the new folder mods.
Make sure the folder is named exactly mods. Then place your compatible Minecraft Forge mod .jar files inside it.
Where Should Minecraft Mods Go?
Your Minecraft folder should look something like this:
.minecraft → mods → your-mod.jar
The .jar file for your mod should be inside the mods folder, not simply inside the main .minecraft folder.
Once your mod is in the correct location, launch Minecraft using your Forge installation. Forge will check the mods folder when Minecraft starts and load compatible mods.
How to Check if a Minecraft Mod Is Compatible
Before downloading a Minecraft mod, it’s important to make sure it’s compatible with your Minecraft version and Forge installation. A mod made for a different Minecraft version or modloader may not work correctly and could cause errors or crashes.
Before installing a mod, check the following:
Check Your Minecraft Version
First, find out which version of Minecraft you’re running. Then check the mod’s download page to make sure the mod supports that same version.
For example, if you’re playing Minecraft 1.20.1, look for a version of the mod that specifically supports Minecraft 1.20.1.
Don’t assume that a mod made for one Minecraft version will automatically work with another version.
Check the Modloader
Next, make sure the mod is compatible with Minecraft Forge.
Minecraft Java Edition mods can use different modloaders, including Forge, Fabric, and others. A mod designed for Fabric, for example, may not work with a Forge installation.
Look for information such as Forge, Minecraft Forge, or Forge Mod Loader on the mod’s download or project page before downloading it.
Check for Required Dependencies
Some Minecraft mods require additional mods or libraries to work correctly. These are called dependencies.
Check the mod’s installation instructions for any required dependencies and make sure you download versions that are compatible with your Minecraft version and Forge installation.
Check Before You Download
Before downloading a Minecraft mod, make sure:
Your Minecraft version matches the version supported by the mod.
The mod supports Forge.
Any required dependencies are installed.
You are downloading the correct version of the mod.
Taking a few seconds to check these details can save you from crashes, error messages, and mods that don’t appear in Minecraft.
Minecraft Forge Mods Not Working? Try These Fixes
Having trouble getting a Minecraft Forge mod to work? If your mod doesn’t appear in the game, Minecraft crashes when you launch it, or Forge doesn’t load the mod, there are several things you can check.
Check Your Minecraft Version
First, make sure the mod supports the version of Minecraft you’re playing. A mod created for one Minecraft version may not work with another version.
Check the mod’s download or project page and compare its supported Minecraft version with the version you’re using.
Make Sure You’re Launching Minecraft With Forge
Installing Forge does not automatically mean you’re running Minecraft with Forge.
Open the Minecraft Launcher and make sure you’ve selected your Forge installation before clicking Play. If you launch a regular Minecraft installation instead, your Forge mods won’t load.
Check the Modloader
Make sure the mod is designed for Forge. Minecraft Java Edition mods can use different modloaders, and a mod designed for another modloader may not work with Forge.
If the mod’s download page lists Fabric, NeoForge, or another modloader instead of Forge, look for a Forge-compatible version before installing it.
Check for Required Dependencies
Some mods need additional mods or libraries to work correctly. These are called dependencies.
If a mod isn’t loading, return to its download or project page and check whether the creator lists any required dependencies. Install the appropriate versions before launching Minecraft again.
Make Sure the Mod Is in the Correct Folder
Check that the mod’s .jar file is inside your Minecraft mods folder.
Your file structure should look something like this:
.minecraft → mods → your-mod.jar
The mod should not be placed directly inside the main .minecraft folder.
Remove Recently Installed Mods
If Minecraft was working correctly before you installed a new mod, that mod may be causing a compatibility problem.
Close Minecraft, temporarily remove the most recently installed mod from the mods folder, and then launch Minecraft with Forge again.
If Minecraft starts normally, check the mod’s compatibility information before trying to install it again.
Add Mods One at a Time
If you’re installing several mods, try adding them one at a time instead of installing everything at once.
This makes it easier to identify which mod is causing a crash or other problem. Once you’ve confirmed that one mod works correctly, add the next one.
Quick Troubleshooting Checklist
Before giving up on a Minecraft Forge mod, check the following:
Your Minecraft version matches the mod’s supported version.
You’re launching Minecraft with Forge.
The mod is designed for Forge.
Any required dependencies are installed.
The mod
.jarfile is inside themodsfolder.You’ve removed any recently installed mod that may be causing a problem.
If the problem continues, check the mod creator’s installation instructions for additional requirements or known compatibility issues.
Conclusion
To recap, here is what we covered in our guide to installing Minecraft Forge:
Table of Contents:
- What is Minecraft Forge?
- What are Minecraft Mods?
- Preparing for Installation
- Installing Minecraft Forge
Now that you know how to install Minecraft Forge, you’re ready to start exploring mods! Consider trying a Minecraft mod maker online or enrolling in one of CodaKid’s Minecraft Coding Courses online!
The initial process may seem intimidatingly complex, but don’t worry; it’s actually pretty straightforward. Don’t let all the numbers and versions and minute details throw you off-guard. Again, the whole point of the Forge is to simplify mod compatibility, making it easy to install them, run them, and enjoy them. Tools like these, coupled with community support, make it so that even Minecraft modding for kids is 100% possible.
For a limited time, your child can try CodaKid for Free!